
- Home
- BMW 3 Series
- E46
- General information
- Maintenance
- Wheel rotation and replacement
Wheel rotation and replacement (BMW 3 Series E46)
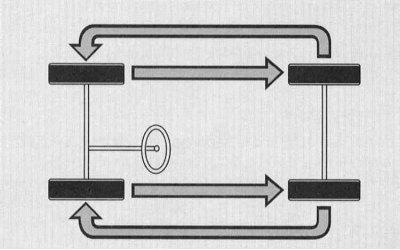
1. Rotation can be done when signs of uneven tread wear appear. However, remember that if you successfully rotate all four wheels, you will eventually have to replace all tires at the same time.
Since this procedure requires raising the vehicle off the ground and removing the wheels, check the brakes at the same time (refer to Section Brake system checks).
2. If the front tires wear out faster, it is recommended to swap the front and rear tires. This will equalize the service life of all four tires.
3. Refer to the information in Section Jacking and towing to properly lift the car when changing a wheel.
4. The car should be raised on a lift or supported on jack stands so that all four wheels are off the ground. Make sure the car is securely supported!
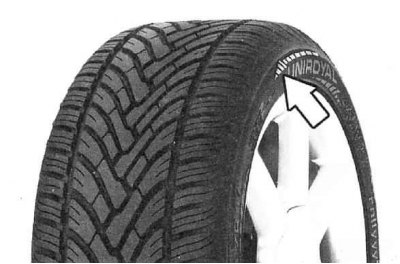
5. When using tyres with a tread pattern that only allows movement in a certain direction, which is indicated by an arrow on the side of the tyre, the specified direction must be observed. This is the only way to ensure the necessary driving properties of the vehicle, namely the absence of aquaplaning, road stability, low noise levels and low wear. If the spare wheel has to be installed with the opposite direction of rotation due to an accident, such use should only be temporary, since achieving the above-mentioned driving properties of the vehicle is then impossible. This applies especially to driving on wet roads. Therefore, it is recommended to match the driving speed to the road conditions and reinstall the tyre in accordance with the specified direction of rotation.
6. The spare wheel can be installed on either the front or rear axle.
7. The spare tire is intended for short-term use only and should be replaced with a regular tire as soon as possible.
8. After installing the spare wheel, the pressure in its tire should be 4.2 bar.
9. With the spare wheel installed, the speed must not exceed 80 km/h. Maximum acceleration of the vehicle, intensive braking and sharp turns must be avoided.
10. When installing a spare wheel, the ground clearance under the corresponding axle is reduced by approximately 30 mm.
Spare wheels from other types of vehicles should not be used.
It is not permitted to install two or more spare wheels.
11. Remove the decorative wheel cover.
12. With the vehicle on the ground, apply the handbrake and loosen the wheel mounting bolts.
13. Raise the appropriate side of the vehicle and secure it on stands.
14. Remove the upper wheel mounting bolt and screw in the dowel pin in its place. Using the dowel pin makes it easier to install the spare wheel.
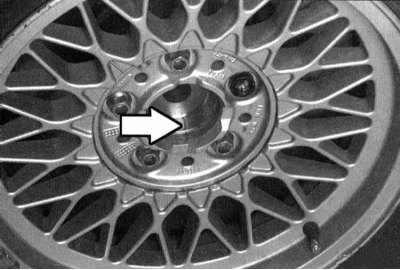
15. To prevent the wheel disks from "sticking" to the hub, before installing the wheel, apply a thin layer of grease to the hub flange that centers the wheel disk.
16. Galvanized wheel bolts can only be used on stamped steel wheels.
17. Light alloy wheels are secured only with chromed wheel bolts, which have a conical rotating washer. This washer, installed under the bolt head, protects the surface of the wheel when tightening the bolts.
18. Do not lubricate the threads of the wheel mounting bolts before screwing them in.
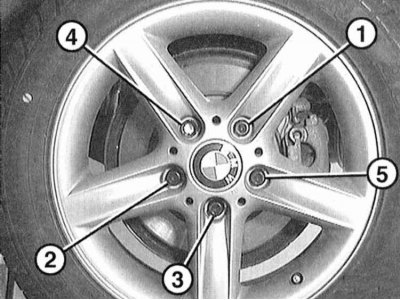
19. Tighten the wheel mounting bolts evenly in several stages in a diagonal sequence.
The tightening torque of the wheel mounting bolts is given in Specifications.
20. Chains must be installed only on the front wheels, including all-wheel drive vehicles.
21. Anti-skid chains may only be installed on tyres of size 195/65 R 15. For technical reasons, the installation of anti-skid chains on the emergency wheel is not permitted.
22. Only fine mesh chains with a protrusion of no more than 15 mm should be used (including locking links).
23. When installing anti-skid chains, remove full-size wheel caps and decorative rim rings. For safety reasons, wheel bolts must be protected with special caps.
24. Before driving on a snow-free section of the road, you must remove anti-skid chains. They impair the vehicle's performance, increase tire wear, and quickly deteriorate themselves.
(Examine the original source using the link on the website www.bmwman.ru)
Since this procedure requires raising the vehicle off the ground and removing the wheels, check the brakes at the same time (refer to Section Brake system checks).
Even if you are not going to rotate the wheels, at least check the tightness of the wheel mounting bolts.
2. If the front tires wear out faster, it is recommended to swap the front and rear tires. This will equalize the service life of all four tires.
3. Refer to the information in Section Jacking and towing to properly lift the car when changing a wheel.
4. The car should be raised on a lift or supported on jack stands so that all four wheels are off the ground. Make sure the car is securely supported!
Do not replace any tire separately. Both tires on the same axle must be replaced. Tires with greater tread depth are installed on the rear wheels. The front and rear wheels must have tires of the same size and type, and for all-wheel drive vehicles, also of the same manufacturer and tread pattern. Tires that have been in use for more than 6 years should only be used in the event of an accident, and care must be taken when driving. When replacing and removing tubeless tires, be sure to change the valve.
5. When using tyres with a tread pattern that only allows movement in a certain direction, which is indicated by an arrow on the side of the tyre, the specified direction must be observed. This is the only way to ensure the necessary driving properties of the vehicle, namely the absence of aquaplaning, road stability, low noise levels and low wear. If the spare wheel has to be installed with the opposite direction of rotation due to an accident, such use should only be temporary, since achieving the above-mentioned driving properties of the vehicle is then impossible. This applies especially to driving on wet roads. Therefore, it is recommended to match the driving speed to the road conditions and reinstall the tyre in accordance with the specified direction of rotation.
Spare wheel
6. The spare wheel can be installed on either the front or rear axle.
7. The spare tire is intended for short-term use only and should be replaced with a regular tire as soon as possible.
8. After installing the spare wheel, the pressure in its tire should be 4.2 bar.
9. With the spare wheel installed, the speed must not exceed 80 km/h. Maximum acceleration of the vehicle, intensive braking and sharp turns must be avoided.
10. When installing a spare wheel, the ground clearance under the corresponding axle is reduced by approximately 30 mm.
Spare wheels from other types of vehicles should not be used.
It is not permitted to install two or more spare wheels.
Wheel replacement
11. Remove the decorative wheel cover.
12. With the vehicle on the ground, apply the handbrake and loosen the wheel mounting bolts.
13. Raise the appropriate side of the vehicle and secure it on stands.
14. Remove the upper wheel mounting bolt and screw in the dowel pin in its place. Using the dowel pin makes it easier to install the spare wheel.
Light alloy wheels are protected from corrosion by a clear varnish. Be careful not to damage the varnish coating. If the coating is damaged, cover the wheel with a layer of varnish.
15. To prevent the wheel disks from "sticking" to the hub, before installing the wheel, apply a thin layer of grease to the hub flange that centers the wheel disk.
16. Galvanized wheel bolts can only be used on stamped steel wheels.
17. Light alloy wheels are secured only with chromed wheel bolts, which have a conical rotating washer. This washer, installed under the bolt head, protects the surface of the wheel when tightening the bolts.
18. Do not lubricate the threads of the wheel mounting bolts before screwing them in.
19. Tighten the wheel mounting bolts evenly in several stages in a diagonal sequence.
The tightening torque of the wheel mounting bolts is given in Specifications.
Anti-skid chains
20. Chains must be installed only on the front wheels, including all-wheel drive vehicles.
21. Anti-skid chains may only be installed on tyres of size 195/65 R 15. For technical reasons, the installation of anti-skid chains on the emergency wheel is not permitted.
22. Only fine mesh chains with a protrusion of no more than 15 mm should be used (including locking links).
23. When installing anti-skid chains, remove full-size wheel caps and decorative rim rings. For safety reasons, wheel bolts must be protected with special caps.
24. Before driving on a snow-free section of the road, you must remove anti-skid chains. They impair the vehicle's performance, increase tire wear, and quickly deteriorate themselves.
(Examine the original source using the link on the website www.bmwman.ru)
This article is available at russian, bulgarian, belarusian, ukrainian, serbian, croatian, romanian, polish, slovak, hungarian
Article verified: Sevastyanov Nikolay
Share information:
Previous articles
БМВ E46: Maintenance
Next articles
Similar articles on other types of BMW cars:
Wheel replacement BMW 5 Series E34 (1988-1996)
Wheel replacement and balancing BMW 5 Series E39 (1995-2003)
Rear Wheel Bearings — Replacement BMW 7 Series E32 (1986-1994)
Changing a wheel BMW X3 E83 (2003-2010)
Wheel replacement BMW X5 E53 (1999-2006)
Wheel replacement BMW 5 Series E34 (1988-1996)
Wheel replacement and balancing BMW 5 Series E39 (1995-2003)
Rear Wheel Bearings — Replacement BMW 7 Series E32 (1986-1994)
Changing a wheel BMW X3 E83 (2003-2010)
Wheel replacement BMW X5 E53 (1999-2006)
Link in different formats to this page
Visitor comments
No comments yet
- General information
- Manual
- Maintenance
- Power unit
- Engine repair
- Cooling system
- Power system (gasoline)
- Injection system (gasoline)
- Fuel system (diesel)
- Exhaust system
- Ignition system
- Charge and launch systems
- Transmission
- Car gearbox
- Clutch and drive shafts
- Chassis
- Brake system
- Suspension front and rear
- Steering
- Body
- Body care and repair
- Exterior
- Interior
- Electrical equipment
- Troubleshooting
- Lighting and signaling
- Equipment and devices
- Heater and air conditioner
- Electrical circuits
- General information
- Manual
- Repair on the road
- Weekly checks
- Maintenance
- Troubleshooting
- Power unit
- 4 cylinder engines
- 6 cylinder engines
- Engine overhaul
- Cooling and heating
- Fuel and exhaust system
- Starting and charging system
- Ignition system
- Transmission
- Clutch
- Mechanical gearbox
- Automatic gearbox
- Cardan and drive shafts
- Chassis
- Brake system
- Wheel suspension
- Steering
- Body
- Exterior
- Interior
- Electrical equipment
- Equipment and devices
- Electrical circuits
- General information
- Maintenance
- Power unit
- Engine repair
- Cooling system
- Ignition system
- Supply system
- Fuel injection system
- Exhaust system
- Transmission
- Clutch
- Car gearbox
- Front and rear axle
- Chassis
- Steering
- Brake system
- Body
- Exterior
- Interior
- Electrical equipment
- Heating system
- Equipment and devices
- Power devices
- Electrical circuits
- Power unit
- M10/M20 engine
- M40 engine
- Ignition system
- Lubrication system
- Cooling system
- Supply system
- Fuel injection
- Exhaust system
- Transmission
- Clutch
- Manual gearbox
- Front axle
- Rear axle
- Chassis
- Steering
- Brake system
- Body
- Exterior
- Interior
- Electrical equipment
- Heating system
- Equipment and devices
- Electrical circuits
- General information
- Specifications
- Operation and maintenance
- 4-cylinder engine
- Engine repair
- Cooling and lubrication system
- Supply system
- Ignition system
- 6-cylinder engine
- Engine repair
- Cooling and lubrication system
- Supply system
- Fuel injection system
- Ignition system
- Transmission
- Clutch
- 4-speed manual gearbox
- 5-speed manual gearbox
- Automatic gearbox
- Cardan and rear axle
- Chassis
- Steering
- Front suspension
- Rear suspension
- Brake system
- Electrical equipment
- Equipment and devices
- Electrical circuits