
- Home
- BMW 3 Series
- E46
- General information
- Maintenance
- Checking and replacing spark plugs
Checking and replacing spark plugs (BMW 3 Series E46)
Tools needed when replacing spark plugs
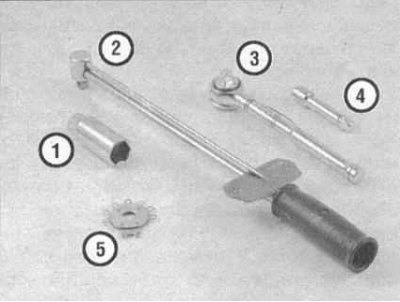
1 — Spark plug head - Equipped with a special elastic insert, eliminating the possibility of accidental damage to the porcelain insulator when unscrewing the spark plug.
2 - Torque wrench - Although not a required tool, it provides a reliable guarantee of the correct tightening force of the spark plugs.
3 - Ratchet drive - Used in combination with a spark plug head and torque wrench.
4 — Extension - Depending on the model and its auxiliary units, access to the spark plugs may be limited to varying degrees, so using extensions of the appropriate shape and design will make the procedure much easier.
5 - Device for measuring and adjusting spark plug gaps - Several types of this type of tool are available - make sure that the tool is equipped with a feeler gauge that matches the size of the spark plug gaps on your vehicle.
1. Before you begin, gather all the necessary tools, which include a spark plug wrench head and a set of feeler gauge blades. Some spark plug manufacturers supply special tools for measuring spark plug gaps.
2. The best way to replace spark plugs is to buy new ones in advance, adjust their gap, and replace each spark plug one by one. When buying spark plugs, it is very important to choose the ones that are designed for your car's engine. Information about them can be found in the Specifications.
3. With new spark plugs on hand, allow the engine to cool completely before removing the old ones. During this time, you can inspect the new spark plugs for defects and check the spark plug gaps.
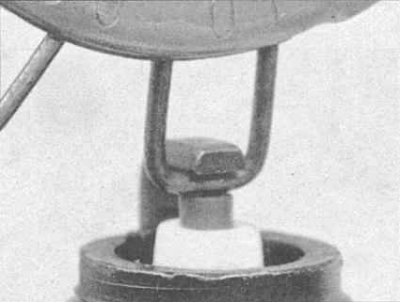
4. The spark plug gap is checked by inserting a gauge of the correct thickness between the electrodes at the end of the spark plug. The gap should be as specified in the Specifications. The wire should just touch each of the electrodes. If the gap is not correct, slightly bend the curved part of the electrode with a knurled adjuster until the correct gap is achieved.
When adjusting the gap of a new spark plug, bend only the base of the ground electrode, without touching its end. If the ground electrode is offset from the center electrode, use a notched adjuster to align them. Check the porcelain insulator for cracks, indicating that the spark plug should be replaced.
Replacement of spark plugs should be done only on a cold or slightly warm engine. If spark plugs are unscrewed on a hot engine, the threads in the cylinder head holes made of light metal may be damaged.
5. Turn off the ignition.
6. Engines 316i, 318i: Disconnect the spark plug connector vertically. When doing this, pull upwards by the cable, not by the plug.
Engines 320i, 323i, 328i
7. Remove the heating and air conditioning system cabin ventilation air filter element, refer to Section Replacing the cabin air filter element.
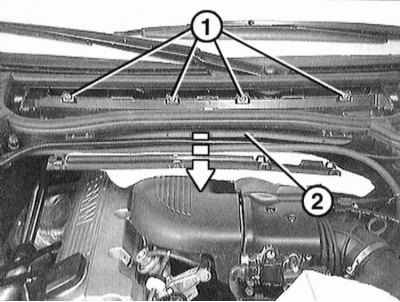
8. Disconnect the cable channel at the bottom of the filter housing "2" by opening the clamps and remove the cable.
9. Remove screws "1" with a Torx T30 screwdriver and remove the lower part of the air collection box "2".
10. Remove the oil filler plug.
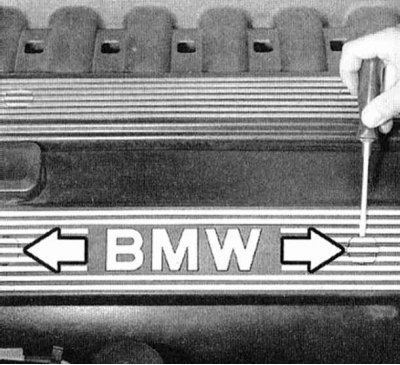
11. Use a screwdriver to pry off the mounting bolt covers (arrows in the accompanying illustration), unscrew the two bolts located underneath them.
12. Disconnect the connector of each ignition coil by pulling up on the plugs.
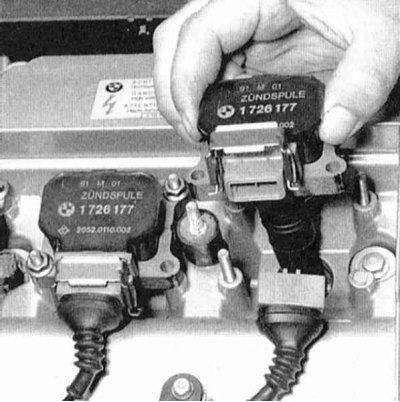
13. Loosen the mounting bolts of each ignition coil and carefully remove the coils.
Note the cylinder head cover grounding straps at cylinder coils 1 and 6. They must be reattached to their original locations when installed.
14. If possible, blow out the spark plug recesses with compressed air to prevent dirt from getting into the cylinder bores.
15. Remove the spark plugs using the appropriate spark plug wrench. Make sure that the wrench is not tilted, as this may damage the ceramic insulator.
Examination
16. Check the condition of the spark plugs. Compare the removed spark plug with those shown in the pictures in Section Charging and starting systems, this will give you useful information about the general condition of the engine. An oily spark plug indicates interruptions in its operation or poor sealing of the piston rings. You can check for a mechanical defect in the spark plug using a compression tester, refer to the corresponding section.
Installation
17. Screw in the spark plugs by hand using a spark plug wrench until they touch the cylinder head. Caution: Be careful not to tilt the spark plugs.
18. Tighten the spark plugs to 25 Nm.
If you do not have a torque wrench, tighten the new spark plugs by 90° (1/4 turn). Used spark plugs should only be tightened by an additional 15°.
19. Engines 316i, 318i: Place the plug on each spark plug. The plug should be clearly fixed. Do not mix up the plugs, they are numbered, with the first cylinder located at the front in the direction of travel.
Engines 320i, 323i, 328i
20. Place the ignition coils on the spark plugs and secure them. Secure the plugs to the coils with clamps. Secure the grounding straps to the ignition coils of cylinders 1 and 6.
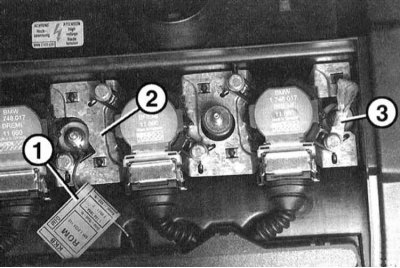
21. Fasten the ground busbar "3" of the coil connecting plate to the front bolt of the ignition coil. The ground busbar "1" of the cable shaft must be connected with bolts to the connecting plate "2" of the spark plugs.
22. Secure the engine cover with bolts.
23. Screw on the oil filler cap.
24. Secure the lower part of the air collection box.
25. Place the cable in the cable channel at the bottom of the air collection box. Close the cable channel.
26. Reinstall the HVAC air filter element, refer to Section Replacing the cabin air filter element.
Spark plug thread restoration
If the spark plug thread is damaged, it must be repaired. For this, there is a suitable tool and repair kit, for example, from BERU. The old thread is drilled out with a special drill, for which there is no need to remove the cylinder head. Then a new thread is cut in the head and a spark plug with a special threaded insert is screwed in. The insert sits securely and hermetically.
[The original article is available on the website «BMWMan»]
This article is available at russian, bulgarian, belarusian, ukrainian, serbian, croatian, romanian, polish, slovak, hungarian
Article verified: Sevastyanov Nikolay
Share information:
Previous articles
БМВ E46: Maintenance
Next articles
Similar articles on other types of BMW cars:
Checking and replacing spark plugs BMW 5 Series E34 (1988-1996)
Checking and replacing spark plugs BMW 5 Series E28 (1981-1988)
Replacing spark plugs BMW 7 Series E38 (1994-2001)
Valve guides — checking and replacing BMW 7 Series E32 (1986-1994)
Identifying engine faults by the condition of spark plugs BMW X3 E83 (2003-2010)
Checking and replacing spark plugs BMW X5 E53 (1999-2006)
Link in different formats to this page
Visitor comments
No comments yet
- General information
- Manual
- Maintenance
- Power unit
- Engine repair
- Cooling system
- Power system (gasoline)
- Injection system (gasoline)
- Fuel system (diesel)
- Exhaust system
- Ignition system
- Charge and launch systems
- Transmission
- Car gearbox
- Clutch and drive shafts
- Chassis
- Brake system
- Suspension front and rear
- Steering
- Body
- Body care and repair
- Exterior
- Interior
- Electrical equipment
- Troubleshooting
- Lighting and signaling
- Equipment and devices
- Heater and air conditioner
- Electrical circuits
- General information
- Manual
- Repair on the road
- Weekly checks
- Maintenance
- Troubleshooting
- Power unit
- 4 cylinder engines
- 6 cylinder engines
- Engine overhaul
- Cooling and heating
- Fuel and exhaust system
- Starting and charging system
- Ignition system
- Transmission
- Clutch
- Mechanical gearbox
- Automatic gearbox
- Cardan and drive shafts
- Chassis
- Brake system
- Wheel suspension
- Steering
- Body
- Exterior
- Interior
- Electrical equipment
- Equipment and devices
- Electrical circuits
- General information
- Maintenance
- Power unit
- Engine repair
- Cooling system
- Ignition system
- Supply system
- Fuel injection system
- Exhaust system
- Transmission
- Clutch
- Car gearbox
- Front and rear axle
- Chassis
- Steering
- Brake system
- Body
- Exterior
- Interior
- Electrical equipment
- Heating system
- Equipment and devices
- Power devices
- Electrical circuits
- Power unit
- M10/M20 engine
- M40 engine
- Ignition system
- Lubrication system
- Cooling system
- Supply system
- Fuel injection
- Exhaust system
- Transmission
- Clutch
- Manual gearbox
- Front axle
- Rear axle
- Chassis
- Steering
- Brake system
- Body
- Exterior
- Interior
- Electrical equipment
- Heating system
- Equipment and devices
- Electrical circuits
- General information
- Specifications
- Operation and maintenance
- 4-cylinder engine
- Engine repair
- Cooling and lubrication system
- Supply system
- Ignition system
- 6-cylinder engine
- Engine repair
- Cooling and lubrication system
- Supply system
- Fuel injection system
- Ignition system
- Transmission
- Clutch
- 4-speed manual gearbox
- 5-speed manual gearbox
- Automatic gearbox
- Cardan and rear axle
- Chassis
- Steering
- Front suspension
- Rear suspension
- Brake system
- Electrical equipment
- Equipment and devices
- Electrical circuits