
Table of contents: Removal ↓ Installation ↓
- Home
- BMW 3 Series
- E46
- Power unit
- Cooling system
- Removal and installation of the radiator — removal and installation
Removal and installation of the radiator — removal and installation (BMW 3 Series E46)
As a result of long-term operation of the car, the thin channels in the radiator can become clogged with sediments contained in the coolant and lime deposits. As a result, the cooling efficiency is significantly reduced and the engine overheats. The only way to correct the situation is to replace the radiator.
If oil gets into the cooling circuit, for example due to a defective cylinder head gasket, after the repair, the radiator and expansion tank must be removed and cleaned with conventional cleaning agents. Follow the cleaning agent manufacturer's instructions. After reinstalling the radiator, the entire cooling system must be filled with hot water several times and drained.
1. Remove the fan shroud, refer to Section Removal and installation the fan/fan shroud.
2. Drain and dispose of the coolant, refer to Section Replacing the coolant.
3. Gasoline engine: Remove the air filter box on the intake, refer to Section Removal and installation the engine air filter.
4. Disconnect the coolant hoses at the top and bottom of the radiator. To do this, use a small screwdriver to pry the quick release coupling clips upwards, refer to Section Connecting and disconnecting the quick release coupling.
5. Disconnect the level sensor cable at the bottom left of the radiator.
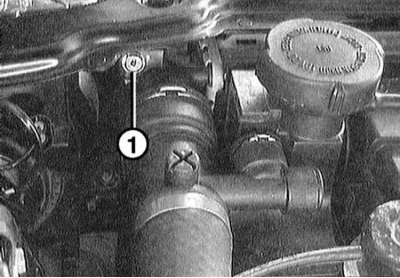
6. Unscrew screw "1" on the top left of the radiator.
7. Tilt the radiator back at the top, then lift it up out of the lower holders.
The radiator fins have sharp edges, so it is recommended to use gloves to remove the radiator.
8. Check all cooling system hoses for cuts, cracks and other damage. Replace them if necessary. Check the condition of both lower radiator rubber mounts.
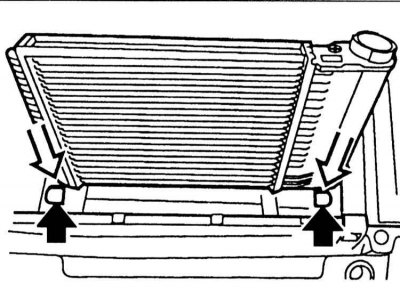
9. Insert the radiator from above so that the rubber supports fit exactly into the pads (black arrows in the illustration).
10. Tilt the radiator forward and tighten the top screw on the water filler side.
11. Install the fan shroud, refer to Section Removal and installation the fan/fan shroud.
12. Connect the cable to the level sensor on the lower left side of the radiator.
13. Visually inspect the sealing rings in the quick-release couplings. Replace if there is any deformation.
14. Press the wire retainers on the couplings. Connect the hoses to the radiator. The quick-release couplings should click into place, refer to Section Connecting and disconnecting the quick release coupling.
15. Gasoline engine: Install the air filter box for the intake air, refer to Section Removal and installation the engine air filter.
16. Fill the system with liquid and bleed air from it, refer to Section Replacing the coolant.
If oil gets into the cooling circuit, for example due to a defective cylinder head gasket, after the repair, the radiator and expansion tank must be removed and cleaned with conventional cleaning agents. Follow the cleaning agent manufacturer's instructions. After reinstalling the radiator, the entire cooling system must be filled with hot water several times and drained.
Fluid after rinsing should not be poured out. Follow the manufacturer's instructions. Local authorities should provide information on where such fluids can be disposed of.
Removal
1. Remove the fan shroud, refer to Section Removal and installation the fan/fan shroud.
2. Drain and dispose of the coolant, refer to Section Replacing the coolant.
3. Gasoline engine: Remove the air filter box on the intake, refer to Section Removal and installation the engine air filter.
4. Disconnect the coolant hoses at the top and bottom of the radiator. To do this, use a small screwdriver to pry the quick release coupling clips upwards, refer to Section Connecting and disconnecting the quick release coupling.
5. Disconnect the level sensor cable at the bottom left of the radiator.
6. Unscrew screw "1" on the top left of the radiator.
7. Tilt the radiator back at the top, then lift it up out of the lower holders.
The power steering and air conditioning radiators are located in front of the engine radiator in the module holder. To remove these radiators, you must first remove the engine radiator. The air conditioning cooling circuit may only be opened by a specialised workshop with the appropriate equipment. There is a risk of accident, refer to Section 11.
The radiator fins have sharp edges, so it is recommended to use gloves to remove the radiator.
Installation
8. Check all cooling system hoses for cuts, cracks and other damage. Replace them if necessary. Check the condition of both lower radiator rubber mounts.
9. Insert the radiator from above so that the rubber supports fit exactly into the pads (black arrows in the illustration).
10. Tilt the radiator forward and tighten the top screw on the water filler side.
11. Install the fan shroud, refer to Section Removal and installation the fan/fan shroud.
12. Connect the cable to the level sensor on the lower left side of the radiator.
13. Visually inspect the sealing rings in the quick-release couplings. Replace if there is any deformation.
14. Press the wire retainers on the couplings. Connect the hoses to the radiator. The quick-release couplings should click into place, refer to Section Connecting and disconnecting the quick release coupling.
15. Gasoline engine: Install the air filter box for the intake air, refer to Section Removal and installation the engine air filter.
16. Fill the system with liquid and bleed air from it, refer to Section Replacing the coolant.
This article is available at russian, bulgarian, belarusian, ukrainian, serbian, croatian, romanian, polish, slovak, hungarian
Article verified: Sevastyanov Nikolay
Share information:
Previous articles
БМВ E46: Cooling system
Next articles
Similar articles on other types of BMW cars:
Removal and installation the radiator BMW 5 Series E34 (1988-1996)
Removal and installation the radiator BMW 5 Series E39 (1995-2003)
Removal and installation the EGR system radiator BMW 7 Series E38 (1994-2001)
Radiator — removal and installation BMW 7 Series E32 (1986-1994)
Pistons — removal and installation BMW X3 E83 (2003-2010)
Removal and installation the radiator BMW X5 E53 (1999-2006)
Link in different formats to this page
Visitor comments
No comments yet
- General information
- Manual
- Maintenance
- Power unit
- Engine repair
- Cooling system
- Power system (gasoline)
- Injection system (gasoline)
- Fuel system (diesel)
- Exhaust system
- Ignition system
- Charge and launch systems
- Transmission
- Car gearbox
- Clutch and drive shafts
- Chassis
- Brake system
- Suspension front and rear
- Steering
- Body
- Body care and repair
- Exterior
- Interior
- Electrical equipment
- Troubleshooting
- Lighting and signaling
- Equipment and devices
- Heater and air conditioner
- Electrical circuits
- General information
- Manual
- Repair on the road
- Weekly checks
- Maintenance
- Troubleshooting
- Power unit
- 4 cylinder engines
- 6 cylinder engines
- Engine overhaul
- Cooling and heating
- Fuel and exhaust system
- Starting and charging system
- Ignition system
- Transmission
- Clutch
- Mechanical gearbox
- Automatic gearbox
- Cardan and drive shafts
- Chassis
- Brake system
- Wheel suspension
- Steering
- Body
- Exterior
- Interior
- Electrical equipment
- Equipment and devices
- Electrical circuits
- General information
- Maintenance
- Power unit
- Engine repair
- Cooling system
- Ignition system
- Supply system
- Fuel injection system
- Exhaust system
- Transmission
- Clutch
- Car gearbox
- Front and rear axle
- Chassis
- Steering
- Brake system
- Body
- Exterior
- Interior
- Electrical equipment
- Heating system
- Equipment and devices
- Power devices
- Electrical circuits
- Power unit
- M10/M20 engine
- M40 engine
- Ignition system
- Lubrication system
- Cooling system
- Supply system
- Fuel injection
- Exhaust system
- Transmission
- Clutch
- Manual gearbox
- Front axle
- Rear axle
- Chassis
- Steering
- Brake system
- Body
- Exterior
- Interior
- Electrical equipment
- Heating system
- Equipment and devices
- Electrical circuits
- General information
- Specifications
- Operation and maintenance
- 4-cylinder engine
- Engine repair
- Cooling and lubrication system
- Supply system
- Ignition system
- 6-cylinder engine
- Engine repair
- Cooling and lubrication system
- Supply system
- Fuel injection system
- Ignition system
- Transmission
- Clutch
- 4-speed manual gearbox
- 5-speed manual gearbox
- Automatic gearbox
- Cardan and rear axle
- Chassis
- Steering
- Front suspension
- Rear suspension
- Brake system
- Electrical equipment
- Equipment and devices
- Electrical circuits