
Table of contents: Removal ↓ Installation ↓
- Home
- BMW 7 Series
- E32
- Power unit
- Cooling system
- Radiator — removal and installation
Radiator — removal and installation (BMW 7 Series E32)
After a long mileage of the car, the thin channels in the radiator become clogged with coolant deposits and lime deposits. Because of this, the cooling efficiency decreases and the engine overheats. In this case, only replacing the radiator will help.
If engine oil gets into the coolant circulation circuit, for example, if the cylinder head gasket is damaged, then after repairs you need to remove the radiator and expansion tank and wash them with a special cleaning agent. You will need about 2 liters of cleaning agent and you should follow the instructions for its use. After installing the radiator, you need to fill the cooling system with hot water several times and then drain it.
Remove the fan.
Drain the coolant from the engine.
Loosen the clamps and slide them off to remove the thick coolant hoses at the top and bottom of the radiator.
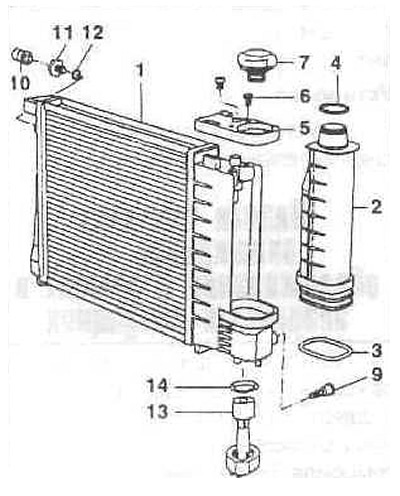
Late model car radiator
1 - radiator;
2 - expansion tank;
3 - sealing ring;
4 - sealing ring;
5 — lid;
6 — bolt;
7 — radiator cap;
8 — plug bolt;
10 - temperature switch (only models with air conditioning);
11 — plug bolt;
12 — sealing ring;
13 — level sensor;
14 — sealing ring.
Disconnect the wire from the level sensor (13) on the lower left of the radiator. For models with air conditioning, remove the plug from the temperature switch (10) on the right of the radiator.
If present, remove the automatic transmission oil cooler lines from the radiator, collect the leaking fluid, and plug any open line connections to prevent dirt from getting inside.
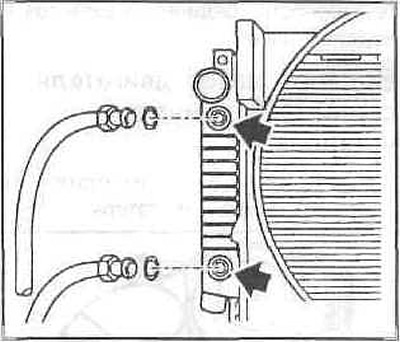
Pull the seal upwards. Unscrew the bolts on the left and right and remove both radiator mounts. Remove the radiator upwards.
Check and replace coolant hoses if necessary. You should also check the condition of both lower radiator rubber mounts.
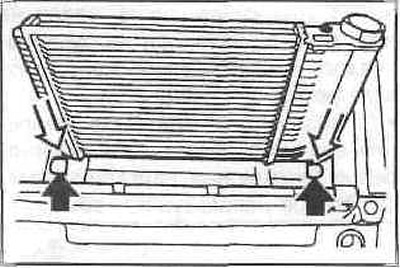
Insert the radiator from above so that the rubber supports fit onto the support surfaces.
Press the top of the radiator down and install its fasteners.
Put on the seal.
Tighten the nuts of the pipes from the automatic transmission to its oil cooler with a torque of 20 Nm.
Then check the fluid level.
Place the coolant hoses onto the radiator and secure them with clamps.
If removed, put the plugs on the temperature switch and on the level sensor. Install the fan. Fill the coolant and bleed the air from the cooling system.
Check the coolant level and top up if necessary.
The original article is located on BMWMAN
If engine oil gets into the coolant circulation circuit, for example, if the cylinder head gasket is damaged, then after repairs you need to remove the radiator and expansion tank and wash them with a special cleaning agent. You will need about 2 liters of cleaning agent and you should follow the instructions for its use. After installing the radiator, you need to fill the cooling system with hot water several times and then drain it.
Removal
Remove the fan.
Drain the coolant from the engine.
Loosen the clamps and slide them off to remove the thick coolant hoses at the top and bottom of the radiator.
Late model car radiator
1 - radiator;
2 - expansion tank;
3 - sealing ring;
4 - sealing ring;
5 — lid;
6 — bolt;
7 — radiator cap;
8 — plug bolt;
10 - temperature switch (only models with air conditioning);
11 — plug bolt;
12 — sealing ring;
13 — level sensor;
14 — sealing ring.
Disconnect the wire from the level sensor (13) on the lower left of the radiator. For models with air conditioning, remove the plug from the temperature switch (10) on the right of the radiator.
If present, remove the automatic transmission oil cooler lines from the radiator, collect the leaking fluid, and plug any open line connections to prevent dirt from getting inside.
Caution: The radiators for the power steering, air conditioning system and automatic transmission are located in front of the engine cooling system radiator in a mount (cassette). When removing the main radiator, these radiators must be removed first. The air conditioning system refrigerant line must only be disconnected in a workshop with special equipment.
Pull the seal upwards. Unscrew the bolts on the left and right and remove both radiator mounts. Remove the radiator upwards.
Caution: The radiator fins are thin and sharp, so wear protective gloves when removing them.
Installation
Check and replace coolant hoses if necessary. You should also check the condition of both lower radiator rubber mounts.
Insert the radiator from above so that the rubber supports fit onto the support surfaces.
Press the top of the radiator down and install its fasteners.
Put on the seal.
Tighten the nuts of the pipes from the automatic transmission to its oil cooler with a torque of 20 Nm.
Then check the fluid level.
Place the coolant hoses onto the radiator and secure them with clamps.
If removed, put the plugs on the temperature switch and on the level sensor. Install the fan. Fill the coolant and bleed the air from the cooling system.
Check the coolant level and top up if necessary.
The original article is located on BMWMAN
This article is available at russian, bulgarian, belarusian, ukrainian, serbian, croatian, romanian, polish, slovak, hungarian
Article verified: Sevastyanov Nikolay
Share information:
Previous articles
БМВ E32: Cooling system
Next articles
Similar articles on other types of BMW cars:
Removal and installation the radiator BMW 3 Series E30 (1982-1994)
Removal and installation the radiator BMW 3 Series E36 (1990-2000)
Removal and installation the radiator BMW 5 Series E34 (1988-1996)
Removal and installation the radiator BMW 5 Series E39 (1995-2003)
Pistons — removal and installation BMW X3 E83 (2003-2010)
Removal and installation the radiator BMW X5 E53 (1999-2006)
Removal and installation the radiator BMW 3 Series E30 (1982-1994)
Removal and installation the radiator BMW 3 Series E36 (1990-2000)
Removal and installation the radiator BMW 5 Series E34 (1988-1996)
Removal and installation the radiator BMW 5 Series E39 (1995-2003)
Pistons — removal and installation BMW X3 E83 (2003-2010)
Removal and installation the radiator BMW X5 E53 (1999-2006)
Link in different formats to this page
Visitor comments
No comments yet
- General information
- Introduction to guide
- Manual
- Maintenance
- Power unit
- Engine M60/1, M60/2 (petrol)
- M62 engine (petrol)
- M57 engine (diesel)
- M67 engine (diesel)
- Cooling system
- Fuel system (petrol)
- Fuel system (diesel)
- Exhaust system
- Ignition and control systems
- Charge and launch systems
- Transmission
- Clutch
- Mechanical gearbox
- Automatic gearbox
- Cardan and drive shafts
- Chassis
- Brake system
- Front suspension
- Rear suspension
- Steering
- Body
- Exterior
- Interior
- Electrical equipment
- Equipment and devices
- Lighting
- Heating and air conditioning
- Electrical circuits
- General information
- Care and maintenance
- Power unit
- Minor engine repair
- Engine overhaul
- Lubrication system
- Cooling system
- Ignition system
- Supply system
- Injection system (petrol)
- Injection system (diesel)
- Exhaust system
- Transmission
- Clutch
- Manual gearbox
- Automatic gearbox
- Cardan gear
- Rear axle and shafts
- Chassis
- Front suspension
- Rear suspension
- Steering
- Wheels and tires
- Brake system
- Body
- Body elements
- Electrical equipment
- Equipment and devices
- Electrical circuits