
Table of contents: Release bearing ↓ Release bearing fork ↓
- Home
- BMW 3 Series
- E46
- Transmission
- Clutch
- Release bearing and clutch fork — removal, inspection and installation
Release bearing and clutch fork — removal, inspection and installation (BMW 3 Series E46)
Warning! Dust generated by wear of clutch friction linings may contain asbestos, which is hazardous to health. Do not blow compressed air into clutch components or inhale this air. Do not use gasoline (or mineral based solvents) to clean the clutch from dust. To clean the clutch components, use only brake system cleaners or methyl alcohol. After cleaning the clutch components with a rag, throw this rag into a special container with a sealed lid.
Release bearing
Removal
1. Remove the gearbox (see chapter 7A).
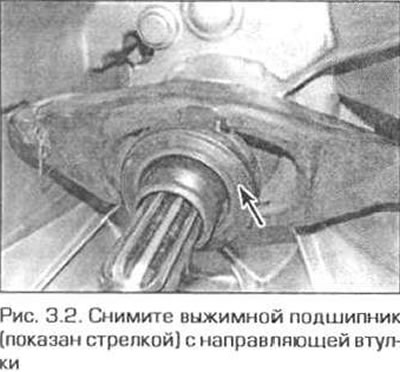
2. Slide the bearing forward and remove it from the guide sleeve (Fig. 3.2).
Examination
3. Rotate the bearing and make sure it rotates without noise or binding. Grasp the outer ring and rock the inner ring of the bearing. If the bearing has excessive play or rotates stiffly, replace it. If you are installing a new clutch, replace the bearing regardless of its condition.
Installation
4. Lubricate the bearing surfaces that contact the release fork and guide sleeve.
5. Place the bearing on the guide sleeve. Engage the bearing with the fork.
6. Install the gearbox (see chapter 7A).
Release bearing fork
Removal
7. Remove the release bearing (see above).
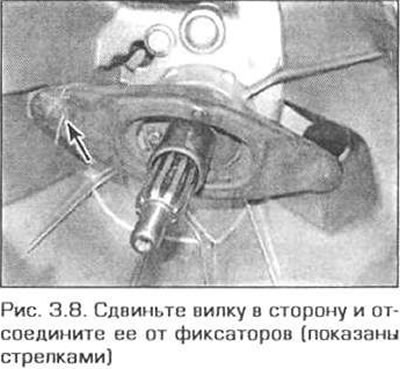
8. Rotate the fork, disengaging it from the spring clips and the hinge, then remove the fork from the guide sleeve (Fig. 3.8).
Examination
9. Inspect the surfaces of the fork that contact the release bearing, axle and slave cylinder push rod for signs of wear. If excessive wear is present, replace the fork.
10. Inspect the fork spring retainer and replace it if necessary. It is recommended to replace the retainer regardless of its condition.
Installation
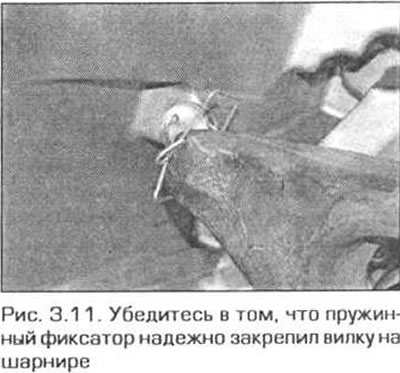
11. Place the fork on the guide bushing and place its end on the hinge. Make sure that the spring clip securely fastens the fork on the hinge (Fig. 3.11).
12. Install the release bearing (see above).
The original article is located on bmwman.ru
This article is available at russian, bulgarian, belarusian, ukrainian, serbian, croatian, romanian, polish, slovak, hungarian
Article verified: Ilyinsky Matvey
Share information:
Previous articles
БМВ E46: Clutch
Next articles
Similar articles on other types of BMW cars:
Removal and installation the clutch release bearing from the 1977… BMW 5 Series E12 (1972-1981)
Removal and installation the clutch release bearing BMW 5 Series E39 (1995-2003)
Replacing the release bearing and clutch release fork BMW 7 Series E38 (1994-2001)
Drive chain and sprockets — removal, inspection and installation BMW 7 Series E32 (1986-1994)
Removal and installation the clutch master cylinder BMW X3 E83 (2003-2010)
Replacing the release bearing and clutch release fork BMW X5 E53 (1999-2006)
Link in different formats to this page
Visitor comments
No comments yet
- General information
- Manual
- Maintenance
- Power unit
- Engine repair
- Cooling system
- Power system (gasoline)
- Injection system (gasoline)
- Fuel system (diesel)
- Exhaust system
- Ignition system
- Charge and launch systems
- Transmission
- Car gearbox
- Clutch and drive shafts
- Chassis
- Brake system
- Suspension front and rear
- Steering
- Body
- Body care and repair
- Exterior
- Interior
- Electrical equipment
- Troubleshooting
- Lighting and signaling
- Equipment and devices
- Heater and air conditioner
- Electrical circuits
- General information
- Manual
- Repair on the road
- Weekly checks
- Maintenance
- Troubleshooting
- Power unit
- 4 cylinder engines
- 6 cylinder engines
- Engine overhaul
- Cooling and heating
- Fuel and exhaust system
- Starting and charging system
- Ignition system
- Transmission
- Clutch
- Mechanical gearbox
- Automatic gearbox
- Cardan and drive shafts
- Chassis
- Brake system
- Wheel suspension
- Steering
- Body
- Exterior
- Interior
- Electrical equipment
- Equipment and devices
- Electrical circuits
- General information
- Maintenance
- Power unit
- Engine repair
- Cooling system
- Ignition system
- Supply system
- Fuel injection system
- Exhaust system
- Transmission
- Clutch
- Car gearbox
- Front and rear axle
- Chassis
- Steering
- Brake system
- Body
- Exterior
- Interior
- Electrical equipment
- Heating system
- Equipment and devices
- Power devices
- Electrical circuits
- Power unit
- M10/M20 engine
- M40 engine
- Ignition system
- Lubrication system
- Cooling system
- Supply system
- Fuel injection
- Exhaust system
- Transmission
- Clutch
- Manual gearbox
- Front axle
- Rear axle
- Chassis
- Steering
- Brake system
- Body
- Exterior
- Interior
- Electrical equipment
- Heating system
- Equipment and devices
- Electrical circuits
- General information
- Specifications
- Operation and maintenance
- 4-cylinder engine
- Engine repair
- Cooling and lubrication system
- Supply system
- Ignition system
- 6-cylinder engine
- Engine repair
- Cooling and lubrication system
- Supply system
- Fuel injection system
- Ignition system
- Transmission
- Clutch
- 4-speed manual gearbox
- 5-speed manual gearbox
- Automatic gearbox
- Cardan and rear axle
- Chassis
- Steering
- Front suspension
- Rear suspension
- Brake system
- Electrical equipment
- Equipment and devices
- Electrical circuits