
Table of contents: Removal ↓ Installation ↓
- Home
- BMW 3 Series
- E46
- Transmission
- Mechanical gearbox
- Gearbox — removal and installation
Gearbox — removal and installation (BMW 3 Series E46)
Note: This is a very complex job. Before starting, study the entire procedure carefully and purchase a suitable winch or hydraulic trolley.
Removal
1. Disconnect the cable from the negative battery terminal (see chapter 5A).
2. Raise the vehicle and support it on supports (see "Lifting and installing the car on supports"). Make sure the vehicle is raised to a height that allows the transmission to be removed from underneath the vehicle. Remove the screws and the engine and transmission guards.
3. Remove the starter (see chapter 5A).
4. For models with a four-cylinder M43TU engine, loosen the nuts, remove the ignition coil and move it to the side. This is done to prevent damage to the high-voltage circuit of the ignition system when moving the engine. It is not necessary to disconnect the high-voltage wires.
5. Remove the driveshaft (see chapter 8).
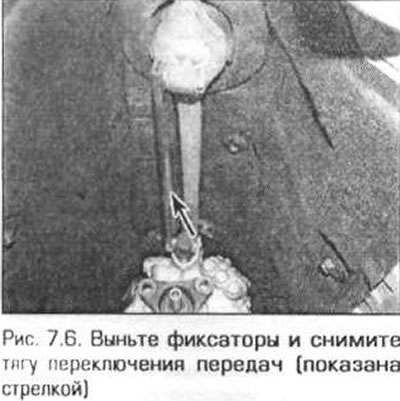
6. Remove the gearshift rod axle retainer from underneath the vehicle. Remove the axle and washers. Similarly, remove the axle from the gearshift lever and remove the rod (Fig. 7.6).
7. Loosen the nuts securing the clutch slave cylinder to the gearbox and remove the slave cylinder from the studs. Secure the cylinder to the side, preventing the hose from being pulled.
8. Note the location of all electrical wiring connectors and disconnect them. Disconnect all electrical wiring harnesses from the transmission.
9. Disconnect the exhaust system support bracket from the gearbox.
10. Unscrew the mounting bolts and remove the front suspension reinforcement.
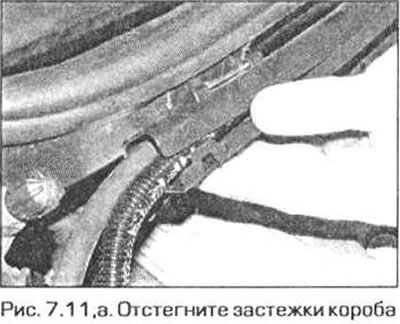
11. On six-cylinder models, remove the heating/ventilation duct from the rear of the engine compartment as follows: (fig. 7.11, a, b).
- a) Remove the cabin filter cover by turning its latches 90° counterclockwise. Pull the filter out of the housing.
- b) Unfasten the four fasteners of the cable management box and remove the sleeves with wires from the box.
- c) Remove the four screws and pull the cabin filter housing forward.
- d) In the left rear corner of the engine compartment, pull off the seal, turn the two fasteners counterclockwise and move the trim panel forward slightly.
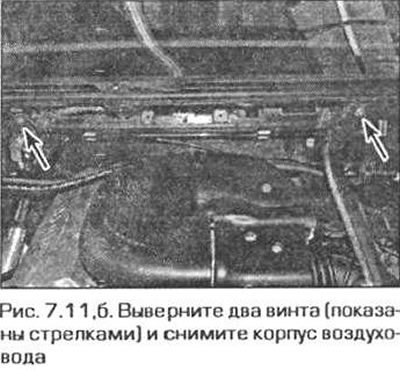
- d) Remove the two screws and remove the air duct.
- e) Release the clips and remove the air duct cover from the front cross panel.
12. On models with the M43TU four-cylinder engine, support the engine with a hydraulic jack dolly. Place the jack under the engine pan, placing a block of wood between the jack and the pan. Raise the jack until it just touches the pan.
13. On other models, connect the winch to the engine rigging eye. The eye is located on the rear left corner of the engine (on the rear end of the cylinder block).
14. Place a hydraulic trolley under the gearbox (behind the clutch housing). Place a block of wood on the cart, then lift the cart up to lift the gearbox off the ground.
15. Remove the subframe and rear gearbox support mounts.
16. Using a jack (or winches) lower the engine and transmission so that the engine exhaust manifold passes under the engine bulkhead. Make sure that the engine is not hanging on any hoses or wires running along the engine bulkhead.
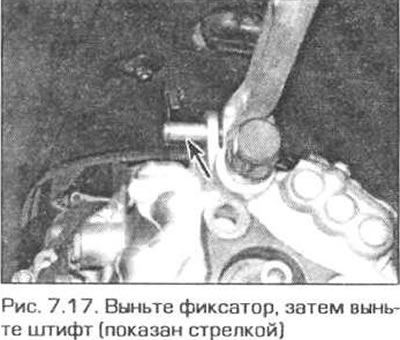
17. At the top of the gearbox, remove the gearshift lever mounting pin retainer. Remove the pin and disconnect the lever from the gearbox (Fig. 7.17).
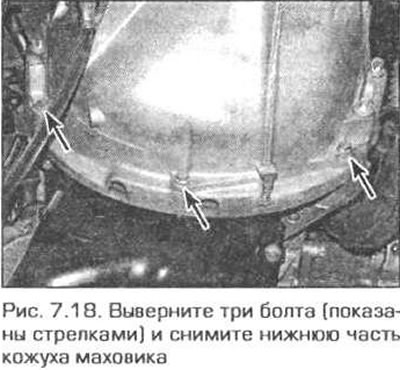
18. Remove the transmission/engine adapter mounting bolt to the right side of the clutch housing and/or remove the lower part of the flywheel housing (depending on the model) (Fig. 7.18).
19. Remove the transmission-to-engine mounting bolts, remove the washers, then slide the transmission back and disconnect the input shaft from the clutch. Be very careful during this operation and do not allow the transmission to hang on the input shaft. After the transmission is disconnected from the engine, make sure that the heater hoses are not overtightened.
20. Lower the transmission and roll it out from under the vehicle. If the transmission is removed indefinitely, make sure the engine is securely supported.
Installation
21. Before installation, center the clutch driven disc (see chapter 6)
22. Before installing the gearbox, check the condition and lubricate the release bearing and fork (see chapter 6).
23. The rest of the installation procedure is carried out in the reverse order of removal. Please note the following points.
- a) Check for the presence of the gearbox mounting pins (they are located at the rear end of the engine).
- b) Don't forget to put washers on the bolts that secure the gearbox to the engine.
- c) Tighten all fasteners to the specified torque.
- d) Before installation, lightly lubricate the gear shift lever shaft and the traction shaft.
- d) Connect the propeller shaft to the gearbox (see chapter 8).
- e) Install the starter (see chapter 5A).
This article is available at russian, bulgarian, belarusian, ukrainian, serbian, croatian, romanian, polish, slovak, hungarian
Article verified: Ilyinsky Matvey
Share information:
Previous articles
БМВ E46: Mechanical gearbox
Next articles
Similar articles on other types of BMW cars:
Removal and installation the gearbox BMW 5 Series E12 (1972-1981)
Removal and installation the gearbox BMW 5 Series E39 (1995-2003)
Rear axle gearbox removal and installation BMW 7 Series E32 (1986-1994)
Removal and installation the rear axle gearbox BMW 7 Series E38 (1994-2001)
Pistons — removal and installation BMW X3 E83 (2003-2010)
Removal and installation of gearbox S5D 280Z BMW X5 E53 (1999-2006)
Link in different formats to this page
Visitor comments
No comments yet
- General information
- Manual
- Maintenance
- Power unit
- Engine repair
- Cooling system
- Power system (gasoline)
- Injection system (gasoline)
- Fuel system (diesel)
- Exhaust system
- Ignition system
- Charge and launch systems
- Transmission
- Car gearbox
- Clutch and drive shafts
- Chassis
- Brake system
- Suspension front and rear
- Steering
- Body
- Body care and repair
- Exterior
- Interior
- Electrical equipment
- Troubleshooting
- Lighting and signaling
- Equipment and devices
- Heater and air conditioner
- Electrical circuits
- General information
- Manual
- Repair on the road
- Weekly checks
- Maintenance
- Troubleshooting
- Power unit
- 4 cylinder engines
- 6 cylinder engines
- Engine overhaul
- Cooling and heating
- Fuel and exhaust system
- Starting and charging system
- Ignition system
- Transmission
- Clutch
- Mechanical gearbox
- Automatic gearbox
- Cardan and drive shafts
- Chassis
- Brake system
- Wheel suspension
- Steering
- Body
- Exterior
- Interior
- Electrical equipment
- Equipment and devices
- Electrical circuits
- General information
- Maintenance
- Power unit
- Engine repair
- Cooling system
- Ignition system
- Supply system
- Fuel injection system
- Exhaust system
- Transmission
- Clutch
- Car gearbox
- Front and rear axle
- Chassis
- Steering
- Brake system
- Body
- Exterior
- Interior
- Electrical equipment
- Heating system
- Equipment and devices
- Power devices
- Electrical circuits
- Power unit
- M10/M20 engine
- M40 engine
- Ignition system
- Lubrication system
- Cooling system
- Supply system
- Fuel injection
- Exhaust system
- Transmission
- Clutch
- Manual gearbox
- Front axle
- Rear axle
- Chassis
- Steering
- Brake system
- Body
- Exterior
- Interior
- Electrical equipment
- Heating system
- Equipment and devices
- Electrical circuits
- General information
- Specifications
- Operation and maintenance
- 4-cylinder engine
- Engine repair
- Cooling and lubrication system
- Supply system
- Ignition system
- 6-cylinder engine
- Engine repair
- Cooling and lubrication system
- Supply system
- Fuel injection system
- Ignition system
- Transmission
- Clutch
- 4-speed manual gearbox
- 5-speed manual gearbox
- Automatic gearbox
- Cardan and rear axle
- Chassis
- Steering
- Front suspension
- Rear suspension
- Brake system
- Electrical equipment
- Equipment and devices
- Electrical circuits