
- Home
- BMW 5 Series
- E12
- Power unit
- Supply system
- Maintenance of carburetor Solex Zenith 35/40 INAT
Maintenance of carburetor Solex Zenith 35/40 INAT (BMW 5 Series E12)
Synchronization of carburetors
Synchronization of carburetors is performed on a warm engine and with the automatic starting device turned off.
Remove the plugs from the exhaust manifold holes and insert the 7062 measuring instrument sensors into the holes.
Connect the gas analyzer.
Remove the air filter and connect the 130,000 device. Using this device allows you to ignore the increase in engine crankshaft speed caused by removing the air filter. If adjustment is made without using the 130,000 device, it should be taken into account that the engine idle speed after installing the air filter will decrease by approximately 200 rpm.
Disconnect the connecting rod, connect the device for synchronizing the carburetors and set the idle speed of the crankshaft with both carburetors operating within 900-1000 rpm using the adjusting screws 3 and 4 (see photo) of the mixture quantity. The operation of the carburetors is considered synchronized if the arrow of the device is steadily at the zero mark.

Using adjusting screws 5 and 6 for the mixture quality (composition), achieve a carbon monoxide (CO) content in the exhaust gases of 2±0.5%. If necessary, using screws 3 and 4, achieve synchronization of the carburetors at idle speed at a given CO content value.
Adjust the length of the connecting rod so that after connecting it, the idle speed of the crankshaft remains the same.
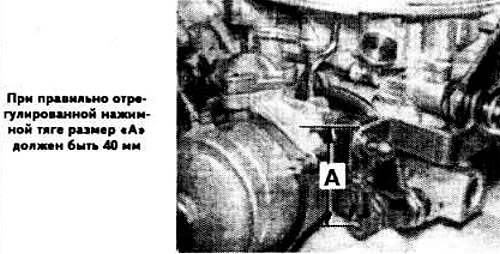
If it is difficult to achieve synchronization of the carburetors, check the adjustment of the push rod. If it is adjusted correctly, the dimension "A" (see photo) should be equal to 40 mm.
Adjusting the automatic starting device
Adjustment of the automatic starting device and accelerated engine idle speed is performed on a warm engine, with the air filter removed and the carburetors synchronized (see above).
With the engine not running, loosen the connecting rods and lift the rear carburetor throttle control rod a few millimetres.
Move the air damper manually so that it opens 3 mm.
Release the throttle control rod. In this case, the cam of the starting device should rest on the second profile of the throttle control lever of the 1st chamber, which corresponds to the accelerated idle speed of the engine.
Without touching the throttle control rod, start the engine. The crankshaft speed at fast idle should be 1400 rpm. If not, achieve the specified value as follows:
- stop the engine and set the throttle control to the full throttle position;
- adjust the engine's fast idle speed with the adjusting screw (see photo), keeping in mind that turning it out reduces the crankshaft speed. One turn of the screw corresponds to a change in the crankshaft speed of approximately 300 rpm.
Adjust the second carburetor in the same way and connect the connecting rod.
Set both carburetors to fast idle, opening the air flaps by 3 mm, and start the engine without pressing the accelerator pedal. The crankshaft speed at fast idle should be 1800-2000 rpm.
Check the position of the automatic starting device cover. The marks on its cover and body should match. If a cold engine is difficult to start, turn the starting device cover 90° to the left (in the direction of the arrow "Rich" — "Rich mix").
Checking the Thermostat Valve
Remove the thermostat valve cover. At an ambient temperature of +15°C, the valve should be open, i.e. raised above the seat. At a temperature below +15°C, turn on the ignition and after about 1 min, the thermostat spring should raise the valve by 1-2 mm. If this does not happen, the reason is a faulty resistor and no supply voltage. Check the wires and their connections.
Note: The thermostat valve seat is factory adjusted in a climate controlled environment and should not be changed.
Checking the pneumatic drive of the throttle valve of the 2nd chamber
Remove the carburetor, disconnect the 2nd chamber throttle drive rod, remove the pneumatic drive together with the rod.
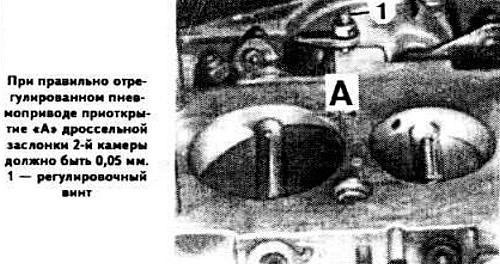
With the throttle valve of the 1st chamber fully closed, use the adjusting screw 1 (see photo) to achieve an opening "A" of the throttle valve of the 2nd chamber by 0.05 mm.
Remove the cover of the pneumatic drive of the 2nd chamber throttle valve, check the condition of the diaphragm and replace it if necessary. Check the length in the free state of the diaphragm spring, as well as the total length of the drive rod, which should be 72 and 65 mm, respectively.
(You can read the original on the website: bmwman)
This article is available at russian, bulgarian, belarusian, ukrainian, serbian, croatian, romanian, polish, slovak, hungarian
Article verified: Polikarpov Saveliy
Share information:
Previous articles
БМВ E12: Supply system
Next articles
Similar articles on other types of BMW cars:
Main parts of the Solex «Zenith» 2B4 carburetor BMW 3 Series E21 (1975-1983)
Carburetor maintenance work BMW 3 Series E30 (1982-1994)
Vehicle maintenance plan BMW 7 Series E32 (1986-1994)
Schedule of current maintenance BMW 7 Series E38 (1994-2001)
Maintenance upcoming indicator (MOT) BMW X3 E83 (2003-2010)
Carrying out maintenance work BMW X5 E53 (1999-2006)
Link in different formats to this page
Visitor comments
No comments yet
- General information
- Governing bodies
- Manual
- Maintenance
- Power unit
- Engine repair
- Lubrication system
- Cooling system
- Ignition system
- Supply system
- Injection system (gasoline)
- Injection system (diesel)
- Exhaust system
- Transmission
- Clutch
- Car gearbox
- Front axle
- Rear axle
- Chassis
- Steering
- Brake system
- Wheels and tires
- Body
- Interior
- Exterior
- Heating system
- Electrical equipment
- Equipment and devices
- Power devices
- Windscreen wipers
- Electrical circuits
- General information
- Manual
- Maintenance
- Power unit
- Engine repair
- Ignition system
- Engine lubrication system
- Cooling system
- Fuel system (gasoline)
- Fuel system (diesel)
- Exhaust system
- Transmission
- Clutch
- Car gearbox
- Chassis
- Front and rear suspension
- Steering
- Brake system
- Body
- Exterior
- Interior
- Electrical equipment
- Heating system
- Equipment and devices
- Power devices
- Electrical circuits
- General information
- Manual
- Maintenance
- Power unit
- Engine in a car
- Engine overhaul
- Cooling system
- Supply system
- Ignition system
- Control system
- Transmission
- Clutch
- Manual gearbox
- Automatic gearbox
- Transmission line
- Chassis
- Steering
- Front suspension
- Rear suspension
- Brake system
- Body
- Body elements
- Car care and painting
- Electrical equipment
- Heater and air conditioner
- Equipment and devices
- Starter and generator
- Electrical circuits
- General information
- Operation and maintenance
- Specifications
- Power unit
- Engine repair
- Cooling and lubrication system
- Supply system
- Ecotronic power supply system
- Fuel injection system
- Ignition system
- Transmission
- Clutch
- Gearbox BMW 242/4
- Gearbox Getrag 262/8
- Gearbox Getrag 265/6
- Automatic gearbox
- Cardan gear
- Rear axle
- Chassis
- Steering
- Front suspension
- Rear suspension
- Brake system
- Electrical equipment
- Equipment and devices
- Electrical circuits