
Table of contents: Unlocking the hood ↓ Opening the trunk ↓ Top cover ↓ Bottom cover ↓ Lifting a car ↓
- Home
- BMW X5
- E53
- General information
- Maintenance
- Carrying out maintenance work
Carrying out maintenance work (BMW X5 E53)
This section is based on the maintenance requirements (TO) set forth by BMW-AG and many years of experience in operating the vehicle. It is aimed at helping the vehicle owner to properly service it and maintain it in good condition. When accessing a particular mechanism or unit for maintenance work, it is necessary to familiarize yourself with the sections devoted to its design and the rules for removing and installing it on the vehicle, as set out in this Manual. This will improve the quality of the work performed and save time on performing the work. The location of individual units and assemblies is known from the general design of the vehicle, units located in the engine compartment (engine compartment), are shown in the figures below.
All types of work performed must be coordinated with the readings of the upcoming maintenance indicators and the time-mileage schedule. Particular attention must be paid to the circumstances of vehicle operation - road conditions, driving style, specific climatic conditions of operation after the last maintenance.
The placement of the main units in the engine compartment of the vehicle is shown in Fig. 2.1.
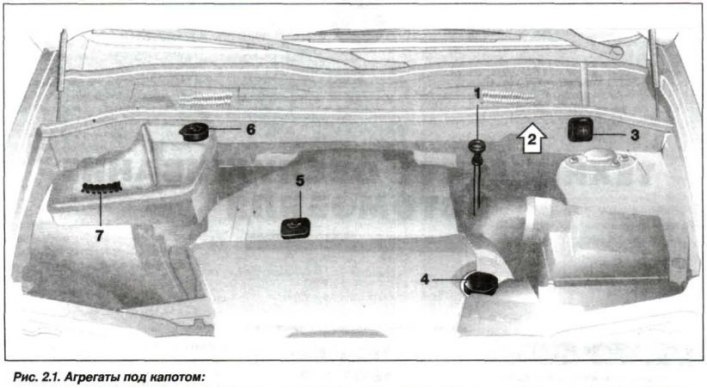
1 - oil dipstick; 2 - brake fluid reservoir; 3 - terminal "+" AB; 4-cooling system tank; 5 - oil filler neck; 6 - headlight and glass washer reservoir; 7 - identification number; 8 - air filter
If you encounter technical problems when disassembling a particular unit, determine the complete technology for performing them and consult with someone who has already performed this work or contact CTOA-BMW.
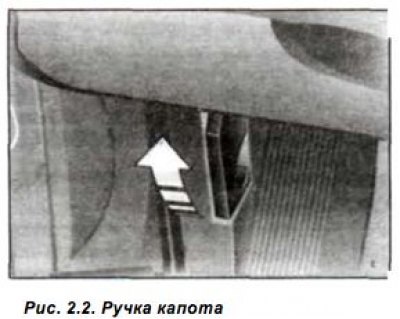
To unlock the hood, pull the hood lock handle (arrow, Fig. 2.2) towards you. The handle is located on the left side of the steering column, under the front panel of the car interior.
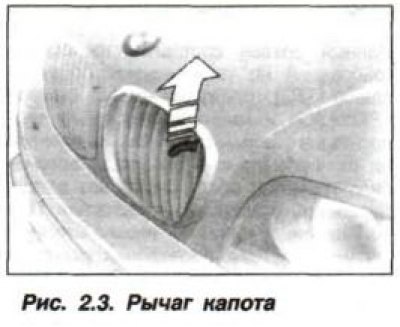
To open the hood, pull the hood locking lever up (arrow, Fig. 2.3) and raise the hood.
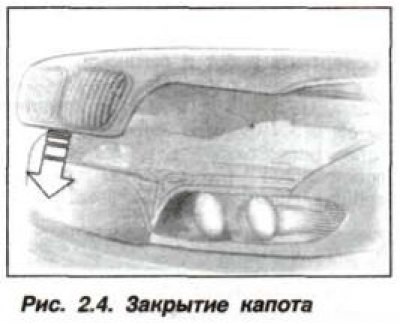
To close the hood, it is necessary to smoothly lower it and press it tightly from both sides from a height of approximately 20-30 mm (arrow, Fig. 2.4), a characteristic click of the hood locking should be heard.
The luggage compartment has upper and lower covers that open up and down, respectively.
To open the top lid of the trunk from the outside, press the button (arrow, Fig. 2.5) on the trunk lid, it will open slightly.
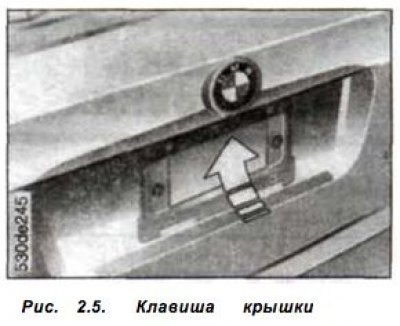
When the luggage compartment lid is open, its lighting is switched on. When the lid is fully open, it is necessary to take into account that its lifting height is more than 2.0 m.
If the luggage compartment lock is not under the control of the security alarm, it can be opened by pressing the button (arrow, Fig. 2.6) on the front panel of the passenger compartment.
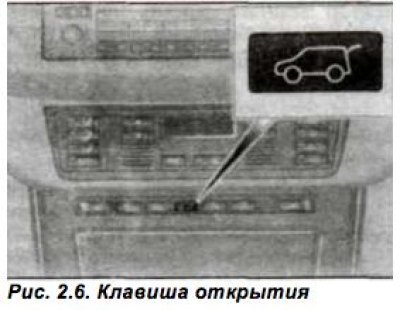
When the vehicle is moving, it is not possible to open the trunk lid using this button.
If there is a fault in the electrical equipment, the upper trunk lid can be opened manually; to do this, you need to remove the plastic plug from the trunk side (from the passenger compartment) (arrow, Fig. 2.7) and pull it towards you (inside the salon), the top cover opens slightly.

When the lid opens slightly, put the plug back.
When closing, lower the trunk lid, holding the handles with both hands. To close the trunk lid, it is enough to press it lightly, after which it closes automatically due to the automatic closer.
Opening the lower luggage compartment lid is only possible after lifting the upper lid and pressing the button (arrow, Fig. 2.8).
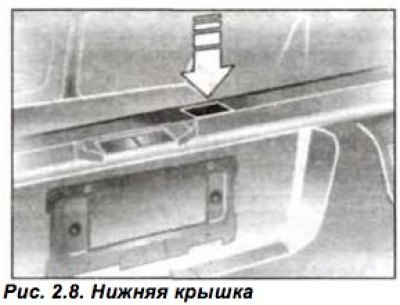
Now you can lower the trunk lid down. The open trunk lid can withstand a load of up to 200 kg, and it can be used in the parking lot as a seat or a shelf for equipment, gear.
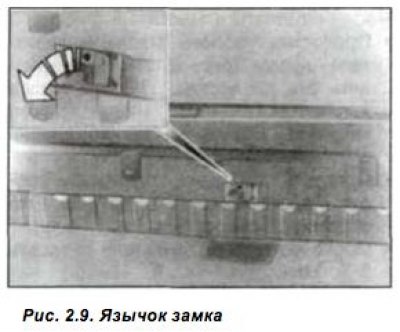
If there is an electrical fault, the lower trunk lid can be unlocked manually in the following order.
Using a screwdriver, press the trim of the bottom cover and remove it by moving it upwards. Move the lock tongue (arrow, Fig. 2.9) to the side, the lock will open. Install the trim in place.
Before lifting the car, four platforms must be installed on it (1, Fig. 2.10) for the lift, if necessary, they should be taken from the lift delivery set.
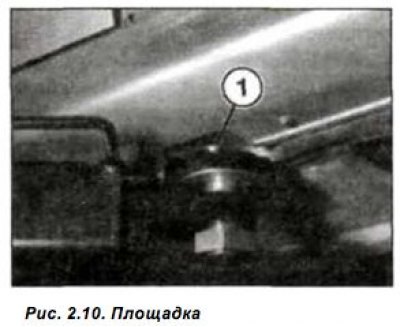
Install and secure the pads in the holes near the front and rear thresholds (in the side members). Make sure that the plate (2) of the lift bracket does not come into contact with adjacent elements.
When lifting the car by its front part, the front spoiler should be removed (its edge) and bring the garage jack as shown in Fig. 2.11.
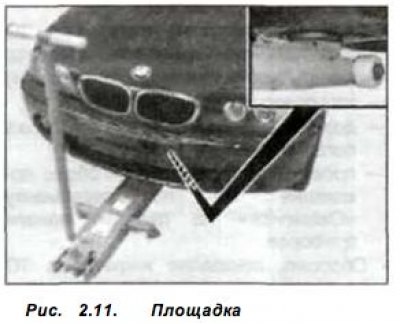
In this case, the support plate with the rubber pad of the jack should be under the support platform of the front axle beam.
(The original version is on the portal «www.bmwman.ru»)
Attention! When performing operations on the body, all working surfaces must have paintwork protection in the form of standard soft covers, mats or fabric fender pads.
All types of work performed must be coordinated with the readings of the upcoming maintenance indicators and the time-mileage schedule. Particular attention must be paid to the circumstances of vehicle operation - road conditions, driving style, specific climatic conditions of operation after the last maintenance.
The placement of the main units in the engine compartment of the vehicle is shown in Fig. 2.1.
1 - oil dipstick; 2 - brake fluid reservoir; 3 - terminal "+" AB; 4-cooling system tank; 5 - oil filler neck; 6 - headlight and glass washer reservoir; 7 - identification number; 8 - air filter
If you encounter technical problems when disassembling a particular unit, determine the complete technology for performing them and consult with someone who has already performed this work or contact CTOA-BMW.
Unlocking the hood
To unlock the hood, pull the hood lock handle (arrow, Fig. 2.2) towards you. The handle is located on the left side of the steering column, under the front panel of the car interior.
To open the hood, pull the hood locking lever up (arrow, Fig. 2.3) and raise the hood.
To close the hood, it is necessary to smoothly lower it and press it tightly from both sides from a height of approximately 20-30 mm (arrow, Fig. 2.4), a characteristic click of the hood locking should be heard.
Warning! If you notice while driving that the hood is not tightly locked, stop immediately and close it.
Opening the trunk
The luggage compartment has upper and lower covers that open up and down, respectively.
Top cover
To open the top lid of the trunk from the outside, press the button (arrow, Fig. 2.5) on the trunk lid, it will open slightly.
When the luggage compartment lid is open, its lighting is switched on. When the lid is fully open, it is necessary to take into account that its lifting height is more than 2.0 m.
If the luggage compartment lock is not under the control of the security alarm, it can be opened by pressing the button (arrow, Fig. 2.6) on the front panel of the passenger compartment.
When the vehicle is moving, it is not possible to open the trunk lid using this button.
Attention! Sharp edges of luggage that could touch the rear window while driving must be wrapped in protective material, as they can damage the rear window heating element.
If there is a fault in the electrical equipment, the upper trunk lid can be opened manually; to do this, you need to remove the plastic plug from the trunk side (from the passenger compartment) (arrow, Fig. 2.7) and pull it towards you (inside the salon), the top cover opens slightly.
When the lid opens slightly, put the plug back.
When closing, lower the trunk lid, holding the handles with both hands. To close the trunk lid, it is enough to press it lightly, after which it closes automatically due to the automatic closer.
Caution: To avoid injury, make sure there are no obstructions in the path of the luggage compartment lid when closing it.
Bottom cover
Opening the lower luggage compartment lid is only possible after lifting the upper lid and pressing the button (arrow, Fig. 2.8).
Now you can lower the trunk lid down. The open trunk lid can withstand a load of up to 200 kg, and it can be used in the parking lot as a seat or a shelf for equipment, gear.
If there is an electrical fault, the lower trunk lid can be unlocked manually in the following order.
Using a screwdriver, press the trim of the bottom cover and remove it by moving it upwards. Move the lock tongue (arrow, Fig. 2.9) to the side, the lock will open. Install the trim in place.
Lifting a car
Attention! The car may only be lifted on these four reinforced platforms.
Before lifting the car, four platforms must be installed on it (1, Fig. 2.10) for the lift, if necessary, they should be taken from the lift delivery set.
Install and secure the pads in the holes near the front and rear thresholds (in the side members). Make sure that the plate (2) of the lift bracket does not come into contact with adjacent elements.
Attention! Raising the front of the car with a garage jack is only permitted if there is a special platform for the jack on the front axle beam.
When lifting the car by its front part, the front spoiler should be removed (its edge) and bring the garage jack as shown in Fig. 2.11.
In this case, the support plate with the rubber pad of the jack should be under the support platform of the front axle beam.
(The original version is on the portal «www.bmwman.ru»)
This article is available at russian, bulgarian, belarusian, ukrainian, serbian, croatian, romanian, polish, slovak, hungarian
Article verified: Zhuravleva Isolda
Share information:
Previous articles
БМВ E53: Maintenance
Next articles
Similar articles on other types of BMW cars:
Engine maintenance work BMW 3 Series E30 (1982-1994)
Maintenance work BMW 5 Series E34 (1988-1996)
Maintenance work — general information BMW 5 Series E39 (1995-2003)
Vehicle maintenance plan BMW 7 Series E32 (1986-1994)
Schedule of current maintenance BMW 7 Series E38 (1994-2001)
Maintenance upcoming indicator (MOT) BMW X3 E83 (2003-2010)
Link in different formats to this page
Visitor comments
No comments yet
- General information
- Manual
- Maintenance
- M54 petrol engine
- Engine repair
- Lubrication system
- Cooling system
- Supply system
- Injection system
- Exhaust system
- Engine electrics
- M62 petrol engine
- Engine repair
- Lubrication system
- Cooling system
- Supply system
- Exhaust system
- Engine electrics
- N62 petrol engine
- Engine repair
- Cooling and lubrication system
- Power and exhaust system
- Engine electrics
- Diesel engine M57
- Engine repair
- Lubrication system
- Cooling system
- Power and exhaust system
- Engine electrics
- Turbocharging system
- Transmission
- Clutch
- Mechanical gearbox
- Automatic gearbox
- Transfer case and cardan
- Chassis
- Brake system
- Steering
- Front suspension
- Rear suspension
- Wheels and tires
- Body
- Exterior
- Interior
- Doors and windows
- Repair and maintenance
- Heater and air conditioner
- Electrical equipment
- Equipment and devices
- Levers and switches
- Electrical circuits