
Table of contents: Removal ↓ Installation ↓
- Home
- BMW 5 Series
- E28
- Chassis
- Rear suspension
- Removal and installation rear trailing arms
Removal and installation rear trailing arms (BMW 5 Series E28)
Removal
1. Loosen the wheel mounting bolts, then block the front wheels. Jack up the rear of the vehicle and securely place it on axle supports. Remove the wheel(s).
2. Remove the drive shaft (see chapter Transmission line).
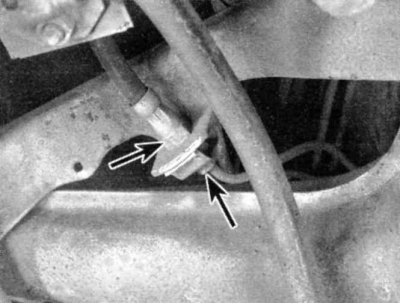
3. Disconnect the rear brake hose (left arrow) from the metal brake line (right arrow) on the longitudinal arm bracket.
For instructions on disconnecting the brake hoses from the metal lines, refer to Chapter Brake system. Plug the line and hose to prevent dirt from getting in and brake fluid from being lost.
4. Disconnect the parking brake cable from the drive mechanism and remove the cable clamps from the trailing arm (see chapter Brake system).
5. Remove the ABS wheel sensor (if it exists) from the trailing arm and disconnect the sensor wiring from the arm. Place the sensor aside to avoid damaging it when removing the trailing arm.
6. If you are removing the right trailing arm, disconnect the brake pad wear sensor connector, if equipped.
7. Disconnect the rear stabilizer bar from the trailing arm (see section Removal and installation the rear stabilizer bar).
8. On models from 1983 onwards, loosen one of the bolts securing the trailing arm to the rear axle carrier (it doesn't matter which one - one of them holds the link on the trailing arm, the other - the link on the supporting axle)
9. Loosen the lower shock absorber mounting bolt (see section Removal and installation the rear shock absorber and coil spring assembly).
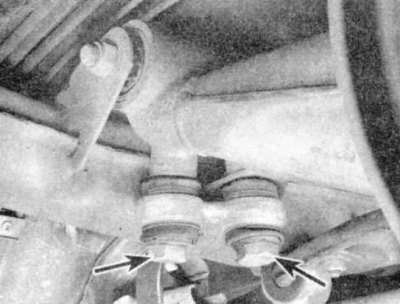
10. Remove the two trailing arm pivot bolts with nuts and remove the trailing arm from the vehicle.
11. Inspect the pivot bolt bushings. If they are cracked, dry, or torn, take the trailing arm to a shop and have new bushings installed. The inner end of the bushing is longer on one side. Make sure the bushings are installed with the long side toward the center of the car.
Installation
1. Install in reverse order. Install the inner pivot bolt first. Do not tighten the nuts on the pivot bolts or on the shock absorber all the way.
2. Bleed the brake system as described in Chapter Brake system.
3. Support the trailing arm with a wheel jack and raise it to normal operating height, then tighten the nuts and bolts to the required torque.
[This article is based on data from the website «BMWMan.ru»]
This article is available at russian, bulgarian, belarusian, ukrainian, serbian, croatian, romanian, polish, slovak, hungarian
Article verified: Zhuravleva Isolda
Share information:
Previous articles
БМВ E28: Rear suspension
Next articles
Similar articles on other types of BMW cars:
Rear Suspension Trailing Arm — Removal, Repair and Installation BMW 3 Series E46 (1998-2006, petrol)
Removal and installation the rear axle BMW 3 Series E21 (1975-1983)
Removal and installation rear suspension arms and struts BMW 7 Series E38 (1994-2001)
Rear axle gearbox removal and installation BMW 7 Series E32 (1986-1994)
Removal and installation the rear door BMW X3 E83 (2003-2010)
Rear disc — removal and installation BMW X5 E53 (1999-2006)
Link in different formats to this page
Visitor comments
No comments yet
- General information
- Governing bodies
- Manual
- Maintenance
- Power unit
- Engine repair
- Lubrication system
- Cooling system
- Ignition system
- Supply system
- Injection system (gasoline)
- Injection system (diesel)
- Exhaust system
- Transmission
- Clutch
- Car gearbox
- Front axle
- Rear axle
- Chassis
- Steering
- Brake system
- Wheels and tires
- Body
- Interior
- Exterior
- Heating system
- Electrical equipment
- Equipment and devices
- Power devices
- Windscreen wipers
- Electrical circuits
- General information
- Manual
- Maintenance
- Power unit
- Engine repair
- Ignition system
- Engine lubrication system
- Cooling system
- Fuel system (gasoline)
- Fuel system (diesel)
- Exhaust system
- Transmission
- Clutch
- Car gearbox
- Chassis
- Front and rear suspension
- Steering
- Brake system
- Body
- Exterior
- Interior
- Electrical equipment
- Heating system
- Equipment and devices
- Power devices
- Electrical circuits
- General information
- Manual
- Maintenance
- Power unit
- Engine in a car
- Engine overhaul
- Cooling system
- Supply system
- Ignition system
- Control system
- Transmission
- Clutch
- Manual gearbox
- Automatic gearbox
- Transmission line
- Chassis
- Steering
- Front suspension
- Rear suspension
- Brake system
- Body
- Body elements
- Car care and painting
- Electrical equipment
- Heater and air conditioner
- Equipment and devices
- Starter and generator
- Electrical circuits
- General information
- Operation and maintenance
- Specifications
- Power unit
- Engine repair
- Cooling and lubrication system
- Supply system
- Ecotronic power supply system
- Fuel injection system
- Ignition system
- Transmission
- Clutch
- Gearbox BMW 242/4
- Gearbox Getrag 262/8
- Gearbox Getrag 265/6
- Automatic gearbox
- Cardan gear
- Rear axle
- Chassis
- Steering
- Front suspension
- Rear suspension
- Brake system
- Electrical equipment
- Equipment and devices
- Electrical circuits