
Table of contents: Bosch Generator ↓ Motorola Generator ↓
- Home
- BMW 5 Series
- E28
- Electrical equipment
- Starter and generator
- Checking and replacing generator brushes
Checking and replacing generator brushes (BMW 5 Series E28)
If your vehicle's radio has an anti-theft system, make sure you know the correct activation code before disconnecting the battery. Refer to Section 1 for information before disconnecting the wire Anti-theft audio system and instrument cluster language.
If a message in another language appears on the instrument cluster display after connecting the battery, refer to Section 1 for the language setting procedure Anti-theft audio system and instrument cluster language.
Disconnect the negative battery cable.
Bosch Generator
1. Remove the voltage regulator from the rear of the generator (see section Replacing the voltage regulator).
2. Measure the length of the brushes. They should not be shorter than 6 mm. If any of them are worn to this limit, replace the entire set.
3. Also check for wear on the collector ring (see illustration).
4. The brushes are either screwed or soldered. If you are not experienced in soldering, it may be better to have an electrician install the brushes.
Be careful not to heat the soldering area for more than 5 seconds. If necessary, use a heat sink to prevent overheating. This can be done with narrow pliers, which should be grasped near the soldering area.
5. For screw mounting, hold the assembly in place and install the screws. Tighten the screws gradually and evenly to prevent the holder from warping.
6. Install the voltage regulator assembly onto the generator.
7. Connect the negative battery cable.
Motorola Generator
1. Remove the generator.
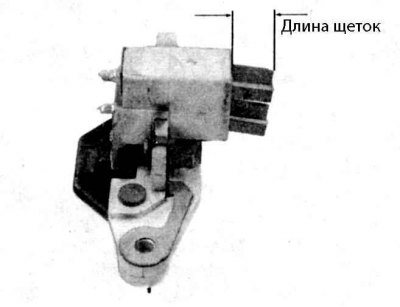
2. The brushes are mounted under the voltage regulator at the rear of the generator (see illustration).
3. Remove the mounting screws and insulating washers and separate the voltage regulator and brush holder from the housing on the collector side.
4. Measure the length of the brushes (see the illustration above). If any of the brushes are shorter than 6mm, replace the entire set.
5. Make sure that the brushes move without jamming in the brush holder.
6. Install the brush holder/voltage regulator. Tighten the screws securely. Make sure the brushes are not shorted to ground.
7. Installation is the reverse of removal.
This article is available at russian, bulgarian, belarusian, ukrainian, serbian, croatian, romanian, polish, slovak, hungarian
Article verified: Zhuravleva Isolda
Share information:
Previous articles
БМВ E28: Starter and generator
Next articles
Similar articles on other types of BMW cars:
Checking and replacing generator/voltage regulator brushes BMW 3 Series E46 (1998-2006)
Checking and replacing the pulse generator of the ignition… BMW 3 Series E21 (1975-1983)
Pulse Generator — Checking and Replacing BMW 7 Series E32 (1986-1994)
Checking the condition and replacing hoses and tubes in the engine… BMW 7 Series E38 (1994-2001)
Generator drive belt BMW X3 E83 (2003-2010)
Checking the engine oil level and replacing it BMW X5 E53 (1999-2006)
Link in different formats to this page
Visitor comments
No comments yet
- General information
- Governing bodies
- Manual
- Maintenance
- Power unit
- Engine repair
- Lubrication system
- Cooling system
- Ignition system
- Supply system
- Injection system (gasoline)
- Injection system (diesel)
- Exhaust system
- Transmission
- Clutch
- Car gearbox
- Front axle
- Rear axle
- Chassis
- Steering
- Brake system
- Wheels and tires
- Body
- Interior
- Exterior
- Heating system
- Electrical equipment
- Equipment and devices
- Power devices
- Windscreen wipers
- Electrical circuits
- General information
- Manual
- Maintenance
- Power unit
- Engine repair
- Ignition system
- Engine lubrication system
- Cooling system
- Fuel system (gasoline)
- Fuel system (diesel)
- Exhaust system
- Transmission
- Clutch
- Car gearbox
- Chassis
- Front and rear suspension
- Steering
- Brake system
- Body
- Exterior
- Interior
- Electrical equipment
- Heating system
- Equipment and devices
- Power devices
- Electrical circuits
- General information
- Manual
- Maintenance
- Power unit
- Engine in a car
- Engine overhaul
- Cooling system
- Supply system
- Ignition system
- Control system
- Transmission
- Clutch
- Manual gearbox
- Automatic gearbox
- Transmission line
- Chassis
- Steering
- Front suspension
- Rear suspension
- Brake system
- Body
- Body elements
- Car care and painting
- Electrical equipment
- Heater and air conditioner
- Equipment and devices
- Starter and generator
- Electrical circuits
- General information
- Operation and maintenance
- Specifications
- Power unit
- Engine repair
- Cooling and lubrication system
- Supply system
- Ecotronic power supply system
- Fuel injection system
- Ignition system
- Transmission
- Clutch
- Gearbox BMW 242/4
- Gearbox Getrag 262/8
- Gearbox Getrag 265/6
- Automatic gearbox
- Cardan gear
- Rear axle
- Chassis
- Steering
- Front suspension
- Rear suspension
- Brake system
- Electrical equipment
- Equipment and devices
- Electrical circuits