
- Home
- BMW 7 Series
- E32
- Power unit
- Ignition system
- Pulse Generator — Checking and Replacing
Pulse Generator — Checking and Replacing (BMW 7 Series E32)
The DME control unit receives information about the engine speed from a pulse generator (sensor) mounted at the pinion behind the crankshaft pulley. Another sensor on the front of the cylinder head provides information about when the engine stops rotating (recognition or identification of cylinders).
To check, remove the corresponding plug of the wires coming from the common engine wiring harness. If necessary, you must first remove the intake manifold, since sometimes it is difficult to reach the plug.
Measure the resistance at the contacts of the corresponding sensor plug with an ohmmeter and, if necessary, replace the sensor.
Resistance values at +20°C:
Remove the sensor plug (generator) impulses.
Unscrew the oil line from the VANOS actuator and close it with a clean plug.
Remove the engine lifting eye, marking the position of the wire (1).
Remove the sensor wire from the guides. To do this, loosen the clamps and remove the sheath (casing) of the wires.
Unscrew the screw on the crankshaft gear and remove the generator (sensor) together with the cover.
Insert the sensor and tighten its mounting screw to a torque of 5 Nm.
Check the distance from the sensor to the gear using a flat feeler gauge. It should be 0.7-1.3 mm.
Place the wire in the guides so that it does not rub against the belt. Connect the plug.
Install the engine lifting eye.
Screw the oil line onto the VANOS actuator using new sealing rings.
Remove the top cover (casing) of the engine.
The sensor is difficult to reach. When removing, first disconnect the plug from the solenoid valve of the VANOS actuator and unscrew the valve.
Unscrew the oil line from the VANOS actuator and plug it with a clean plug.
Unscrew the sensor bolt and remove the sensor.
Disconnect the sensor plug.
Insert the sensor. Make sure the rubber seal is seated correctly on the sensor, replace the seal if necessary.
Tighten the sensor bolt to a torque of 5 Nm.
Connect the plug and route the sensor wire.
Tighten the oil pipe with new sealing rings onto the VANOS actuator with a torque of 30 Nm.
Tighten the solenoid valve into the VANOS unit with a torque of 30 Nm, having first replaced the damaged gasket if necessary. Connect the plug to the solenoid valve.
Install the upper engine cover.
Examination
To check, remove the corresponding plug of the wires coming from the common engine wiring harness. If necessary, you must first remove the intake manifold, since sometimes it is difficult to reach the plug.
Measure the resistance at the contacts of the corresponding sensor plug with an ohmmeter and, if necessary, replace the sensor.
Resistance values at +20°C:
- crankshaft pulse generator: 1.3 kOhm;
- recognition sensor (identification) cylinders: between contacts 1 and 2 - no more than 1 Ohm;
- between contacts 2 and 3 - not less than 10 mOhm.
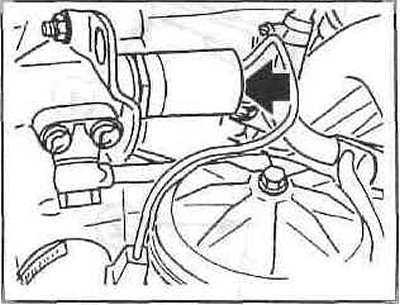
Crankshaft pulse generator
Removal
Remove the sensor plug (generator) impulses.
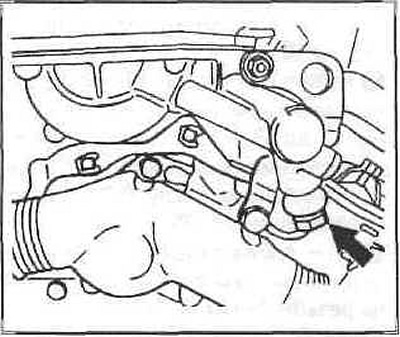
Unscrew the oil line from the VANOS actuator and close it with a clean plug.
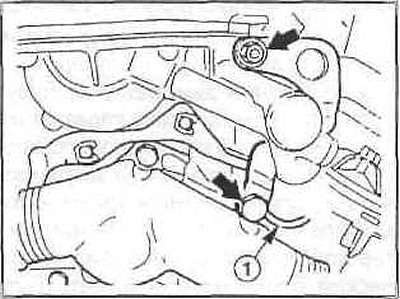
Remove the engine lifting eye, marking the position of the wire (1).
Remove the sensor wire from the guides. To do this, loosen the clamps and remove the sheath (casing) of the wires.
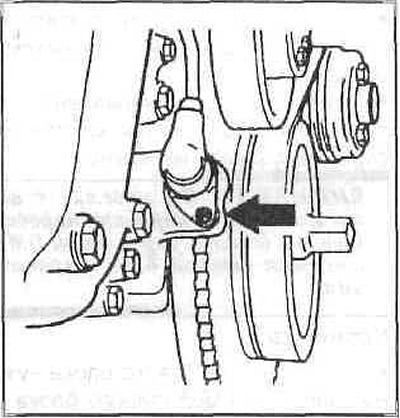
Unscrew the screw on the crankshaft gear and remove the generator (sensor) together with the cover.
Installation
Insert the sensor and tighten its mounting screw to a torque of 5 Nm.
Check the distance from the sensor to the gear using a flat feeler gauge. It should be 0.7-1.3 mm.
Place the wire in the guides so that it does not rub against the belt. Connect the plug.
Install the engine lifting eye.
Screw the oil line onto the VANOS actuator using new sealing rings.
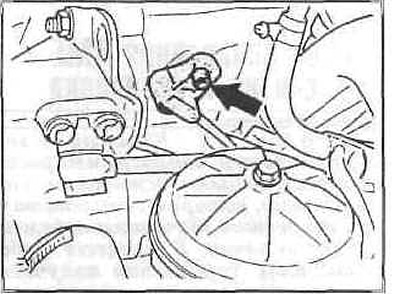
Cylinder recognition sensor
Removal
Remove the top cover (casing) of the engine.
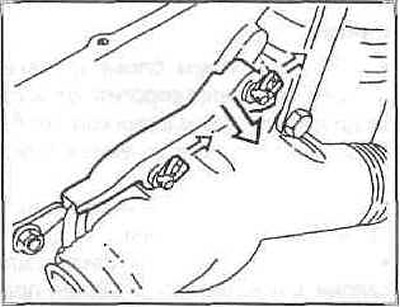
The sensor is difficult to reach. When removing, first disconnect the plug from the solenoid valve of the VANOS actuator and unscrew the valve.
Unscrew the oil line from the VANOS actuator and plug it with a clean plug.
Unscrew the sensor bolt and remove the sensor.
Disconnect the sensor plug.
Installation
Insert the sensor. Make sure the rubber seal is seated correctly on the sensor, replace the seal if necessary.
Tighten the sensor bolt to a torque of 5 Nm.
Connect the plug and route the sensor wire.
Tighten the oil pipe with new sealing rings onto the VANOS actuator with a torque of 30 Nm.
Tighten the solenoid valve into the VANOS unit with a torque of 30 Nm, having first replaced the damaged gasket if necessary. Connect the plug to the solenoid valve.
Install the upper engine cover.
This article is available at russian, bulgarian, belarusian, ukrainian, serbian, croatian, romanian, polish, slovak, hungarian
Article verified: Sevastyanov Nikolay
Share information:
Previous articles
БМВ E32: Ignition system
Next articles
Similar articles on other types of BMW cars:
Checking and replacing the pulse generator of the ignition… BMW 3 Series E21 (1975-1983)
Checking and replacing the pulse sensor BMW 3 Series E36 (1990-2000)
Checking/replacing the pulse sensor BMW 5 Series E39 (1995-2003)
Checking and replacing the pulse sensor and ignition control unit… BMW 5 Series E28 (1981-1988)
Generator drive belt BMW X3 E83 (2003-2010)
Checking the engine oil level and replacing it BMW X5 E53 (1999-2006)
Link in different formats to this page
Visitor comments
No comments yet
- General information
- Introduction to guide
- Manual
- Maintenance
- Power unit
- Engine M60/1, M60/2 (petrol)
- M62 engine (petrol)
- M57 engine (diesel)
- M67 engine (diesel)
- Cooling system
- Fuel system (petrol)
- Fuel system (diesel)
- Exhaust system
- Ignition and control systems
- Charge and launch systems
- Transmission
- Clutch
- Mechanical gearbox
- Automatic gearbox
- Cardan and drive shafts
- Chassis
- Brake system
- Front suspension
- Rear suspension
- Steering
- Body
- Exterior
- Interior
- Electrical equipment
- Equipment and devices
- Lighting
- Heating and air conditioning
- Electrical circuits
- General information
- Care and maintenance
- Power unit
- Minor engine repair
- Engine overhaul
- Lubrication system
- Cooling system
- Ignition system
- Supply system
- Injection system (petrol)
- Injection system (diesel)
- Exhaust system
- Transmission
- Clutch
- Manual gearbox
- Automatic gearbox
- Cardan gear
- Rear axle and shafts
- Chassis
- Front suspension
- Rear suspension
- Steering
- Wheels and tires
- Brake system
- Body
- Body elements
- Electrical equipment
- Equipment and devices
- Electrical circuits