
Table of contents: Removal ↓ Installation ↓
- Home
- BMW 5 Series
- E28
- Transmission
- Clutch
- Removal and installation the clutch master cylinder
Removal and installation the clutch master cylinder (BMW 5 Series E28)
Hydraulic fluid is poisonous. It also dissolves paint well. Be careful not to let the fluid come into contact with exposed skin or eyes. Keep a rag handy to soak up spills, and if it comes into contact with painted surfaces, rinse immediately with plenty of cold water.
Removal
1. Remove the brake fluid reservoir cap (for left-hand drive models) or a reservoir with hydraulic clutch fluid (for right-hand drive models) and use a syringe to remove fluid from the reservoir. On left-hand drive models, the fluid level should be below the brake line connection to the master cylinder.
2. On right-hand drive models, disconnect the hydraulic hose from the bottom of the reservoir and drain any remaining fluid.
3. Loosen the union nut and disconnect the clutch hydraulic line nipple from the front of the master cylinder.
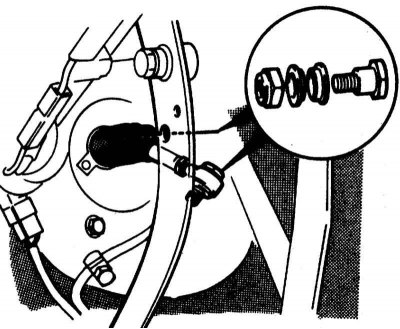
4. Working under the instrument panel, remove the lower trim panel on the driver's side (see chapter Body). Loosen the bolt securing the clutch master cylinder push rod to the clutch pedal.
5. Loosen the two bolts that secure the master cylinder to the clutch pedal bracket, disconnect the hydraulic hose from the top of the master cylinder, and remove the master cylinder. Keep a rag handy to catch any spilled fluid.
Installation
1. Installation is basically the reverse of removal. Where applicable, ensure that the over-center helper spring is correctly seated in the guide. Remember to tighten the master cylinder mounting bolts to the specified torque. Tighten the clutch hydraulic line union nut securely.
2. Check the clutch pedal adjustment (see section Adjusting the clutch pedal). Where provided, also check the clutch switch adjustment (see section Checking the operation and replacing the clutch switch (where provided)).
3. Fill the reservoir with fresh hydraulic fluid and bleed the clutch system (see section Bleeding the hydraulic clutch system).
This article is available at russian, bulgarian, belarusian, ukrainian, serbian, croatian, romanian, polish, slovak, hungarian
Article verified: Zhuravleva Isolda
Share information:
Previous articles
БМВ E28: Clutch
Next articles
Similar articles on other types of BMW cars:
Removal and installation the clutch master cylinder BMW 3 Series E21 (1975-1983)
Clutch Master Cylinder — Removal, Inspection and Installation BMW 3 Series E46 (1998-2006, petrol)
Clutch slave cylinder — removal and installation BMW 7 Series E32 (1986-1994)
Removal and installation of the brake master cylinder and its… BMW 7 Series E38 (1994-2001)
Removal and installation the clutch master cylinder BMW X3 E83 (2003-2010)
Removal and installation the clutch BMW X5 E53 (1999-2006)
Link in different formats to this page
Visitor comments
No comments yet
- General information
- Governing bodies
- Manual
- Maintenance
- Power unit
- Engine repair
- Lubrication system
- Cooling system
- Ignition system
- Supply system
- Injection system (gasoline)
- Injection system (diesel)
- Exhaust system
- Transmission
- Clutch
- Car gearbox
- Front axle
- Rear axle
- Chassis
- Steering
- Brake system
- Wheels and tires
- Body
- Interior
- Exterior
- Heating system
- Electrical equipment
- Equipment and devices
- Power devices
- Windscreen wipers
- Electrical circuits
- General information
- Manual
- Maintenance
- Power unit
- Engine repair
- Ignition system
- Engine lubrication system
- Cooling system
- Fuel system (gasoline)
- Fuel system (diesel)
- Exhaust system
- Transmission
- Clutch
- Car gearbox
- Chassis
- Front and rear suspension
- Steering
- Brake system
- Body
- Exterior
- Interior
- Electrical equipment
- Heating system
- Equipment and devices
- Power devices
- Electrical circuits
- General information
- Manual
- Maintenance
- Power unit
- Engine in a car
- Engine overhaul
- Cooling system
- Supply system
- Ignition system
- Control system
- Transmission
- Clutch
- Manual gearbox
- Automatic gearbox
- Transmission line
- Chassis
- Steering
- Front suspension
- Rear suspension
- Brake system
- Body
- Body elements
- Car care and painting
- Electrical equipment
- Heater and air conditioner
- Equipment and devices
- Starter and generator
- Electrical circuits
- General information
- Operation and maintenance
- Specifications
- Power unit
- Engine repair
- Cooling and lubrication system
- Supply system
- Ecotronic power supply system
- Fuel injection system
- Ignition system
- Transmission
- Clutch
- Gearbox BMW 242/4
- Gearbox Getrag 262/8
- Gearbox Getrag 265/6
- Automatic gearbox
- Cardan gear
- Rear axle
- Chassis
- Steering
- Front suspension
- Rear suspension
- Brake system
- Electrical equipment
- Equipment and devices
- Electrical circuits