



- Home
- BMW 5 Series
- E34
- Body
- Exterior
- Removal and installation the outside door handle and lock cylinder
Removal and installation the outside door handle and lock cylinder (BMW 5 Series E34)
The outer handle and the front door lock cylinder are installed together from the inside and cannot be removed separately.
Remove the inner door trim.
Remove the foam trim from the top of the door.
The window must be closed.
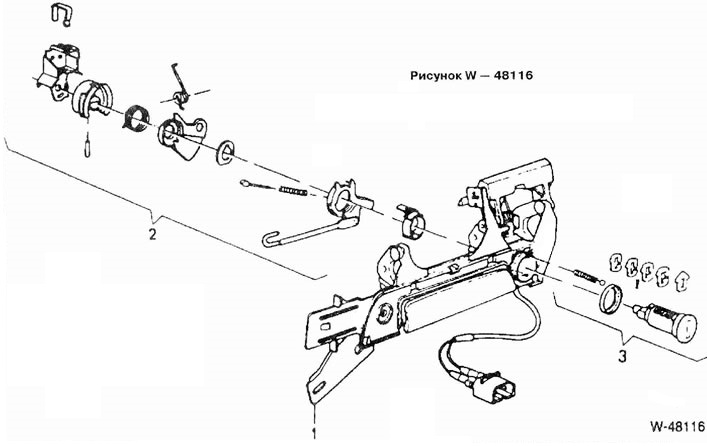
Figure W - 48116. Outside Door Handle / Lock Cylinder
1 Door handle
2 Additional details of the lock cylinder
3 Lock cylinder
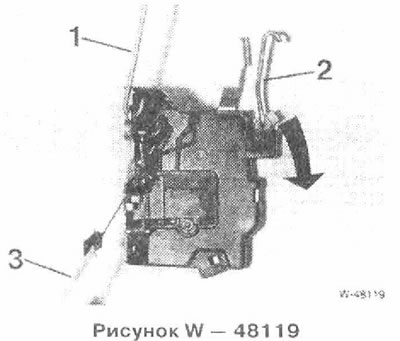
Disconnect the connecting rod from the door lock. To do this, move the plastic cover of the lock "arrow" to the side. After that, pull the hook of the rod from the lever.
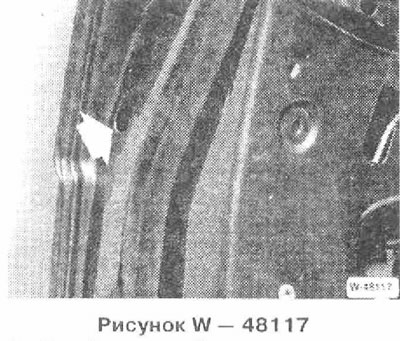
Use a narrow screwdriver to separate the "arrow" cover.
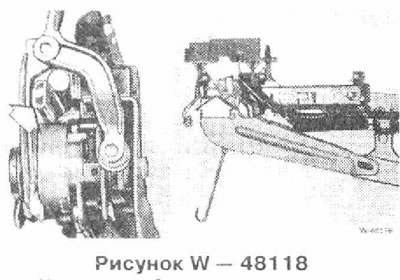
Press the bolt through the freed hole in the door with a screwdriver. This will release the door handle trim, which can be removed. The figure shows the bolt with the door handle removed.
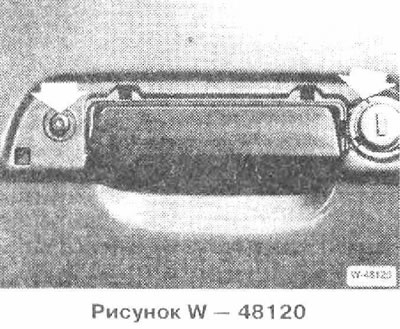
Unscrew the left bolt and the right nut (using BMW tool 512070). The nut can also be carefully loosened using a hammer and punch.
Disconnect all door lock connectors.
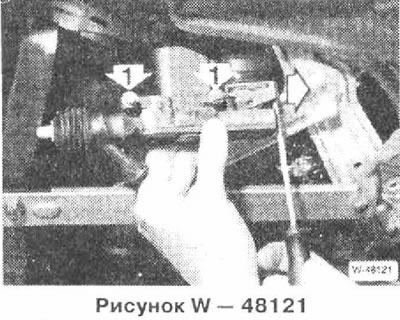
Pull the door handle out of the door cutout and disconnect the central locking system connector.
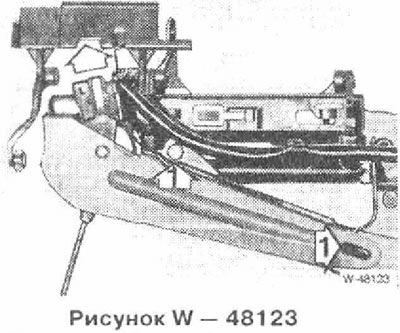
Loosen bolts 1 and remove the trim and the central control locking system drive.
Remove the central locking system microswitch with the bracket.
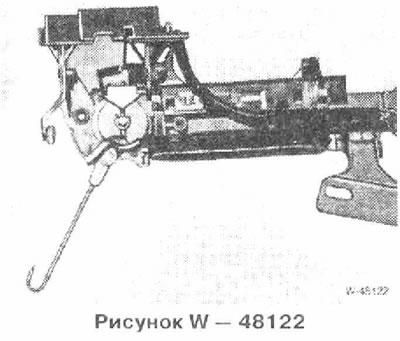
Insert the key into the lock cylinder and carefully push down the pin with the "arrow" slot.
Compress the lock cylinder and pull out the cam bushing and spring. When installing, assemble all parts in the same places.
Remove the locking rods as a set. Carefully pull the lock cylinder out.
Assemble the door handle and lock cylinder. Install the elements of the central control lock system.
Insert the assembly and connect all connectors.
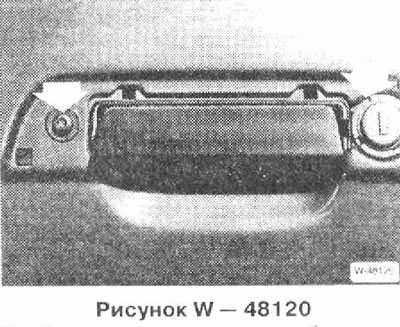
Tighten the door handle with a bolt and nut.
Connect the connecting rod to the lock and secure it. Set the rotary latch to the "closed" position and turn the key in the lock cylinder to the "closed" position.
Check all closing functions.
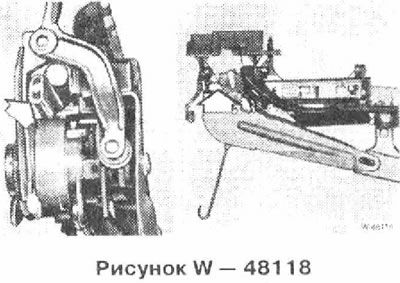
Place the door handle trim on the outside and use a suitable hook through the hole in the door above the lock (for example. BMW 513140 or HAZET 2184-2) pull out the "arrow" bolt. This will fix the door handle trim. The figure shows the bolt with the door handle removed.
Put on the overlay.
Install the door seal and trim.
Removal
Remove the inner door trim.
Remove the foam trim from the top of the door.
The window must be closed.
Figure W - 48116. Outside Door Handle / Lock Cylinder
1 Door handle
2 Additional details of the lock cylinder
3 Lock cylinder
Disconnect the connecting rod from the door lock. To do this, move the plastic cover of the lock "arrow" to the side. After that, pull the hook of the rod from the lever.
Use a narrow screwdriver to separate the "arrow" cover.
Press the bolt through the freed hole in the door with a screwdriver. This will release the door handle trim, which can be removed. The figure shows the bolt with the door handle removed.
Note: When installing, a suitable hook is required for removal.
Unscrew the left bolt and the right nut (using BMW tool 512070). The nut can also be carefully loosened using a hammer and punch.
Caution: Do not scratch the paint, cover the surrounding surface with adhesive tape. Replace the damaged nut.
Disconnect all door lock connectors.
Note: When installing, it is impossible to mix up the connectors, as only the corresponding connectors fit together.
Pull the door handle out of the door cutout and disconnect the central locking system connector.
Removal the lock cylinder
Loosen bolts 1 and remove the trim and the central control locking system drive.
Remove the central locking system microswitch with the bracket.
Note: The microswitch is marked depending on which door it is installed on: L = left, R = right.
Insert the key into the lock cylinder and carefully push down the pin with the "arrow" slot.
Attention: If you do not have sufficient experience, visit a service station.
Compress the lock cylinder and pull out the cam bushing and spring. When installing, assemble all parts in the same places.
Remove the locking rods as a set. Carefully pull the lock cylinder out.
Note: If the crackers are difficult to move, visit a service station. Using the old keys, the service station can assemble a new lock cylinder suitable for your car using a cylinder repair kit. The repair kit also contains cracker grease.
Installation
Assemble the door handle and lock cylinder. Install the elements of the central control lock system.
Insert the assembly and connect all connectors.
Tighten the door handle with a bolt and nut.
Connect the connecting rod to the lock and secure it. Set the rotary latch to the "closed" position and turn the key in the lock cylinder to the "closed" position.
Check all closing functions.
Place the door handle trim on the outside and use a suitable hook through the hole in the door above the lock (for example. BMW 513140 or HAZET 2184-2) pull out the "arrow" bolt. This will fix the door handle trim. The figure shows the bolt with the door handle removed.
Put on the overlay.
Install the door seal and trim.
This article is available at russian, bulgarian, belarusian, ukrainian, serbian, croatian, romanian, polish, slovak, hungarian
Article verified: Polikarpov Saveliy
Share information:
Previous articles
БМВ E34: Exterior
Next articles
Similar articles on other types of BMW cars:
Removal and installation the outside door handle and lock cylinder BMW 3 Series E36 (1990-2000)
Removal and installation the outer door handle BMW 3 Series E30 (1982-1994)
Cylinder head of gasoline engines of the M52 series — removal and… BMW 7 Series E32 (1986-1994)
Removal and installation cylinder head covers BMW 7 Series E38 (1994-2001)
Removal and installation the clutch master cylinder BMW X3 E83 (2003-2010)
Removal and installation the upper luggage door lock BMW X5 E53 (1999-2006)
Removal and installation the outside door handle and lock cylinder BMW 3 Series E36 (1990-2000)
Removal and installation the outer door handle BMW 3 Series E30 (1982-1994)
Cylinder head of gasoline engines of the M52 series — removal and… BMW 7 Series E32 (1986-1994)
Removal and installation cylinder head covers BMW 7 Series E38 (1994-2001)
Removal and installation the clutch master cylinder BMW X3 E83 (2003-2010)
Removal and installation the upper luggage door lock BMW X5 E53 (1999-2006)
Link in different formats to this page
Visitor comments
No comments yet
- General information
- Governing bodies
- Manual
- Maintenance
- Power unit
- Engine repair
- Lubrication system
- Cooling system
- Ignition system
- Supply system
- Injection system (gasoline)
- Injection system (diesel)
- Exhaust system
- Transmission
- Clutch
- Car gearbox
- Front axle
- Rear axle
- Chassis
- Steering
- Brake system
- Wheels and tires
- Body
- Interior
- Exterior
- Heating system
- Electrical equipment
- Equipment and devices
- Power devices
- Windscreen wipers
- Electrical circuits
- General information
- Manual
- Maintenance
- Power unit
- Engine repair
- Ignition system
- Engine lubrication system
- Cooling system
- Fuel system (gasoline)
- Fuel system (diesel)
- Exhaust system
- Transmission
- Clutch
- Car gearbox
- Chassis
- Front and rear suspension
- Steering
- Brake system
- Body
- Exterior
- Interior
- Electrical equipment
- Heating system
- Equipment and devices
- Power devices
- Electrical circuits
- General information
- Manual
- Maintenance
- Power unit
- Engine in a car
- Engine overhaul
- Cooling system
- Supply system
- Ignition system
- Control system
- Transmission
- Clutch
- Manual gearbox
- Automatic gearbox
- Transmission line
- Chassis
- Steering
- Front suspension
- Rear suspension
- Brake system
- Body
- Body elements
- Car care and painting
- Electrical equipment
- Heater and air conditioner
- Equipment and devices
- Starter and generator
- Electrical circuits
- General information
- Operation and maintenance
- Specifications
- Power unit
- Engine repair
- Cooling and lubrication system
- Supply system
- Ecotronic power supply system
- Fuel injection system
- Ignition system
- Transmission
- Clutch
- Gearbox BMW 242/4
- Gearbox Getrag 262/8
- Gearbox Getrag 265/6
- Automatic gearbox
- Cardan gear
- Rear axle
- Chassis
- Steering
- Front suspension
- Rear suspension
- Brake system
- Electrical equipment
- Equipment and devices
- Electrical circuits