
- Home
- BMW 5 Series
- E39
- Body
- Exterior
- Preparation for paint application
Preparation for paint application (BMW 5 Series E39)
Each time before painting, the car must be washed to avoid scratches and dirt inclusions.
Work only at temperatures above +12°C, not in direct sunlight or strong wind.
Cover the area of repair with corrugated paper (crepe) to avoid accidentally damaging the adjacent varnish.
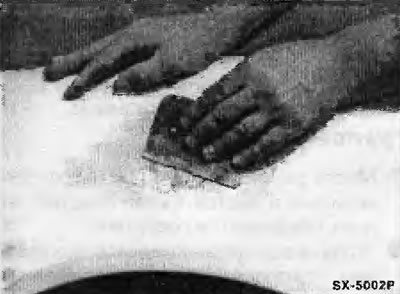
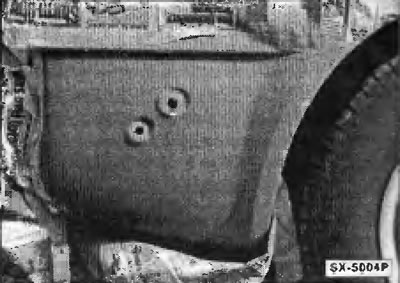
Remove all visible and blistered rust using a triangular scraper or screwdriver and 120-grit sandpaper.
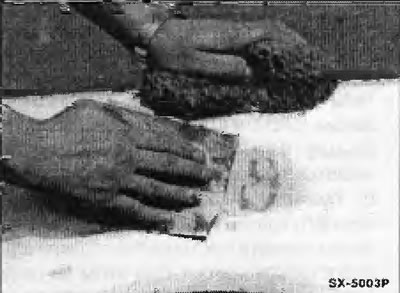
After this, sand the edges around the damaged area to a healthy varnish to a width of one to two centimeters using 320-grit sandpaper.
On galvanized body parts, sand, if possible, not down to the galvanized surface, but only down to the primer.
Applying anti-corrosion primer.
Using nitro solvent and a clean cloth, clean the repair area from dust, degrease and dry.
To avoid unexpected problems, the Primer and the varnish applied on top of it must be from the same manufacturer. Otherwise, the varnish may bubble or wrinkle.
Primer is sprayed onto the rust-free sheet metal in a very thin but continuous layer from a distance of approximately 25 cm. To avoid the aerosol settling on adjacent parts, they should be covered with adhesive tape and newspaper.
After 10-15 minutes of drying, you can apply the next layer. If the repair area needs to be filled. Primer should be completely dried beforehand.
There are two types of putty: two-component and finishing. Two-component putty is mixed with a hardener immediately before work. It hardens quickly and should be applied without delay. This putty is used to smooth out large irregularities in the sheet metal. Finishing putty is intended for the final smoothing of irregularities. It can be applied in several stages. Both types of putty are available in tubes and cans, and filling putty is also available in aerosol cans. Although the packaging often recommends applying the putty directly to the bare sheet metal, it is advisable in each case to pre-treat it with Primer.
Apply two-component filler to the area straightened or repaired with fiberglass and allow it to harden. Pay attention to the manufacturer's instructions for use.
After drying, sand the uneven areas by hand or with a sanding machine. To do this, use sandpaper with a grain size of 1 BO. You can also use waterproof sandpaper. In this case, the repair area and the sandpaper should be generously moistened with water from time to time during the sanding process (using a sponge).
Finally, wipe the repair area clean and dry.
Using a wide elastic plastic spatula, cover the repaired area with finishing putty and dry for at least two hours. It is recommended to apply finishing putty to areas with sharp roundings and bends from an aerosol can.
Depending on the thickness of the coating, the finishing putty dries well within two to three hours.
Sandpaper is differentiated by grain size. The smaller the number indicating the grain size, the rougher the sanded surface. For sanding two-component putty, a grain size of 180 to 240 is recommended; for filler putty and old varnish, wet sanding with 360 grit paper is used. For finishing wet sanding, 600 grit sandpaper is recommended.
The finished putty area is wet sanded with 360 grit sandpaper, with the water above the sanding area constantly squeezed out of the sponge. The sponge is dipped in clean water from time to time and soaked again.
For final wet sanding, special waterproof sandpaper with a grain size of 600 is best suited, while in the process of sanding both the adjacent to the sanding place and the applied varnish are sanded simultaneously. Sanding is carried out only along the longitudinal axis of the car: then the small grooves remaining after sanding under the varnish layer are barely noticeable.
Before spraying the varnish, the sanded surface, as well as the adjacent varnish at a distance of one to two palms, must be cleaned of grease and silicone residues. The best product for this is a silicone remover.
After sanding, thoroughly clean the repaired area and cover all adjacent surfaces of the car with newspaper and adhesive tape. When varnishing the fenders, also carefully cover the tires and bumper.
If possible, the repaired area should be pasted so that the varnished surface ends at the nearest trim or edge of the body, since varnish flashing forms at the edge of the pasting. If the nearest smooth transition to the original varnish coating is far away, the pasting should be done at a distance of two palms from the repaired area.
To bind dust, moisten the floor with water.
To avoid problems, the Primer and the varnish applied to it in the form of an aerosol must be from the same manufacturer. Otherwise, the pack may bubble or wrinkle. Note: It is recommended to practice the varnishing process on a piece of suitable sheet metal, for example, an old wing.
Before varnishing, the part must be dried and cleaned from dust. If possible, blow it with compressed air.
To bind dust, moisten the floor with water.
Wipe the repaired area over the varnished surface with a silicone remover. An even better base for the adhesion of the varnish is obtained by wiping the cleaned surface with a silicone-containing polishing paste.
Before use, shake the aerosol can vigorously for three minutes, otherwise varnish will form on the sheet metal.
When applying the final metallic varnish, spray some onto the paper to remove any metallic particles that may have ended up in the can's lift tube.
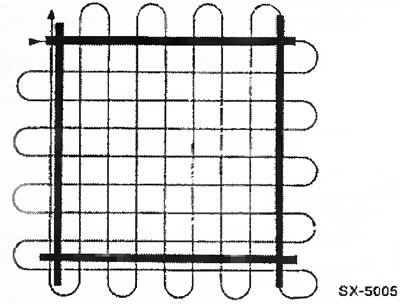
Large surfaces, whether vertical or horizontal, are sprayed crosswise, starting from the adjacent outer surface and deflecting the stream outward in the other direction.
Small surfaces are sprayed in a spiral pattern from the outside in to reduce the surface area of the spray.
Move the can at a constant speed and at the same distance relative to the surface. The recommended distance is approximately 25 cm.
To achieve the most unnoticeable transition to the previous varnish coating, it is best to apply the varnish in at least 4 layers. Each new layer should be 2-3 centimeters wider than the previous one.
The process of spraying the varnish is repeated with 5-minute pauses to add solvent until a sufficiently thick coating is formed. It is especially necessary to shake the can of metallic varnish during the pauses, as the metal particles settle quickly.
The applied metallic base coat must be covered with a clear coat, only after that the metallic coat acquires its gloss. Spraying is again done in 3-4 thin layers, with a pause of several minutes between each application of the coat. Before applying the first coat, the base coat must dry for at least 30 minutes. The surface covered with clear coat must be wider than the surface covered with the base coat by about the width of a palm. To do this, the paper coating must be moved apart accordingly.
Clean the nozzle of the spray can. To do this, turn the can upside down and spray varnish until it stops flowing.
Immediately after finishing the painting work, remove all paper coatings. Due to this, if the coating was sprayed, the liquid varnish at the transition zone can flow off.
Dry the applied varnish coating. The drying process can be accelerated using a heater or a strong photo lamp.
After the paint has dried, that is, not earlier than 48 hours later, carefully remove the paint coating on the surfaces adjacent to the repaired area using a soft polishing agent and a cotton swab. In this case, polish only along the longitudinal axis of the car.
Work only at temperatures above +12°C, not in direct sunlight or strong wind.
Rust removal
Cover the area of repair with corrugated paper (crepe) to avoid accidentally damaging the adjacent varnish.
Remove all visible and blistered rust using a triangular scraper or screwdriver and 120-grit sandpaper.
After this, sand the edges around the damaged area to a healthy varnish to a width of one to two centimeters using 320-grit sandpaper.
On galvanized body parts, sand, if possible, not down to the galvanized surface, but only down to the primer.
Applying anti-corrosion primer.
Using nitro solvent and a clean cloth, clean the repair area from dust, degrease and dry.
To avoid unexpected problems, the Primer and the varnish applied on top of it must be from the same manufacturer. Otherwise, the varnish may bubble or wrinkle.
Primer is sprayed onto the rust-free sheet metal in a very thin but continuous layer from a distance of approximately 25 cm. To avoid the aerosol settling on adjacent parts, they should be covered with adhesive tape and newspaper.
After 10-15 minutes of drying, you can apply the next layer. If the repair area needs to be filled. Primer should be completely dried beforehand.
Putty
There are two types of putty: two-component and finishing. Two-component putty is mixed with a hardener immediately before work. It hardens quickly and should be applied without delay. This putty is used to smooth out large irregularities in the sheet metal. Finishing putty is intended for the final smoothing of irregularities. It can be applied in several stages. Both types of putty are available in tubes and cans, and filling putty is also available in aerosol cans. Although the packaging often recommends applying the putty directly to the bare sheet metal, it is advisable in each case to pre-treat it with Primer.
Apply two-component filler to the area straightened or repaired with fiberglass and allow it to harden. Pay attention to the manufacturer's instructions for use.
After drying, sand the uneven areas by hand or with a sanding machine. To do this, use sandpaper with a grain size of 1 BO. You can also use waterproof sandpaper. In this case, the repair area and the sandpaper should be generously moistened with water from time to time during the sanding process (using a sponge).
Finally, wipe the repair area clean and dry.
Using a wide elastic plastic spatula, cover the repaired area with finishing putty and dry for at least two hours. It is recommended to apply finishing putty to areas with sharp roundings and bends from an aerosol can.
Depending on the thickness of the coating, the finishing putty dries well within two to three hours.
Grinding
Sandpaper is differentiated by grain size. The smaller the number indicating the grain size, the rougher the sanded surface. For sanding two-component putty, a grain size of 180 to 240 is recommended; for filler putty and old varnish, wet sanding with 360 grit paper is used. For finishing wet sanding, 600 grit sandpaper is recommended.
The finished putty area is wet sanded with 360 grit sandpaper, with the water above the sanding area constantly squeezed out of the sponge. The sponge is dipped in clean water from time to time and soaked again.
For final wet sanding, special waterproof sandpaper with a grain size of 600 is best suited, while in the process of sanding both the adjacent to the sanding place and the applied varnish are sanded simultaneously. Sanding is carried out only along the longitudinal axis of the car: then the small grooves remaining after sanding under the varnish layer are barely noticeable.
Cleaning
Before spraying the varnish, the sanded surface, as well as the adjacent varnish at a distance of one to two palms, must be cleaned of grease and silicone residues. The best product for this is a silicone remover.
After sanding, thoroughly clean the repaired area and cover all adjacent surfaces of the car with newspaper and adhesive tape. When varnishing the fenders, also carefully cover the tires and bumper.
If possible, the repaired area should be pasted so that the varnished surface ends at the nearest trim or edge of the body, since varnish flashing forms at the edge of the pasting. If the nearest smooth transition to the original varnish coating is far away, the pasting should be done at a distance of two palms from the repaired area.
To bind dust, moisten the floor with water.
Varnishing
To avoid problems, the Primer and the varnish applied to it in the form of an aerosol must be from the same manufacturer. Otherwise, the pack may bubble or wrinkle. Note: It is recommended to practice the varnishing process on a piece of suitable sheet metal, for example, an old wing.
Before varnishing, the part must be dried and cleaned from dust. If possible, blow it with compressed air.
To bind dust, moisten the floor with water.
Wipe the repaired area over the varnished surface with a silicone remover. An even better base for the adhesion of the varnish is obtained by wiping the cleaned surface with a silicone-containing polishing paste.
Before use, shake the aerosol can vigorously for three minutes, otherwise varnish will form on the sheet metal.
When applying the final metallic varnish, spray some onto the paper to remove any metallic particles that may have ended up in the can's lift tube.
Large surfaces, whether vertical or horizontal, are sprayed crosswise, starting from the adjacent outer surface and deflecting the stream outward in the other direction.
Small surfaces are sprayed in a spiral pattern from the outside in to reduce the surface area of the spray.
Move the can at a constant speed and at the same distance relative to the surface. The recommended distance is approximately 25 cm.
To achieve the most unnoticeable transition to the previous varnish coating, it is best to apply the varnish in at least 4 layers. Each new layer should be 2-3 centimeters wider than the previous one.
Note: If the varnish is sprayed from a very close distance or with too slow or changing jet speed, so-called varnish protrusions occur. This means that the varnish flows down in some places because there is too much of it in these places. The same thing occurs when the change in the direction of the jet does not occur on a surface covered with paper.
The process of spraying the varnish is repeated with 5-minute pauses to add solvent until a sufficiently thick coating is formed. It is especially necessary to shake the can of metallic varnish during the pauses, as the metal particles settle quickly.
Note: It is very difficult to ensure that the colour of the metallic varnish used matches the original varnish. Pigmentation (distribution of aluminum particles) becomes more uniform if the last layer is applied from a distance of 30 cm instead of 25 cm. Some leveling of the color tone can be achieved by using this technique: a slow movement of the hand, and thus a saturated coating, makes the color tone darker, while a fast movement of the stream makes it, on the contrary, lighter.
The applied metallic base coat must be covered with a clear coat, only after that the metallic coat acquires its gloss. Spraying is again done in 3-4 thin layers, with a pause of several minutes between each application of the coat. Before applying the first coat, the base coat must dry for at least 30 minutes. The surface covered with clear coat must be wider than the surface covered with the base coat by about the width of a palm. To do this, the paper coating must be moved apart accordingly.
Clean the nozzle of the spray can. To do this, turn the can upside down and spray varnish until it stops flowing.
Immediately after finishing the painting work, remove all paper coatings. Due to this, if the coating was sprayed, the liquid varnish at the transition zone can flow off.
Dry the applied varnish coating. The drying process can be accelerated using a heater or a strong photo lamp.
Caution: Do not use a heating device with a fan, as particles raised by the air flow will stick to the fresh coating.
After the paint has dried, that is, not earlier than 48 hours later, carefully remove the paint coating on the surfaces adjacent to the repaired area using a soft polishing agent and a cotton swab. In this case, polish only along the longitudinal axis of the car.
This article is available at russian, bulgarian, belarusian, ukrainian, serbian, croatian, romanian, polish, slovak, hungarian
Article verified: Ilyinsky Matvey
Share information:
Previous articles
БМВ E39: Exterior
Next articles
Similar articles on other types of BMW cars:
Application ranges/viscosity classes of motor oils BMW 3 Series E36 (1990-2000)
General preparation for engine repair BMW 7 Series E32 (1986-1994)
Electrical diagram of the mixture preparation/ignition system BMW X5 E53 (1999-2006)
Application ranges/viscosity classes of motor oils BMW 3 Series E36 (1990-2000)
General preparation for engine repair BMW 7 Series E32 (1986-1994)
Electrical diagram of the mixture preparation/ignition system BMW X5 E53 (1999-2006)
Link in different formats to this page
Visitor comments
No comments yet
- General information
- Governing bodies
- Manual
- Maintenance
- Power unit
- Engine repair
- Lubrication system
- Cooling system
- Ignition system
- Supply system
- Injection system (gasoline)
- Injection system (diesel)
- Exhaust system
- Transmission
- Clutch
- Car gearbox
- Front axle
- Rear axle
- Chassis
- Steering
- Brake system
- Wheels and tires
- Body
- Interior
- Exterior
- Heating system
- Electrical equipment
- Equipment and devices
- Power devices
- Windscreen wipers
- Electrical circuits
- General information
- Manual
- Maintenance
- Power unit
- Engine repair
- Ignition system
- Engine lubrication system
- Cooling system
- Fuel system (gasoline)
- Fuel system (diesel)
- Exhaust system
- Transmission
- Clutch
- Car gearbox
- Chassis
- Front and rear suspension
- Steering
- Brake system
- Body
- Exterior
- Interior
- Electrical equipment
- Heating system
- Equipment and devices
- Power devices
- Electrical circuits
- General information
- Manual
- Maintenance
- Power unit
- Engine in a car
- Engine overhaul
- Cooling system
- Supply system
- Ignition system
- Control system
- Transmission
- Clutch
- Manual gearbox
- Automatic gearbox
- Transmission line
- Chassis
- Steering
- Front suspension
- Rear suspension
- Brake system
- Body
- Body elements
- Car care and painting
- Electrical equipment
- Heater and air conditioner
- Equipment and devices
- Starter and generator
- Electrical circuits
- General information
- Operation and maintenance
- Specifications
- Power unit
- Engine repair
- Cooling and lubrication system
- Supply system
- Ecotronic power supply system
- Fuel injection system
- Ignition system
- Transmission
- Clutch
- Gearbox BMW 242/4
- Gearbox Getrag 262/8
- Gearbox Getrag 265/6
- Automatic gearbox
- Cardan gear
- Rear axle
- Chassis
- Steering
- Front suspension
- Rear suspension
- Brake system
- Electrical equipment
- Equipment and devices
- Electrical circuits