
Table of contents: Removal ↓ Installation ↓
- Home
- BMW 7 Series
- E32
- Transmission
- Manual gearbox
- Primary and secondary shafts — removal and installation
Primary and secondary shafts — removal and installation (BMW 7 Series E32)
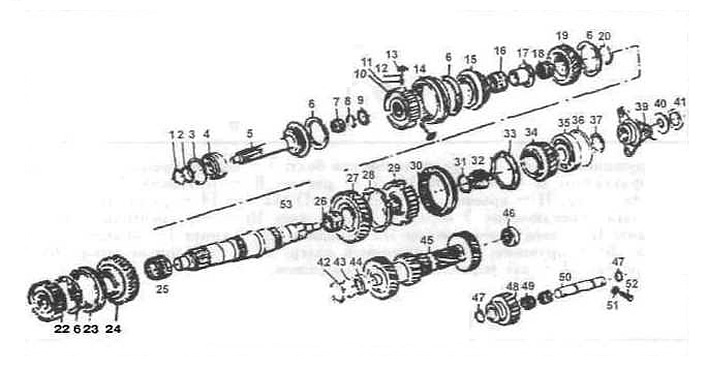
Gearbox shaft elements
1 - retaining ring;
2 - spacer washer;
3 - spacer washer;
4 — bearing;
5 — primary shaft;
6 — synchronizer ring;
7 — needle bearing separator;
8 - retaining ring;
10 — sliding clutch 3/4 gear;
11 — spring;
12 - ball;
13 - cracker;
14 — shift clutch;
15 — 3rd gear pinion;
16 — needle bearing separator;
17 - spacer sleeve;
18 — needle bearing separator;
19 — second gear pinion;
20 — retaining ring;
22 - sliding clutch;
23 — shift clutch;
24 — first gear pinion;
25 — needle bearing separator;
26 — needle bearing separator;
27 — reverse gear;
28 — synchronizer ring;
29 - sliding clutch;
30 — shift clutch;
31 - retaining ring;
32 — needle bearing separator;
33 — synchronizer ring;
34 — first gear pinion;
35 — bearing;
36 - spacer washer;
37 — adjusting washer;
39 — secondary shaft flange;
40 - flange nut;
41 - safety plate;
42 - retaining ring;
43 - spacer washer;
44 - roller bearing;
45 — intermediate shaft;
46 - roller bearing;
47 - retaining ring;
48 — reverse gear;
49 — needle bearing separator;
50 — intermediate gear axis;
51 - spring washer;
52 — bolt M8x25;
53 — secondary shaft.
Removal
Remove the PTO shaft flange using the tool (replace the safety plate).
Remove the mounting plate and cover. Remove the springs and balls.
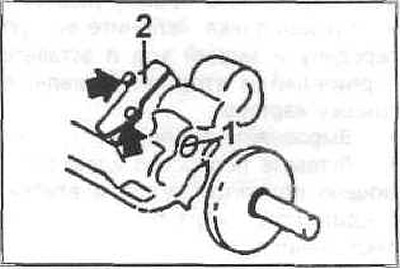
Remove the pin with the reverse gear needle bearing.
Remove the shift lever pin.
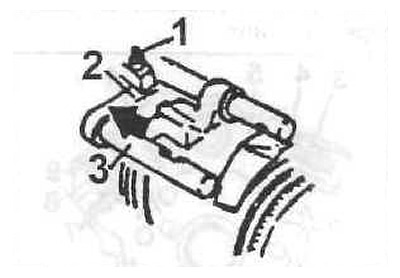
1 - pin;
2 - lever;
3 — shift rod.
Remove the shift fork shaft.
Remove the shift lever. Engage fourth gear and knock out the pin.
Remove the shift control shaft. The gasket comes out too.
Knock out the 3/4 shift fork spacer pin.
Remove the rod forward. Watch the locking pin.
Engage 2nd gear and reverse together.
Remove the primary, secondary and intermediate shafts.
Place a block under the puller jaws to avoid damaging the surface. When pushing, make sure the rod does not jam.
Please note: For versions with springs of different lengths: the shorter spring (15.9 mm) belongs to the 5th gear/reverse gear shift rod.
Installation
Insert the 3/4, 1/2 and 5/R shift forks.
Remove all lock balls from the crankcase.
Insert the roller bearing with the larger diameter facing out.
Lubricate the retaining ring and clips.
Heat the inner race of the radial bearing to 80°C with warm air. Engage second gear and reverse and insert the primary and secondary shafts into the crankcase cover.
Align the shift rod.
Insert the shafts completely using the tool and bushing. Make sure that the shift rods do not jam.
Set the rods to neutral. Insert the 3/4 gear rod through the fork.
Insert the lubricated spacer pin (6) into the 3/4 gear rod. Shift shaft locking elements.
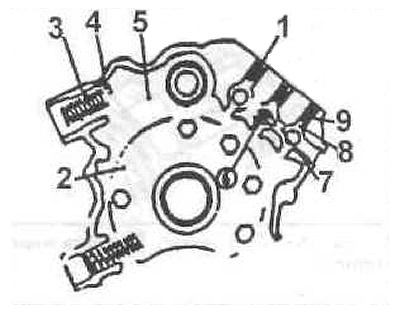
Shift shaft locking elements
1 - spring;
2 - lid;
3 - spring;
4 — finger;
5 - lever;
6 — retainer;
7 - ball;
8 - ball;
9 — spring.
Move the rod to the hole, the groove on the shaft should be facing up.
Insert two locking balls into the 1/2 and 5th gear/reverse rods.
Insert the 3/4 gear rod until it locks into place.
Drive a 6x24 spacer pin into the 3/4 shift fork while holding the fork.
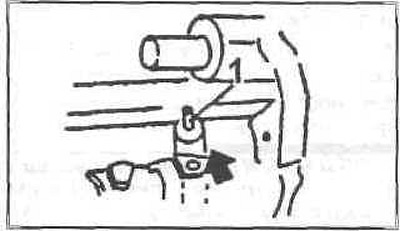
Insert three locking balls with springs.
Install the lid with a flat gasket.
Drive the shift pin expansion pin in completely.
Place four lubricated rollers onto the shift control shaft.
Move the shift control shaft while inserting the shift pin. The groove on the shaft points outward.
Secure the pin to the shaft with a 6x24 spacer pin while holding the shaft.
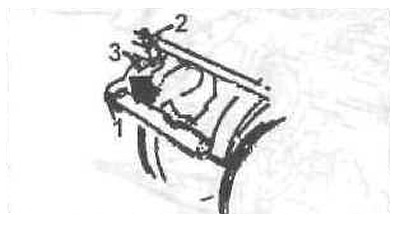
1 - groove;
2 - pins;
3 — lever.
Install the shift fork rod with the groove on the rod facing up.
Insert the shift lever. The fine spline faces up.
Install the pin.
Coat the crankcase in the reverse pin area with silicone grease.
Install the reverse pin with the gear and needle bearing. Secure the pin with a bolt.
Install the reverse gear mounting plate by pressing outward.
Install the input shaft flange. Insert the flange nut.
Install the safety plate.
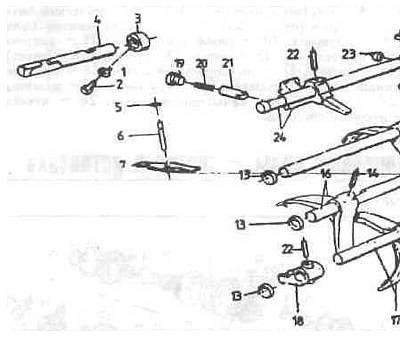
Gearbox shift fork
1 - spring washer;
2 - cylindrical bolt;
3 — fastening ring;
4 — shaft;
5 — retainer;
6 - finger 6x34;
7 - lever;
8 — spring;
9 - ball;
10 — retainer;
11 — lid;
12 — cover D=12 mm;
14 - expansion pin;
15 — 5th gear/reverse gear shift rod;
16 — 3/4 gear shift rod;
17 — shift rod 1/2 gear;
18 — clamp 1/2 gear;
19 — cork;
20 — spring;
21 - locking pin;
22 - spacer pin 6x28;
23 — video;
24 — shift control shaft.
This article is available at russian, bulgarian, belarusian, ukrainian, serbian, croatian, romanian, polish, slovak, hungarian
Article verified: Sevastyanov Nikolay
Share information:
Previous articles
БМВ E32: Manual gearbox
Next articles
Similar articles on other types of BMW cars:
Removal and installation differential output shafts BMW 3 Series E21 (1975-1983)
Removal and installation axle shafts BMW 3 Series E30 (1982-1994)
Removal and installation of primary and secondary shafts BMW 5 Series E12 (1972-1981)
Removal and installation rocker arms and rocker shafts BMW 5 Series E34 (1988-1996)
Pistons — removal and installation BMW X3 E83 (2003-2010)
Removal and installation the engine BMW X5 E53 (1999-2006)
Removal and installation differential output shafts BMW 3 Series E21 (1975-1983)
Removal and installation axle shafts BMW 3 Series E30 (1982-1994)
Removal and installation of primary and secondary shafts BMW 5 Series E12 (1972-1981)
Removal and installation rocker arms and rocker shafts BMW 5 Series E34 (1988-1996)
Pistons — removal and installation BMW X3 E83 (2003-2010)
Removal and installation the engine BMW X5 E53 (1999-2006)
Link in different formats to this page
Visitor comments
No comments yet
- General information
- Introduction to guide
- Manual
- Maintenance
- Power unit
- Engine M60/1, M60/2 (petrol)
- M62 engine (petrol)
- M57 engine (diesel)
- M67 engine (diesel)
- Cooling system
- Fuel system (petrol)
- Fuel system (diesel)
- Exhaust system
- Ignition and control systems
- Charge and launch systems
- Transmission
- Clutch
- Mechanical gearbox
- Automatic gearbox
- Cardan and drive shafts
- Chassis
- Brake system
- Front suspension
- Rear suspension
- Steering
- Body
- Exterior
- Interior
- Electrical equipment
- Equipment and devices
- Lighting
- Heating and air conditioning
- Electrical circuits
- General information
- Care and maintenance
- Power unit
- Minor engine repair
- Engine overhaul
- Lubrication system
- Cooling system
- Ignition system
- Supply system
- Injection system (petrol)
- Injection system (diesel)
- Exhaust system
- Transmission
- Clutch
- Manual gearbox
- Automatic gearbox
- Cardan gear
- Rear axle and shafts
- Chassis
- Front suspension
- Rear suspension
- Steering
- Wheels and tires
- Brake system
- Body
- Body elements
- Electrical equipment
- Equipment and devices
- Electrical circuits