
Table of contents: Removal ↓ Installation ↓
- Home
- BMW 7 Series
- E32
- Transmission
- Manual gearbox
- Gearbox — removal and installation
Gearbox — removal and installation (BMW 7 Series E32)
The description below is valid for a manual transmission.
Disconnect the ground cable from the battery.
Raise and support the vehicle, remove the exhaust system.
Remove the reverse light switch wire from the gearbox.
Unscrew the bolts and remove the coupling from the gearbox. To avoid stressing the coupling, unscrew the nuts, not the bolts, when unscrewing.
Move the driveshaft to the side and pull it off the centering pin.
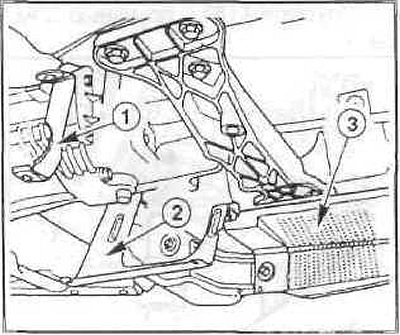
Unscrew the bolts securing the lower engine compartment supports (1) and (2), as well as the heat shield.
Remove the clutch slave cylinder.
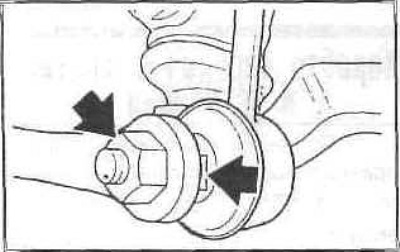
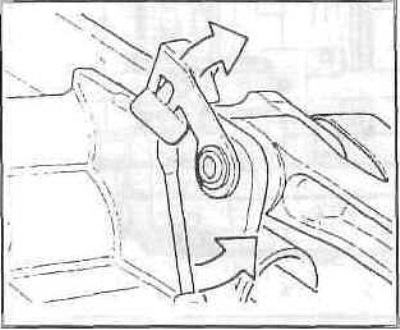
Unscrew the nuts securing the rods from the anti-roll bar on both sides. Hold the ball head with an open-end wrench by the flats (arrows). Fold the stabilizer upwards.
Insert a suitable block of wood or special tool between the oil pan and the front suspension cross member to avoid damaging the oil pan.
Lower the gearbox using a jack.
Support the engine from the front with a second floor jack, as it will tend to tilt forward after the gearbox is removed.
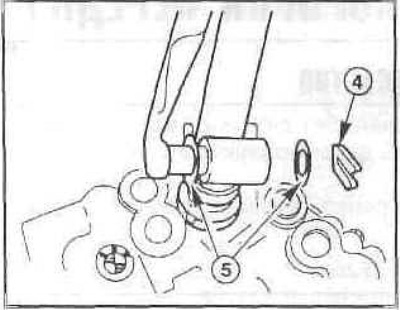
Support the mounting bracket (4) on the shift bar. Remove the washers (5) from both sides of the shift bar and pull the bar out.
Use a screwdriver to pry the shift bar support pins upward from the mount. Pull out the support pins.
Check the clutch parts before installation.
Check the release bearing for ease of movement. Lubricate the necessary places with grease.
Lubricate the splines of the gearbox input shaft with a thin layer of grease. Do not apply too much grease, otherwise it will be squeezed out onto the working surfaces of the clutch, which will lead to its damage. The required amount of grease corresponds to the size of several match heads
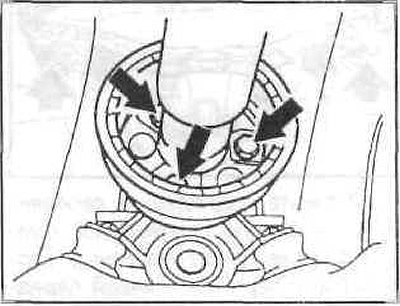
Turn on any gear on the gearbox.
Tighten the TORX bolts connecting the gearbox to the engine together with the washers.
Bolt tightening torques:
Tightening torques for hexagon head bolts:
Raise the gearbox, install the cross member and tighten the mounting bolts/nuts to 25 Nm.
Install the clutch slave cylinder.
Lubricate the shift rod bearing pins with grease and insert the pins. Fold the fasteners down.
Insert the shift rods. Place the washers on the pins and secure the rods with the mounting washers. Install the reverse light switch wire.
[The article text was copied from an online resource: «bmwman»]
Removal
Disconnect the ground cable from the battery.
Raise and support the vehicle, remove the exhaust system.
Remove the reverse light switch wire from the gearbox.
Unscrew the bolts and remove the coupling from the gearbox. To avoid stressing the coupling, unscrew the nuts, not the bolts, when unscrewing.
Move the driveshaft to the side and pull it off the centering pin.
Caution: Secure the driveshaft to the underbody with wire to prevent it from falling.
Unscrew the bolts securing the lower engine compartment supports (1) and (2), as well as the heat shield.
Remove the clutch slave cylinder.
Note: The hydraulic line remains connected.
Unscrew the nuts securing the rods from the anti-roll bar on both sides. Hold the ball head with an open-end wrench by the flats (arrows). Fold the stabilizer upwards.
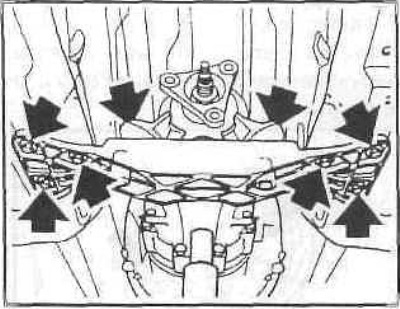
Note: Raise the gearbox slightly and support it with a floor jack. Then unscrew the nuts/bolts securing the crossmember to the underbody and to the gearbox (arrows).
Insert a suitable block of wood or special tool between the oil pan and the front suspension cross member to avoid damaging the oil pan.
Lower the gearbox using a jack.
Support the engine from the front with a second floor jack, as it will tend to tilt forward after the gearbox is removed.
Support the mounting bracket (4) on the shift bar. Remove the washers (5) from both sides of the shift bar and pull the bar out.
Use a screwdriver to pry the shift bar support pins upward from the mount. Pull out the support pins.
Installation
Check the clutch parts before installation.
Check the release bearing for ease of movement. Lubricate the necessary places with grease.
Lubricate the splines of the gearbox input shaft with a thin layer of grease. Do not apply too much grease, otherwise it will be squeezed out onto the working surfaces of the clutch, which will lead to its damage. The required amount of grease corresponds to the size of several match heads
Turn on any gear on the gearbox.
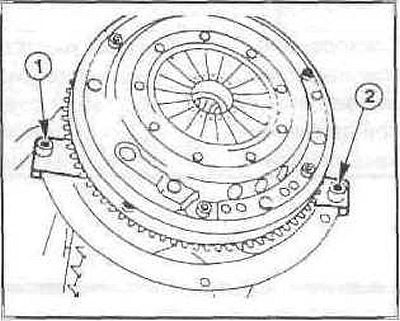
Caution: Make sure that the guide bushings (1) and (2) are in place between the engine and the gearbox. Raise the gearbox and insert it horizontally into the clutch. If the gearbox input shaft does not enter the clutch driven disc during installation, turn the input shaft from behind by the drive flange for the cardan shaft by hand.
Tighten the TORX bolts connecting the gearbox to the engine together with the washers.
Bolt tightening torques:
- with M8 thread - 25 Nm,
- with M10 thread - 45 Nm;
- with M12 thread - 70 Nm.
Tightening torques for hexagon head bolts:
- with M8 thread - 25 Nm;
- with M10 thread - 50 Nm;
- with M12 thread - 80 Nm.
Raise the gearbox, install the cross member and tighten the mounting bolts/nuts to 25 Nm.
Install the clutch slave cylinder.
Lubricate the shift rod bearing pins with grease and insert the pins. Fold the fasteners down.
Insert the shift rods. Place the washers on the pins and secure the rods with the mounting washers. Install the reverse light switch wire.
[The article text was copied from an online resource: «bmwman»]
This article is available at russian, bulgarian, belarusian, ukrainian, serbian, croatian, romanian, polish, slovak, hungarian
Article verified: Sevastyanov Nikolay
Share information:
Previous articles
БМВ E32: Manual gearbox
Next articles
Similar articles on other types of BMW cars:
Removal and installation the gearbox BMW 3 Series E21 (1975-1983)
Removal and installation of a manual gearbox BMW 3 Series E46 (1998-2006)
Removal and installation the gearbox BMW 5 Series E12 (1972-1981)
Removal and installation the gearbox BMW 5 Series E39 (1995-2003)
Pistons — removal and installation BMW X3 E83 (2003-2010)
Removal and installation of gearbox S5D 280Z BMW X5 E53 (1999-2006)
Link in different formats to this page
Visitor comments
No comments yet
- General information
- Introduction to guide
- Manual
- Maintenance
- Power unit
- Engine M60/1, M60/2 (petrol)
- M62 engine (petrol)
- M57 engine (diesel)
- M67 engine (diesel)
- Cooling system
- Fuel system (petrol)
- Fuel system (diesel)
- Exhaust system
- Ignition and control systems
- Charge and launch systems
- Transmission
- Clutch
- Mechanical gearbox
- Automatic gearbox
- Cardan and drive shafts
- Chassis
- Brake system
- Front suspension
- Rear suspension
- Steering
- Body
- Exterior
- Interior
- Electrical equipment
- Equipment and devices
- Lighting
- Heating and air conditioning
- Electrical circuits
- General information
- Care and maintenance
- Power unit
- Minor engine repair
- Engine overhaul
- Lubrication system
- Cooling system
- Ignition system
- Supply system
- Injection system (petrol)
- Injection system (diesel)
- Exhaust system
- Transmission
- Clutch
- Manual gearbox
- Automatic gearbox
- Cardan gear
- Rear axle and shafts
- Chassis
- Front suspension
- Rear suspension
- Steering
- Wheels and tires
- Brake system
- Body
- Body elements
- Electrical equipment
- Equipment and devices
- Electrical circuits