
- Home
- BMW 3 Series
- E30
- Chassis
- Brake system
- Maintenance work on the brake system
Maintenance work on the brake system (BMW 3 Series E30)
Checking the brake fluid level and the brake fluid level warning light
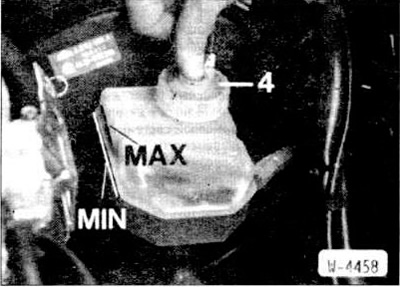
The expansion tank with brake fluid is located in the engine compartment. It has two chambers, one for each brake circuit. The tank cap has a ventilation hole that should not become clogged.
The expansion tank is transparent, which allows you to control the level of brake fluid in it at any time.
When the reservoir cap is closed, the brake fluid level should not be above the MAX mark or below the MIN mark.
Use only DOT 4 specification brake fluid.
Due to disc brake wear, the brake fluid level will drop slightly. This is normal.
If, however, there is a sharp drop in the fluid level within a short period of time, this is a sign of a leak.
The leak location must be found immediately. As a rule, the leak occurs through worn cuffs of wheel brake cylinders. For safety, it is better to perform this work at a service station.
Turn on the ignition, release the handbrake.
Remove connector "4" from the expansion tank cap.
Press your finger on the contact in the cover.
Have the assistant check in the cabin to see if the indicator lamp lights up. If not, check the wiring according to the electrical diagram.
When the brake pads of the front and rear wheels are worn out, a warning light on the dashboard lights up. In this case, the brake pads must be replaced immediately.
Mark the position of the wheel disc on the hub so that you can then install the balanced wheel in its original place. Loosen the wheel bolts.
Raise the car, remove the wheels.
Measure the thickness of the brake lining with a caliper, i.e. without the rear plate of the shoe. On drum brakes or on the hand brake, this requires removing the brake drum or brake disc.
The wear limit of the front and rear disc brake pads is reached when the thickness of the brake linings is 2 mm.
The wear limit of drum brake shoes is reached when the thickness of the brake linings is 1.5 mm.
When the wear limit is reached, replace the brake pads. Be sure to replace all pads on one axle at once.
External inspection of the brake pipeline is performed every 2000 km.
Raise the car.
Clean the brake line.
Check the pipes from the master brake cylinder to the wheel brake cylinders with a portable lamp. The master brake cylinder is located in the engine compartment under the brake system expansion tank.
The tubes should not be bent or dented. There should be no areas covered with corrosion or with abrasions. Otherwise, replace the section of the tube up to the next connection.
Brake hoses connect the tubes to the wheel brake cylinders on the moving parts of the car. They are made of a material that can withstand high pressure, but over time they can crack, swell25- or be damaged by sharp objects. In such cases, they must be replaced immediately.
To detect possible damage, bend the hoses by hand. Do not twist the hoses. Observe the color markings on the hoses!
Turn the steering wheel left and right until it stops. The brake hoses should not touch any parts of the car.
The connection points of the brake hoses and pipes must not be wet with brake fluid.
The parking brake operates on vehicles with rear drum brakes on 2 rear drum brakes.
On vehicles with rear disc brakes, the parking brake is built into the disc brakes as a drum brake. Since the parking brake is rarely used, corrosion of the brake discs or contamination of the brake pads may occur. Therefore, it is recommended to drive about 100 m at a moderate speed with the handbrake slightly applied before checking the parking brake.
Raise the rear of the vehicle.
Pull the handbrake lever 3 clicks. Turn both wheels by hand. You should feel a slight braking of the rear wheels.
Pull the handbrake lever 5 clicks. The rear wheels should now be difficult to turn by hand.
Otherwise, adjust the handbrake.
Lower the car.
The original version is on the portal: bmwman
The expansion tank with brake fluid is located in the engine compartment. It has two chambers, one for each brake circuit. The tank cap has a ventilation hole that should not become clogged.
The expansion tank is transparent, which allows you to control the level of brake fluid in it at any time.
When the reservoir cap is closed, the brake fluid level should not be above the MAX mark or below the MIN mark.
Use only DOT 4 specification brake fluid.
Due to disc brake wear, the brake fluid level will drop slightly. This is normal.
If, however, there is a sharp drop in the fluid level within a short period of time, this is a sign of a leak.
The leak location must be found immediately. As a rule, the leak occurs through worn cuffs of wheel brake cylinders. For safety, it is better to perform this work at a service station.
Checking the control lamp
Turn on the ignition, release the handbrake.
Remove connector "4" from the expansion tank cap.
Press your finger on the contact in the cover.
Have the assistant check in the cabin to see if the indicator lamp lights up. If not, check the wiring according to the electrical diagram.
Checking the thickness of brake pads
When the brake pads of the front and rear wheels are worn out, a warning light on the dashboard lights up. In this case, the brake pads must be replaced immediately.
Mark the position of the wheel disc on the hub so that you can then install the balanced wheel in its original place. Loosen the wheel bolts.
Raise the car, remove the wheels.
Measure the thickness of the brake lining with a caliper, i.e. without the rear plate of the shoe. On drum brakes or on the hand brake, this requires removing the brake drum or brake disc.
The wear limit of the front and rear disc brake pads is reached when the thickness of the brake linings is 2 mm.
The wear limit of drum brake shoes is reached when the thickness of the brake linings is 1.5 mm.
When the wear limit is reached, replace the brake pads. Be sure to replace all pads on one axle at once.
Note: A rough estimate of the service life of the front disc brake pads is a pad wear of 1 mm per 1000 km. This estimate is given for the most unfavorable operating conditions. Under normal operation, the pads last significantly longer. With a front disc brake pad thickness of 10 mm (overlay plus backplate) the remaining resource is at least 3000 km.
External inspection of the brake pipe
External inspection of the brake pipeline is performed every 2000 km.
Raise the car.
Clean the brake line.
Caution: Brake pipes are coated with a plastic layer to protect against corrosion. If this layer is damaged, the pipes may rust. For this reason, do not clean the pipes with a wire brush, sandpaper or screwdriver.
Check the pipes from the master brake cylinder to the wheel brake cylinders with a portable lamp. The master brake cylinder is located in the engine compartment under the brake system expansion tank.
The tubes should not be bent or dented. There should be no areas covered with corrosion or with abrasions. Otherwise, replace the section of the tube up to the next connection.
Brake hoses connect the tubes to the wheel brake cylinders on the moving parts of the car. They are made of a material that can withstand high pressure, but over time they can crack, swell25- or be damaged by sharp objects. In such cases, they must be replaced immediately.
To detect possible damage, bend the hoses by hand. Do not twist the hoses. Observe the color markings on the hoses!
Turn the steering wheel left and right until it stops. The brake hoses should not touch any parts of the car.
The connection points of the brake hoses and pipes must not be wet with brake fluid.
Note: If the expansion tank and gaskets are wet, this does not indicate a defective master cylinder, but rather is caused by brake fluid leaking through the vent in the reservoir cap or through the cap gasket.
Checking the parking brake
The parking brake operates on vehicles with rear drum brakes on 2 rear drum brakes.
On vehicles with rear disc brakes, the parking brake is built into the disc brakes as a drum brake. Since the parking brake is rarely used, corrosion of the brake discs or contamination of the brake pads may occur. Therefore, it is recommended to drive about 100 m at a moderate speed with the handbrake slightly applied before checking the parking brake.
Raise the rear of the vehicle.
Pull the handbrake lever 3 clicks. Turn both wheels by hand. You should feel a slight braking of the rear wheels.
Pull the handbrake lever 5 clicks. The rear wheels should now be difficult to turn by hand.
Otherwise, adjust the handbrake.
Lower the car.
The original version is on the portal: bmwman
This article is available at russian, bulgarian, belarusian, ukrainian, serbian, croatian, romanian, polish, slovak, hungarian
Article verified: Polikarpov Saveliy
Share information:
Previous articles
БМВ E30: Brake system
Next articles
Similar articles on other types of BMW cars:
Maintenance of the brake system BMW 5 Series E12 (1972-1981)
Diagnostics of brake system faults BMW 5 Series E34 (1988-1996)
Diagnostics of brake system faults BMW 7 Series E32 (1986-1994)
Checking the brake system and clutch BMW 7 Series E38 (1994-2001)
Maintenance system BMW X3 E83 (2003-2010)
Work carried out on the brake system BMW X5 E53 (1999-2006)
Maintenance of the brake system BMW 5 Series E12 (1972-1981)
Diagnostics of brake system faults BMW 5 Series E34 (1988-1996)
Diagnostics of brake system faults BMW 7 Series E32 (1986-1994)
Checking the brake system and clutch BMW 7 Series E38 (1994-2001)
Maintenance system BMW X3 E83 (2003-2010)
Work carried out on the brake system BMW X5 E53 (1999-2006)
Link in different formats to this page
Visitor comments
No comments yet
- General information
- Manual
- Maintenance
- Power unit
- Engine repair
- Cooling system
- Power system (gasoline)
- Injection system (gasoline)
- Fuel system (diesel)
- Exhaust system
- Ignition system
- Charge and launch systems
- Transmission
- Car gearbox
- Clutch and drive shafts
- Chassis
- Brake system
- Suspension front and rear
- Steering
- Body
- Body care and repair
- Exterior
- Interior
- Electrical equipment
- Troubleshooting
- Lighting and signaling
- Equipment and devices
- Heater and air conditioner
- Electrical circuits
- General information
- Manual
- Repair on the road
- Weekly checks
- Maintenance
- Troubleshooting
- Power unit
- 4 cylinder engines
- 6 cylinder engines
- Engine overhaul
- Cooling and heating
- Fuel and exhaust system
- Starting and charging system
- Ignition system
- Transmission
- Clutch
- Mechanical gearbox
- Automatic gearbox
- Cardan and drive shafts
- Chassis
- Brake system
- Wheel suspension
- Steering
- Body
- Exterior
- Interior
- Electrical equipment
- Equipment and devices
- Electrical circuits
- General information
- Maintenance
- Power unit
- Engine repair
- Cooling system
- Ignition system
- Supply system
- Fuel injection system
- Exhaust system
- Transmission
- Clutch
- Car gearbox
- Front and rear axle
- Chassis
- Steering
- Brake system
- Body
- Exterior
- Interior
- Electrical equipment
- Heating system
- Equipment and devices
- Power devices
- Electrical circuits
- Power unit
- M10/M20 engine
- M40 engine
- Ignition system
- Lubrication system
- Cooling system
- Supply system
- Fuel injection
- Exhaust system
- Transmission
- Clutch
- Manual gearbox
- Front axle
- Rear axle
- Chassis
- Steering
- Brake system
- Body
- Exterior
- Interior
- Electrical equipment
- Heating system
- Equipment and devices
- Electrical circuits
- General information
- Specifications
- Operation and maintenance
- 4-cylinder engine
- Engine repair
- Cooling and lubrication system
- Supply system
- Ignition system
- 6-cylinder engine
- Engine repair
- Cooling and lubrication system
- Supply system
- Fuel injection system
- Ignition system
- Transmission
- Clutch
- 4-speed manual gearbox
- 5-speed manual gearbox
- Automatic gearbox
- Cardan and rear axle
- Chassis
- Steering
- Front suspension
- Rear suspension
- Brake system
- Electrical equipment
- Equipment and devices
- Electrical circuits