
Table of contents: Replacing the air filter element ↓ Removal and installation the fuel…↓
- Home
- BMW 3 Series
- E30
- Power unit
- Fuel injection
- Maintenance work on the fuel injection device
Maintenance work on the fuel injection device (BMW 3 Series E30)
Replacing the air filter element
The filter element should be replaced every 20,000 km. In case of heavy dustiness, replacement should be done more often.
Removal
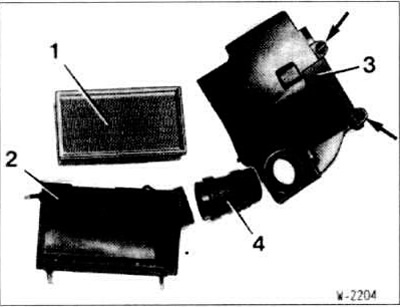
Remove air hose "4".
Pull the trim "3" upwards, after first turning the plastic clamps 90° to the left (arrows).
Release the quick-release fasteners on the air filter housing.
Tilt the air filter cover "2" downwards and remove the filter element "1". If necessary, unscrew the 2 nuts securing the upper part of the filter, lift the upper part. This will make it easier to remove the lower part of the filter.
Wipe the filter housing thoroughly.
In case of minor contamination, knock out the filter element with the dirty side down. An oily filter must be replaced.
Caution: Do not clean the filter element with gasoline or coat it with oil. Do not blow the filter with compressed air.
Installation
Place the new filter element into the cover.
If the top part was removed, insert the assembled filter into the mount and tighten the 2 nuts.
Caution: Ensure that the upper part is correctly installed in the rubber support.
Insert the air filter cover, place it from below and secure with quick-release fasteners.
Connect the trim and secure with the top latches.
Connect the air hose.
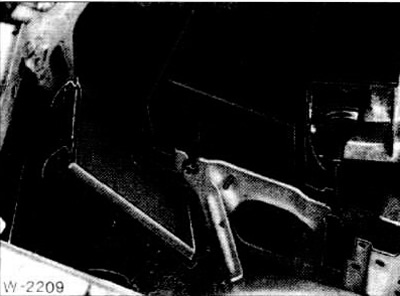
Removal and installation the fuel filter
The fuel filter is located in the engine compartment and must be replaced as part of the maintenance schedule every 60,000 km.
Removal
Connect the ground wire to the battery.
Warning: Do not make open fire! Fire hazard!
Clamp the hose from the fuel pump to the filter.
Disconnect the fuel hose from the filter that goes to the fuel distributor.
Unscrew the filter bracket and remove the fuel filter with the fuel hose.
Disconnect the fuel hose from the fuel filter, having first released and moved the clamp.
Installation
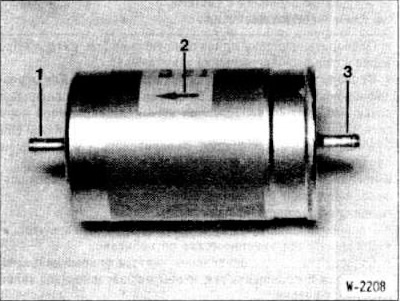
Connect the fuel hose going to the fuel distributor "1" to the new filter and secure the hose with a clamp.
Connect the fuel hose to the new filter, closed with clamp "3", and secure the hose with a clamp.
Insert the fuel filter and secure it to the bracket. When doing so, observe the correct installation position of the filter: the fuel flow passes through the filter from the bottom up. Arrow "2" on the fuel filter body should be directed along the fuel flow.
Remove the clamp from the hose.
Connect the ground wire to the battery.
Start the engine and check for fuel leaks at the connection points.
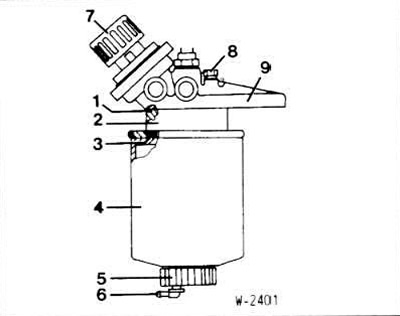
1 Sealing ring
2 Heating element
3 Sealing ring
4 Filter cartridge
5 Lid
6 Drain valve (only model 324td)
7 Hand pump (only model 324td)
8 Air release bolt
9 Filter flange
10 Removing water
Removing water and replacing the diesel engine fuel filter
Removal of water from the fuel filter should be carried out within the framework of the maintenance schedule every 10,000 km, but not less than once a year. The fuel filter should be replaced every 20,000 Nm.
Loosen the air release bolt "8" by a few turns.
Place a suitable container under the drain plug.
Model 324td: Press the drain valve "6" on the cover and drain the water sediment until clean diesel fuel flows out.
Model 324td: Bleed air from the fuel system (on the 324d model, air is removed from the fuel system automatically when the engine is started). To do this, turn the hand pump wheel "7" by 90° (¼ turn) and pump until fuel comes out through the air release bolt "8". After that, turn the hand pump wheel 90° again and thus lock the pump.
Tighten the air release bolt "8".
Replacement
Drain the sediment from the filter as when removing the water.
Unscrew the fuel filter "4" from the filter flange "9" by hand or, if it is firmly seated, with a tension wrench, for example, HAZET 2170. If the heating element "2" turns in the process, hold it with a leather belt or tension wrench.
Replace cover "5" onto the new filter.
Fill the new filter to the brim with diesel fuel and screw it on by hand.
Caution: Do not overtighten the filter. After the gasket is seated against the flange, tighten it another ½ turn.
Model 324td: Bleed air from the fuel system.
Retighten the air release bolt "8".
After the test drive, check the tightness of the fuel system.
Information obtained from this online resource «www.bmwman.ru»
This article is available at russian, bulgarian, belarusian, ukrainian, serbian, croatian, romanian, polish, slovak, hungarian
Article verified: Polikarpov Saveliy
Share information:
Previous articles
БМВ E30: Fuel injection
Next articles
Similar articles on other types of BMW cars:
Rules for maintaining cleanliness when working with a fuel injection… BMW 5 Series E34 (1988-1996)
Injection system device with a high-pressure common fuel line… BMW 5 Series E39 (1995-2003)
Diagnostics of diesel fuel injection system faults BMW 7 Series E32 (1986-1994)
Removal and installation of fuel injection pump BMW 7 Series E38 (1994-2001)
Fuel injection system injectors (N46) BMW X3 E83 (2003-2010)
Carrying out maintenance work BMW X5 E53 (1999-2006)
Link in different formats to this page
Visitor comments
No comments yet
- General information
- Manual
- Maintenance
- Power unit
- Engine repair
- Cooling system
- Power system (gasoline)
- Injection system (gasoline)
- Fuel system (diesel)
- Exhaust system
- Ignition system
- Charge and launch systems
- Transmission
- Car gearbox
- Clutch and drive shafts
- Chassis
- Brake system
- Suspension front and rear
- Steering
- Body
- Body care and repair
- Exterior
- Interior
- Electrical equipment
- Troubleshooting
- Lighting and signaling
- Equipment and devices
- Heater and air conditioner
- Electrical circuits
- General information
- Manual
- Repair on the road
- Weekly checks
- Maintenance
- Troubleshooting
- Power unit
- 4 cylinder engines
- 6 cylinder engines
- Engine overhaul
- Cooling and heating
- Fuel and exhaust system
- Starting and charging system
- Ignition system
- Transmission
- Clutch
- Mechanical gearbox
- Automatic gearbox
- Cardan and drive shafts
- Chassis
- Brake system
- Wheel suspension
- Steering
- Body
- Exterior
- Interior
- Electrical equipment
- Equipment and devices
- Electrical circuits
- General information
- Maintenance
- Power unit
- Engine repair
- Cooling system
- Ignition system
- Supply system
- Fuel injection system
- Exhaust system
- Transmission
- Clutch
- Car gearbox
- Front and rear axle
- Chassis
- Steering
- Brake system
- Body
- Exterior
- Interior
- Electrical equipment
- Heating system
- Equipment and devices
- Power devices
- Electrical circuits
- Power unit
- M10/M20 engine
- M40 engine
- Ignition system
- Lubrication system
- Cooling system
- Supply system
- Fuel injection
- Exhaust system
- Transmission
- Clutch
- Manual gearbox
- Front axle
- Rear axle
- Chassis
- Steering
- Brake system
- Body
- Exterior
- Interior
- Electrical equipment
- Heating system
- Equipment and devices
- Electrical circuits
- General information
- Specifications
- Operation and maintenance
- 4-cylinder engine
- Engine repair
- Cooling and lubrication system
- Supply system
- Ignition system
- 6-cylinder engine
- Engine repair
- Cooling and lubrication system
- Supply system
- Fuel injection system
- Ignition system
- Transmission
- Clutch
- 4-speed manual gearbox
- 5-speed manual gearbox
- Automatic gearbox
- Cardan and rear axle
- Chassis
- Steering
- Front suspension
- Rear suspension
- Brake system
- Electrical equipment
- Equipment and devices
- Electrical circuits