
- Home
- BMW 3 Series
- E36
- General information
- Maintenance
- Replacing spark plugs/checking electrical connections
Replacing spark plugs/checking electrical connections (BMW 3 Series E36)
Special tool required:
The following wearing parts must be purchased:
Remove the cylinder head cover by turning both plastic clamps ¼ turn with a coin.
Use plastic pliers to pull out the spark plug caps. The pliers are located as an on-board tool on the left next to the spark plug caps.
Blow out the spark plug recesses in the cylinder head with compressed air to prevent dirt from getting into the threaded holes when the spark plugs are removed.
Using a special spark plug wrench, remove all spark plugs.
Inspect the spark plugs. With some experience, you can tell how the engine is running by looking at the spark plug.
The following rules apply:
Electrodes and insulator
Check the spark plug insulators for leakage currents. Leakage currents leave thin, uneven marks on the surface. If traces of leakage currents cannot be completely removed, replace the spark plug.
Clean the spark plugs with a brass brush or sandblast.
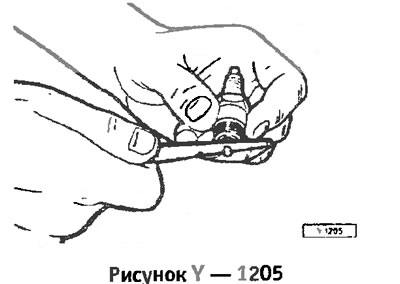
All engines except four-valve: Check the interelectrode distance using feeler gauges. Specified value: 0.8-0.9 mm. On new spark plugs, the interelectrode distance is usually set correctly.
To adjust the distance between the electrodes, bend the ground electrode. There is a simple, practical tool for this, in the absence of which you can lightly hit the electrode from the side. When bending, rest a small screwdriver on the edge of the spark plug thread, but not on the central electrode, so as not to damage it.
Clean the threads on the spark plugs with a clean cloth.
Screw the spark plugs in by hand until they stop in the cylinder head. Caution: Do not allow the spark plugs to become skewed.
Tighten the spark plugs to 25 Nm.
Models 316i/318i/3l8iS: Connect the spark plug boots according to the firing sequence 1-3-4-2. Check by rocking the spark plug boots to ensure they are securely fastened.
Screw on the ignition coils, making sure to install the paper gaskets correctly.
Check the position of the spark plug tips and install the ground jumpers for the 3rd and 6th cylinders.
Install the covers. Installation is carried out in the reverse order.
- A spark plug wrench, included in the on-board tool kit or available commercially.
- 316i/3l8i: It is also recommended to purchase special pliers, such as HAZET 1849, which make it easier to remove spark plug tips.
- 320i/325i: Screwdriver, 10mm socket head.
The following wearing parts must be purchased:
- Spark plugs of the recommended type.
- 320i/325i: 6 paper ignition coil gaskets as required.
Removal
- 316i/318i: Remove all spark plug caps, pulling on the cap rather than the wire. The pliers mentioned above make removal easier.
318is:
Remove the cylinder head cover by turning both plastic clamps ¼ turn with a coin.
Use plastic pliers to pull out the spark plug caps. The pliers are located as an on-board tool on the left next to the spark plug caps.
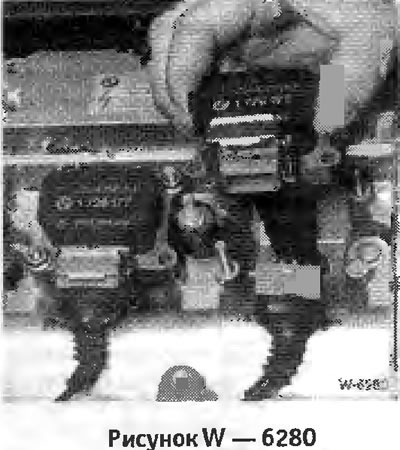
Models 320i/325i/328i:
- Remove the oil filler cap.
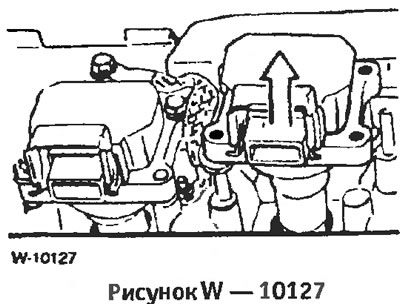
- Remove the plugs from the mounting bolts - arrows, unscrew the 2 bolts located under the plugs. Remove the cylinder head cover.
- Remove the connectors from all ignition coils by moving the connector brackets away.
- Loosen the mounting bolts of all ignition coils, pull out the ignition coils. Note: There are ground jumpers on the ignition coils of the 3rd and 6th cylinders. When installing them, they should be screwed into the same places.
Blow out the spark plug recesses in the cylinder head with compressed air to prevent dirt from getting into the threaded holes when the spark plugs are removed.
Using a special spark plug wrench, remove all spark plugs.
Inspect the spark plugs. With some experience, you can tell how the engine is running by looking at the spark plug.
The following rules apply:
Electrodes and insulator
- * Gray color = correct carburetor adjustment and normal spark plug operation.
- * Black color = enriched mixture.
- * Light grey colour = lean mixture.
- * Oiling = spark plug failure or poor piston ring seal.
Check the spark plug insulators for leakage currents. Leakage currents leave thin, uneven marks on the surface. If traces of leakage currents cannot be completely removed, replace the spark plug.
Clean the spark plugs with a brass brush or sandblast.
Installation
All engines except four-valve: Check the interelectrode distance using feeler gauges. Specified value: 0.8-0.9 mm. On new spark plugs, the interelectrode distance is usually set correctly.
To adjust the distance between the electrodes, bend the ground electrode. There is a simple, practical tool for this, in the absence of which you can lightly hit the electrode from the side. When bending, rest a small screwdriver on the edge of the spark plug thread, but not on the central electrode, so as not to damage it.
Clean the threads on the spark plugs with a clean cloth.
Screw the spark plugs in by hand until they stop in the cylinder head. Caution: Do not allow the spark plugs to become skewed.
Tighten the spark plugs to 25 Nm.
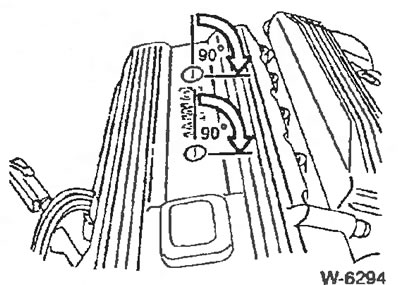
Caution: If you do not have a torque wrench, tighten the spark plug approximately 90° (¼ turn) with a spark plug wrench. Tighten used spark plugs approximately 15°. Spark plugs that are too tight may break off when being removed or the threads in the cylinder head may be damaged. In this case, repair of the spark plug holes with UTC or Heli-Coli inserts is required.
Models 316i/318i/3l8iS: Connect the spark plug boots according to the firing sequence 1-3-4-2. Check by rocking the spark plug boots to ensure they are securely fastened.
Models 320i/325i/328i
Screw on the ignition coils, making sure to install the paper gaskets correctly.
Check the position of the spark plug tips and install the ground jumpers for the 3rd and 6th cylinders.
Install the covers. Installation is carried out in the reverse order.
Checking electrical connections
- Check the tightness of all electrical connections on the ignition coil and distributor.
- Replace damaged terminals.
- Clean rusted connections with a wire brush or sandpaper and spray with contact aerosol.
- The contacts should not be wet, otherwise clean the contacts and spray with contact aerosol.
- Bend the ignition wires at a large angle and check for cracking. Replace all ignition wires if necessary.
This article is available at russian, bulgarian, belarusian, ukrainian, serbian, croatian, romanian, polish, slovak, hungarian
Article verified: Chebotarev Vladislav
Share information:
Previous articles
БМВ E36: Maintenance
Next articles
Similar articles on other types of BMW cars:
Checking and replacing spark plugs BMW 5 Series E34 (1988-1996)
Checking and replacing spark plugs BMW 5 Series E28 (1981-1988)
Replacing spark plugs BMW 7 Series E38 (1994-2001)
Valve guides — checking and replacing BMW 7 Series E32 (1986-1994)
Identifying engine faults by the condition of spark plugs BMW X3 E83 (2003-2010)
Checking and replacing spark plugs BMW X5 E53 (1999-2006)
Link in different formats to this page
Visitor comments
No comments yet
- General information
- Manual
- Maintenance
- Power unit
- Engine repair
- Cooling system
- Power system (gasoline)
- Injection system (gasoline)
- Fuel system (diesel)
- Exhaust system
- Ignition system
- Charge and launch systems
- Transmission
- Car gearbox
- Clutch and drive shafts
- Chassis
- Brake system
- Suspension front and rear
- Steering
- Body
- Body care and repair
- Exterior
- Interior
- Electrical equipment
- Troubleshooting
- Lighting and signaling
- Equipment and devices
- Heater and air conditioner
- Electrical circuits
- General information
- Manual
- Repair on the road
- Weekly checks
- Maintenance
- Troubleshooting
- Power unit
- 4 cylinder engines
- 6 cylinder engines
- Engine overhaul
- Cooling and heating
- Fuel and exhaust system
- Starting and charging system
- Ignition system
- Transmission
- Clutch
- Mechanical gearbox
- Automatic gearbox
- Cardan and drive shafts
- Chassis
- Brake system
- Wheel suspension
- Steering
- Body
- Exterior
- Interior
- Electrical equipment
- Equipment and devices
- Electrical circuits
- General information
- Maintenance
- Power unit
- Engine repair
- Cooling system
- Ignition system
- Supply system
- Fuel injection system
- Exhaust system
- Transmission
- Clutch
- Car gearbox
- Front and rear axle
- Chassis
- Steering
- Brake system
- Body
- Exterior
- Interior
- Electrical equipment
- Heating system
- Equipment and devices
- Power devices
- Electrical circuits
- Power unit
- M10/M20 engine
- M40 engine
- Ignition system
- Lubrication system
- Cooling system
- Supply system
- Fuel injection
- Exhaust system
- Transmission
- Clutch
- Manual gearbox
- Front axle
- Rear axle
- Chassis
- Steering
- Brake system
- Body
- Exterior
- Interior
- Electrical equipment
- Heating system
- Equipment and devices
- Electrical circuits
- General information
- Specifications
- Operation and maintenance
- 4-cylinder engine
- Engine repair
- Cooling and lubrication system
- Supply system
- Ignition system
- 6-cylinder engine
- Engine repair
- Cooling and lubrication system
- Supply system
- Fuel injection system
- Ignition system
- Transmission
- Clutch
- 4-speed manual gearbox
- 5-speed manual gearbox
- Automatic gearbox
- Cardan and rear axle
- Chassis
- Steering
- Front suspension
- Rear suspension
- Brake system
- Electrical equipment
- Equipment and devices
- Electrical circuits