



Table of contents: Oil pan on 316i, 318i models ↓ Models 320i, 325i, 328i ↓
- Home
- BMW 3 Series
- E36
- Power unit
- Engine repair
- Removal and installation the oil pan
Removal and installation the oil pan (BMW 3 Series E36)
Oil pan on 316i, 318i models
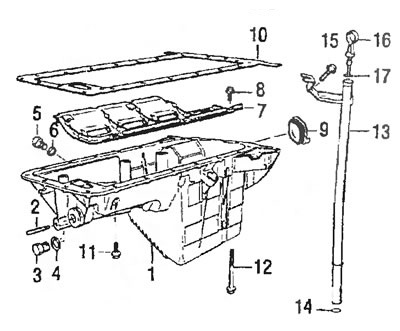
Figure W—1625
1. Oil pan
2. Hairpin
3. Cork
4. Sealing ring
5. Oil drain plug
6. Sealing ring, size A12x15.5-AL
7. Tray
8. Bolt
9. Lid
10. Oil pan gasket
11. Bolt
12. Bolt
13. Guide tube
14. O-ring
15. Bolt
16. Oil dipstick
17. O-ring
Models 320i, 325i, 328i
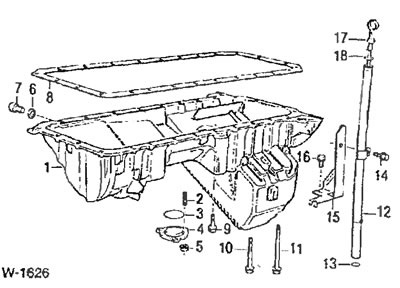
Drawing W 1626
1. Oil pan W-1634
2. Hairpin
3. O-ring
4. Cork
5. Nut
6. Sealing ring, size A12xl5.5-AL
7. Oil drain plug
8. Oil pan gasket
9. Bolt
10. Bolt
11. Bolt
12. Guide tube
13. O-ring
14. Bolt
15. Bracket
16. Bolt
17. Oil dipstick
18. O-ring
Removal
Caution: Due to the lack of space to remove the oil pan, it is necessary to loosen both engine mounts and lift the engine forward. A detailed description of these operations is given in the section "Removal and installation the engine".
Disconnect the ground wire from the battery.
Caution: When the battery is disconnected, the information in the electronic memory devices, such as the engine fault memory or the radio security code memory, is erased. When disconnecting the battery, follow the instructions in the sections "Radio" and "Removing and installing the battery".
Note: On vehicles with a six-cylinder engine, the battery is located in the luggage compartment on the right next to the spare wheel.
Raise the car.
If present, remove the engine compartment protective tray.
Drain the oil from the engine.
Unscrew the muffler pipe from the manifold. Remove the exhaust system as a complete set.
Remove the air filter housing by disconnecting the air intake hose from the throttle valve fitting.
Six-cylinder engine: Unbolt from the top of the radiator, unbolt from the generator and remove the generator ventilation duct.
Remove the heater fresh air supply duct.
Remove the fan.
Unscrew the guide tube of the oil dipstick, for which unscrew the bolt "14" (Six-cylinder engine, Design W 1626) or "15" (Four-cylinder engine. Drawing W 1625). Remove the guide tube from the oil pan.
Unscrew the expansion tank of the hydraulic power steering system (2 bolts) and pull the tank forward.
Remove the alternator/power steering pump V-belt.
Unscrew the power steering pump (3 bolts) and hang it on the side on a wire with the hoses connected.
If available, unscrew the air conditioner compressor and hang it on the side with a wire and the hoses attached.
Unscrew the left and right engine mounts from above.
From the bottom of the car, loosen the nuts on both engine mounts by 4 turns.
Hook the engine with cables and lift it on a lift. If there is no suitable lift, pull a cable through the bars on the engine and slide a sufficiently strong pipe under the cable and rest it on sufficiently strong supports or on the gutters of the front wings.
Caution: Do not rest the pipe on the front fenders. Raise the engine slowly, making sure that the wires and hoses do not stretch or rub.
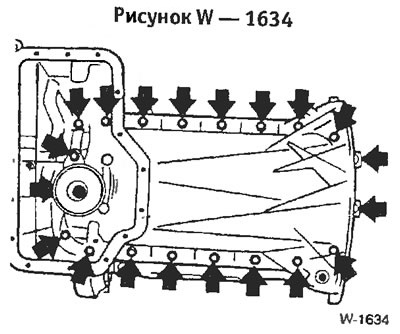
318is/ti models only: To access the mounting bolts, remove the lower part of the oil pan.
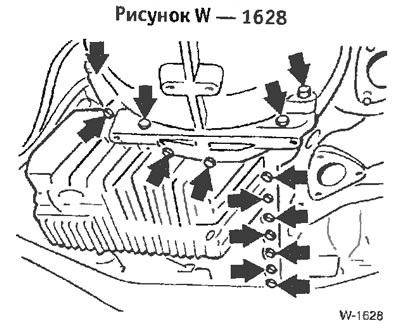
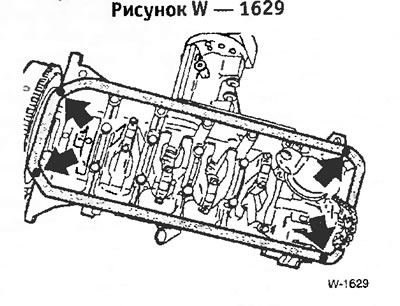
Remove the front and rear oil pan bolts (see picture) and lower the oil pan. A narrow wrench head with an extension is required to loosen the two front bolts.
320i, 325i, 328i models only: Remove the oil pump, otherwise the oil pan cannot be removed.
Pull the oil pan back.
Installation
Clean the surfaces of the oil pan and engine block.
Cover the transitions of the gearbox cover and the upper cover with an elastic sealing compound "3 Bond 1209".
Glue the new gasket with grease, then check the position of the gasket.
Attention: The gasket must be replaced.
Install the oil pan.
Models 320i,325i,328i: Insert the oil pump. Tighten the bolts to 20 Nm. There must be 2 centering sleeves installed between the engine block and the oil pump housing. Insert the sprocket with the chain on and tighten the nut (left hand thread) with a tightening torque of 25 Nm.
Tighten the oil pan bolts by hand. Then tighten them to 10 Nm.
Model 318is/ti: Tighten the lower part of the oil pan with a new gasket and tighten the bolts to 10 Nm.
Insert and screw on the guide tube with a new O-ring.
Install the engine. Installation is performed in the reverse order. Tighten both engine supports with a tightening torque of 45 Nm.
Fill the engine with oil. The marks on the rod indicate the oil level in the engine. The difference between the min and max marks is 1 liter.
Lower the car.
Connect the ground wire to the battery.
After a test drive, check the oil pan for leaks and, if necessary, carefully tighten all bolts.
Install the engine compartment protective tray.
The original article is available on the website: «BMWman»
This article is available at russian, bulgarian, belarusian, ukrainian, serbian, croatian, romanian, polish, slovak, hungarian
Article verified: Chebotarev Vladislav
Share information:
Previous articles
БМВ E36: Engine repair
Next articles
Similar articles on other types of BMW cars:
Removal and installation the oil pan BMW 5 Series E12 (1972-1981)
Cylinder Head Cover — Removal and Installation BMW 7 Series E32 (1986-1994)
Pistons — removal and installation BMW X3 E83 (2003-2010)
Removal and installation the engine BMW X5 E53 (1999-2006)
Removal and installation the oil pan BMW 5 Series E12 (1972-1981)
Cylinder Head Cover — Removal and Installation BMW 7 Series E32 (1986-1994)
Pistons — removal and installation BMW X3 E83 (2003-2010)
Removal and installation the engine BMW X5 E53 (1999-2006)
Link in different formats to this page
Visitor comments
No comments yet
- General information
- Manual
- Maintenance
- Power unit
- Engine repair
- Cooling system
- Power system (gasoline)
- Injection system (gasoline)
- Fuel system (diesel)
- Exhaust system
- Ignition system
- Charge and launch systems
- Transmission
- Car gearbox
- Clutch and drive shafts
- Chassis
- Brake system
- Suspension front and rear
- Steering
- Body
- Body care and repair
- Exterior
- Interior
- Electrical equipment
- Troubleshooting
- Lighting and signaling
- Equipment and devices
- Heater and air conditioner
- Electrical circuits
- General information
- Manual
- Repair on the road
- Weekly checks
- Maintenance
- Troubleshooting
- Power unit
- 4 cylinder engines
- 6 cylinder engines
- Engine overhaul
- Cooling and heating
- Fuel and exhaust system
- Starting and charging system
- Ignition system
- Transmission
- Clutch
- Mechanical gearbox
- Automatic gearbox
- Cardan and drive shafts
- Chassis
- Brake system
- Wheel suspension
- Steering
- Body
- Exterior
- Interior
- Electrical equipment
- Equipment and devices
- Electrical circuits
- General information
- Maintenance
- Power unit
- Engine repair
- Cooling system
- Ignition system
- Supply system
- Fuel injection system
- Exhaust system
- Transmission
- Clutch
- Car gearbox
- Front and rear axle
- Chassis
- Steering
- Brake system
- Body
- Exterior
- Interior
- Electrical equipment
- Heating system
- Equipment and devices
- Power devices
- Electrical circuits
- Power unit
- M10/M20 engine
- M40 engine
- Ignition system
- Lubrication system
- Cooling system
- Supply system
- Fuel injection
- Exhaust system
- Transmission
- Clutch
- Manual gearbox
- Front axle
- Rear axle
- Chassis
- Steering
- Brake system
- Body
- Exterior
- Interior
- Electrical equipment
- Heating system
- Equipment and devices
- Electrical circuits
- General information
- Specifications
- Operation and maintenance
- 4-cylinder engine
- Engine repair
- Cooling and lubrication system
- Supply system
- Ignition system
- 6-cylinder engine
- Engine repair
- Cooling and lubrication system
- Supply system
- Fuel injection system
- Ignition system
- Transmission
- Clutch
- 4-speed manual gearbox
- 5-speed manual gearbox
- Automatic gearbox
- Cardan and rear axle
- Chassis
- Steering
- Front suspension
- Rear suspension
- Brake system
- Electrical equipment
- Equipment and devices
- Electrical circuits