
- Home
- BMW 3 Series
- E46
- General information
- Maintenance
- Replacing spark plugs
Replacing spark plugs (BMW 3 Series E46)
General information
1. Proper spark plug operation is vital to the engine's performance and power output. Obviously, the spark plugs must be matched to the engine (the recommended type of spark plugs is listed at the beginning of this chapter). If you use this type of spark plugs and the engine is in good condition, the spark plugs do not require attention until their scheduled replacement. Cleaning of spark plugs is very rare. Do not start cleaning spark plugs without special tools, because without such tools the spark plug can be easily damaged.
Engine M43TU
2. The spark plugs are located on the right side of the cylinder head.
3. To make it easier to access the spark plugs, remove the ignition coil mounting bolts and move the coil to the side (if necessary, refer to the chapter 5B).
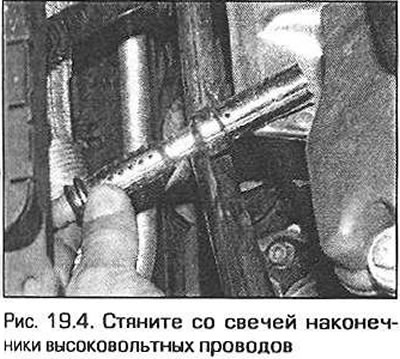
4. If the high-voltage wires are not numbered, mark them yourself with numbers from 1 to 4 in accordance with the cylinder numbers (cylinder numbering starts from the timing chain side). Pull the high-voltage wire tips off the spark plugs. Do not pull the wire, only the rubber insulator (Fig. 19.4).
5. Before removing the spark plugs, clean their sockets from dirt with a brush, vacuum cleaner or compressed air to prevent this dirt from getting into the cylinders.
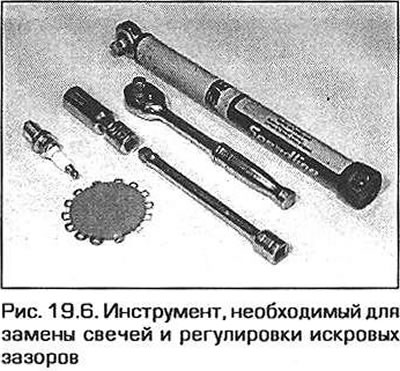
6. Remove the spark plugs using a special spark plug wrench or a socket wrench with a high head (Fig. 19.6). When removing the spark plug, hold the wrench straight, otherwise you may damage the ceramic insulator. When all the spark plugs have been removed, inspect them as follows.
7. Inspection of spark plugs allows you to learn a lot about the condition of the engine. If the tip of the insulator is clean and white, without any deposits, then the engine is running on a lean mixture, or the spark plug is overheating (a hot spark plug transfers heat from the electrodes worse than a cold one).
8. If the tip of the insulator is covered with black deposits, the mixture was too rich. If the black deposits have an oily appearance, the engine is also worn out.
9. If the tip of the insulator is covered with a gray or brown coating, then the mixture has a normal composition, and the engine is most likely in good condition.
10. When purchasing new spark plugs, it is important that they are the correct type for your vehicle.
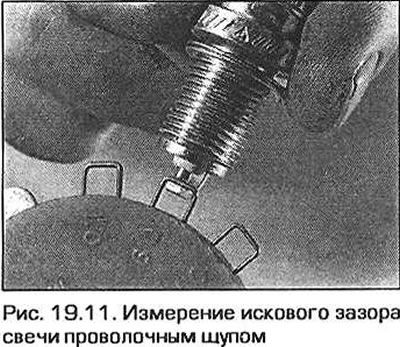
11. If the spark plug has several electrodes, the gap between the central and each of the side electrodes cannot be adjusted. If there is only one side electrode, the spark plug gap can be adjusted. If the gap is too large or too small, the length and power of the spark may not be sufficient to reliably ignite the mixture. The gap should be adjusted in accordance with the manufacturer's recommendations (fig. 19.11).
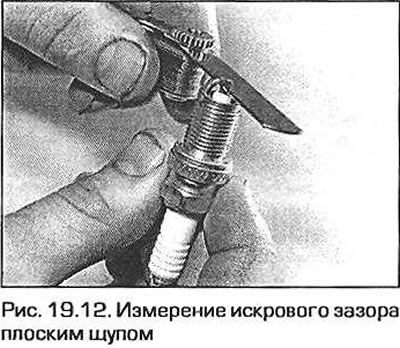
12. To adjust the gap in a spark plug with one side electrode, first measure it (fig. 19.12). Then bend the side electrode until the required gap is achieved. Never bend the center electrode - this will almost certainly crack the insulator and the spark plug can be thrown away. When using a flat feeler gauge, the gap is considered to be correctly adjusted if the feeler gauge passes through it with some friction.
13. You can use a special tool to adjust the spark plug gaps. Such a tool can be purchased at related stores.
14. Before installing new spark plugs in the engine, make sure that the threaded tips on the outer ends of the spark plugs are securely tightened. Clean the outer surfaces of the spark plug, including its threads, from dirt and protective grease. Sometimes it is difficult to start screwing in the spark plug so that the spark plug thread enters the threaded hole in the cylinder head without distortion. To avoid damaging the thread, put a piece of hose of a suitable diameter on the outer insulator of the spark plug (see Haynes advises).
It is often difficult to screw in a spark plug without skewing it. To avoid the undesirable consequences of such skewing, put a piece of rubber or plastic hose with an internal diameter of 8 mm on the insulator. The flexible hose acts as a cardan joint, helping to guide the spark plug thread into the threaded hole. If the threads are skewed, the hose will simply slide along the spark plug body and will not allow the threads to be stripped.
15. Remove the rubber tube (if you used it) and tighten the spark plug with a torque wrench, setting it to the torque specified in the Technical Data. Do the same with the other spark plugs.
16. Connect the high-voltage wires to the spark plugs and install the ignition coil in place (if it was removed).
Engine N42
17. The spark plugs are located under the ignition coils on the right side of the cylinder head.
18. Remove the ignition coils as described in chapter 5B.
19. Perform the actions specified in paragraphs 5-15 of this section.
20. Install the ignition coils in place.
6-cylinder engine
21. The spark plugs are located under the ignition coils in the central part of the cylinder head.
22. Remove the ignition coils as described in chapter 5B.
23. Remove dirt from the ignition coil seats with a brush, vacuum cleaner or compressed air to prevent this dirt from getting into the cylinders.
24. Remove the spark plugs using a special spark plug wrench or a socket wrench with a high head (see fig. 19.8). Do not tilt the key to avoid breaking the spark plug insulator.
25. Perform the actions described in paragraphs 7-15 of this section.
26. Install the ignition coils (see chapter 5B).
Information taken from this resource BMWMAN.ru
This article is available at russian, bulgarian, belarusian, ukrainian, serbian, croatian, romanian, polish, slovak, hungarian
Article verified: Ilyinsky Matvey
Share information:
Previous articles
БМВ E46: Maintenance
Next articles
Similar articles on other types of BMW cars:
Checking and replacing spark plugs BMW 5 Series E34 (1988-1996)
Replacing spark plugs (petrol engines) BMW 5 Series E39 (1995-2003)
Replacing spark plugs BMW 7 Series E38 (1994-2001)
Spark plugs BMW 7 Series E32 (1986-1994)
Identifying engine faults by the condition of spark plugs BMW X3 E83 (2003-2010)
Checking and replacing spark plugs BMW X5 E53 (1999-2006)
Link in different formats to this page
Visitor comments
No comments yet
- General information
- Manual
- Maintenance
- Power unit
- Engine repair
- Cooling system
- Power system (gasoline)
- Injection system (gasoline)
- Fuel system (diesel)
- Exhaust system
- Ignition system
- Charge and launch systems
- Transmission
- Car gearbox
- Clutch and drive shafts
- Chassis
- Brake system
- Suspension front and rear
- Steering
- Body
- Body care and repair
- Exterior
- Interior
- Electrical equipment
- Troubleshooting
- Lighting and signaling
- Equipment and devices
- Heater and air conditioner
- Electrical circuits
- General information
- Manual
- Repair on the road
- Weekly checks
- Maintenance
- Troubleshooting
- Power unit
- 4 cylinder engines
- 6 cylinder engines
- Engine overhaul
- Cooling and heating
- Fuel and exhaust system
- Starting and charging system
- Ignition system
- Transmission
- Clutch
- Mechanical gearbox
- Automatic gearbox
- Cardan and drive shafts
- Chassis
- Brake system
- Wheel suspension
- Steering
- Body
- Exterior
- Interior
- Electrical equipment
- Equipment and devices
- Electrical circuits
- General information
- Maintenance
- Power unit
- Engine repair
- Cooling system
- Ignition system
- Supply system
- Fuel injection system
- Exhaust system
- Transmission
- Clutch
- Car gearbox
- Front and rear axle
- Chassis
- Steering
- Brake system
- Body
- Exterior
- Interior
- Electrical equipment
- Heating system
- Equipment and devices
- Power devices
- Electrical circuits
- Power unit
- M10/M20 engine
- M40 engine
- Ignition system
- Lubrication system
- Cooling system
- Supply system
- Fuel injection
- Exhaust system
- Transmission
- Clutch
- Manual gearbox
- Front axle
- Rear axle
- Chassis
- Steering
- Brake system
- Body
- Exterior
- Interior
- Electrical equipment
- Heating system
- Equipment and devices
- Electrical circuits
- General information
- Specifications
- Operation and maintenance
- 4-cylinder engine
- Engine repair
- Cooling and lubrication system
- Supply system
- Ignition system
- 6-cylinder engine
- Engine repair
- Cooling and lubrication system
- Supply system
- Fuel injection system
- Ignition system
- Transmission
- Clutch
- 4-speed manual gearbox
- 5-speed manual gearbox
- Automatic gearbox
- Cardan and rear axle
- Chassis
- Steering
- Front suspension
- Rear suspension
- Brake system
- Electrical equipment
- Equipment and devices
- Electrical circuits