
Table of contents: Removal ↓ Installation ↓
- Home
- BMW 5 Series
- E28
- Chassis
- Front suspension
- Removal and installation the front hub and bearing assembly
Removal and installation the front hub and bearing assembly (BMW 5 Series E28)
Removal the front hub and bearing assembly renders it unusable and will require a new assembly for reassembly.
Removal
1. Loosen the wheel mounting bolts, then jack up the front of the car and securely place it on the axle supports. Loosen the wheel mounting bolts and remove the wheel.
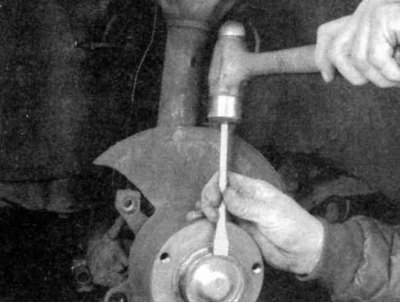
2. Using a hammer and chisel, remove the dust cap from the hub.

3. Loosen the hub nut.
4. Install the wheel and lower the vehicle to the ground. Loosen, but do not remove, the hub nut.
Always loosen and tighten the hub nut only when the vehicle is lowered to the ground. The force required to loosen this nut (which is pulled very tightly), may cause the vehicle to fall off its axle supports.
5. Jack up the front of the car and securely place it on axle supports. Remove the front wheel again.
6. Remove the front brake caliper and its mounting bracket (see chapter Brake system). It is not necessary to disconnect the brake hose. Hang the caliper to the side on a piece of wire so that it does not interfere with the work.
7. Remove the brake disc (see chapter Brake system).
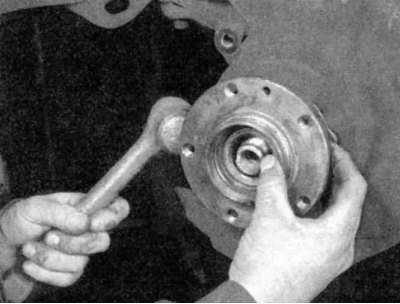
8. Loosen the hub nut and pull the hub and bearing assembly off the steering knuckle. If it is stuck, you can knock it out.
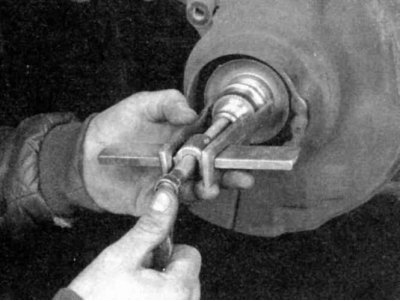
9. If the inner bearing race remains on the steering knuckle (that happens sometimes), remove the dust cover behind the bearing and use a puller to remove the inner race.
Installation
1. Install the new dust cover.
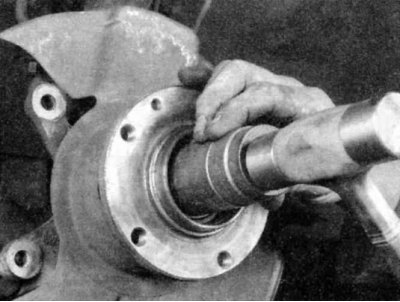
2. Place the new hub and bearing onto the stub axle. If force is required, apply pressure only to the inner bearing race.
3. Install the new hub nut and tighten it with your fingers for now.
4. Install the brake disc, its countersunk mounting screw and the brake caliper (see chapter Brake system).
5. Install the wheel and lower the car to the ground.
6. Tighten the hub nut to the required torque. Remember to do this with the car lowered to the ground and not on the axle stands.
7. Jack up the front of the car and securely place it on axle supports. Remove the wheel.
8. Insert the collar of the nut into the groove on the axle.
9. Apply a suitable sealant to the new dust cap and seat the cap using a soft-faced mallet.
10. Install the wheel and wheel bolts. Lower the vehicle to the ground and tighten the wheel bolts to the specified torque.
[Information obtained from this online resource «BMWman.ru»]
This article is available at russian, bulgarian, belarusian, ukrainian, serbian, croatian, romanian, polish, slovak, hungarian
Article verified: Zhuravleva Isolda
Share information:
Previous articles
БМВ E28: Front suspension
Next articles
Similar articles on other types of BMW cars:
Removal and installation the front axle assembly BMW 3 Series E21 (1975-1983)
Removal and installation the front wheel bearing BMW 3 Series E46 (1998-2006)
Front Wheel Bearing — Removal and Installation BMW 7 Series E32 (1986-1994)
Removal and installation an additional fan assembly with a casing BMW 7 Series E38 (1994-2001)
Removal and installation the engine assembly BMW X3 E83 (2003-2010)
Removal and installation front door glass BMW X5 E53 (1999-2006)
Link in different formats to this page
Visitor comments
No comments yet
- General information
- Governing bodies
- Manual
- Maintenance
- Power unit
- Engine repair
- Lubrication system
- Cooling system
- Ignition system
- Supply system
- Injection system (gasoline)
- Injection system (diesel)
- Exhaust system
- Transmission
- Clutch
- Car gearbox
- Front axle
- Rear axle
- Chassis
- Steering
- Brake system
- Wheels and tires
- Body
- Interior
- Exterior
- Heating system
- Electrical equipment
- Equipment and devices
- Power devices
- Windscreen wipers
- Electrical circuits
- General information
- Manual
- Maintenance
- Power unit
- Engine repair
- Ignition system
- Engine lubrication system
- Cooling system
- Fuel system (gasoline)
- Fuel system (diesel)
- Exhaust system
- Transmission
- Clutch
- Car gearbox
- Chassis
- Front and rear suspension
- Steering
- Brake system
- Body
- Exterior
- Interior
- Electrical equipment
- Heating system
- Equipment and devices
- Power devices
- Electrical circuits
- General information
- Manual
- Maintenance
- Power unit
- Engine in a car
- Engine overhaul
- Cooling system
- Supply system
- Ignition system
- Control system
- Transmission
- Clutch
- Manual gearbox
- Automatic gearbox
- Transmission line
- Chassis
- Steering
- Front suspension
- Rear suspension
- Brake system
- Body
- Body elements
- Car care and painting
- Electrical equipment
- Heater and air conditioner
- Equipment and devices
- Starter and generator
- Electrical circuits
- General information
- Operation and maintenance
- Specifications
- Power unit
- Engine repair
- Cooling and lubrication system
- Supply system
- Ecotronic power supply system
- Fuel injection system
- Ignition system
- Transmission
- Clutch
- Gearbox BMW 242/4
- Gearbox Getrag 262/8
- Gearbox Getrag 265/6
- Automatic gearbox
- Cardan gear
- Rear axle
- Chassis
- Steering
- Front suspension
- Rear suspension
- Brake system
- Electrical equipment
- Equipment and devices
- Electrical circuits