
Table of contents: Removal ↓ Installation ↓
- Home
- BMW 5 Series
- E34
- Power unit
- Engine repair
- Removal and installation the timing belt — model 518i
Removal and installation the timing belt — model 518i (BMW 5 Series E34)
Caution: If the timing belt is removed, it must be replaced regardless of its service life. A special BMW tool is required to adjust the correct tension.
Removal
Remove the radiator fan.
Disconnect all spark plug tips. You can use HAZET 1849 pliers for this.
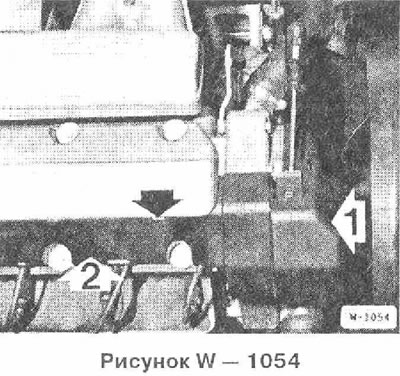
Remove cover 1 from the ignition distributor. To do this, lift the upper and lower latches with a screwdriver.
Lift cable channel 2 upwards. To do this, insert a screwdriver into the "arrow" slots.
Unscrew the distributor cap (3 screws) and remove it together with the ignition wires.
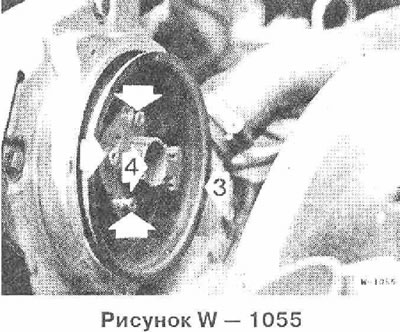
Unscrew the distributor runner 4 and remove it together with the cover 3.
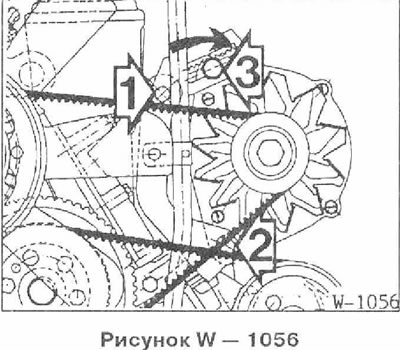
Remove the V-belt from the generator. To do this, unscrew bolt 1, unscrew the nuts of bolts 2 and 3. Turn bolt 3 in the direction of the arrow and thereby loosen the tension of the V-belt.
Loosen the water pump pulley. At the same time, squeeze the V-belt and thus hold the pulley from turning.
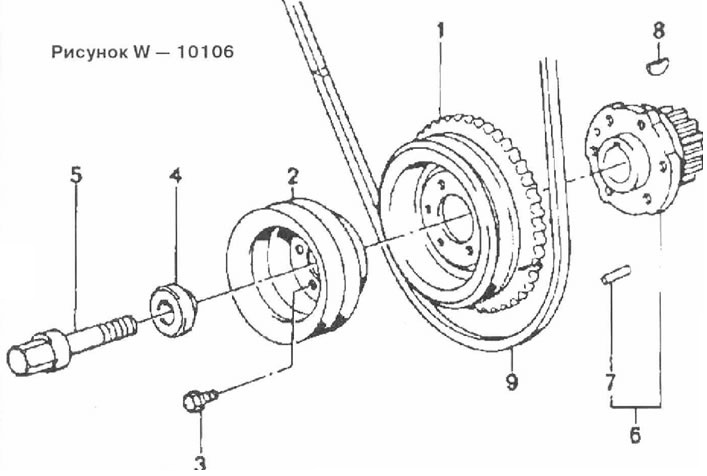
See Figure W - 10106
Unscrew the vibration damper 1 from the crankshaft. At the same time, engage 1st gear, tighten the handbrake, thus holding the belt pulley. Additional parts shown in the figure:
- 1 Belt pulley
- 2 Bolt
- 3 Spacer washer
- 4 Central bolt
- 5 Timing Belt Pulley
- 6 Centering pin
- 7 Key
- 8 V-belt
Drain the coolant.
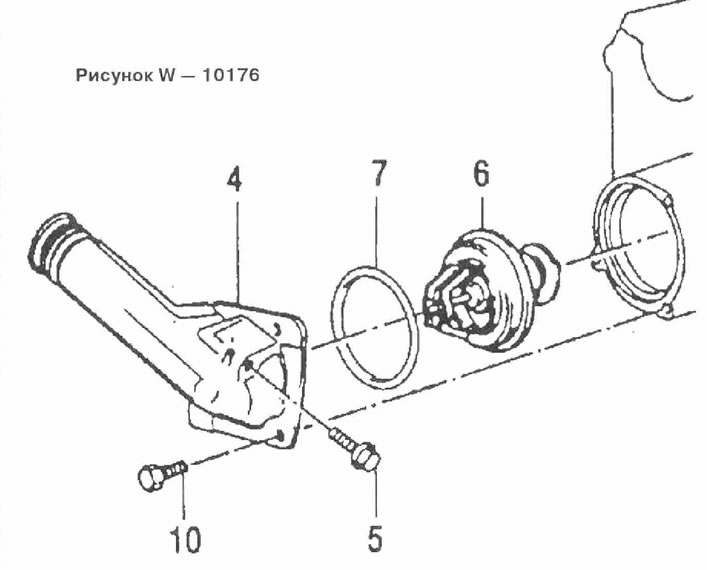
See Figure W - 10176
Unscrew the cooling system thermostat housing under the distributor (3 bolts 10) and put aside. Remove thermostat 6 with gasket 7.
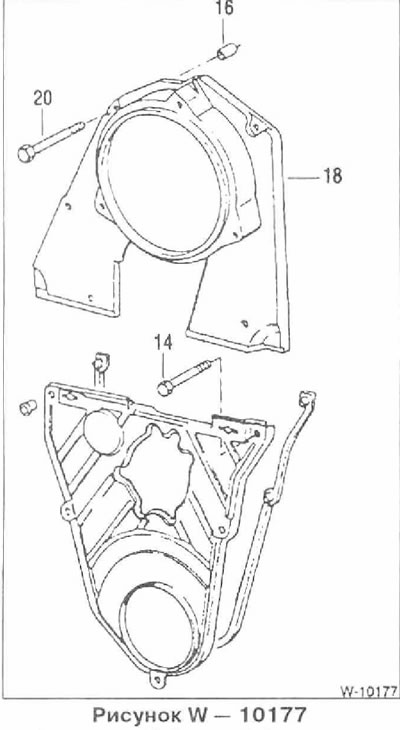
Unscrew 5 bolts 14 of the lower toothed belt casing. Remove the casing with the gasket.
Unscrew the 4 bolts of the upper toothed belt casing. Do not lose the centering bushings 16 for the upper bolts.
Turn the engine to the top dead center position of cylinder 1. In this case, the ignition distributor pin on the toothed pulley of the camshaft should be located at the bottom.
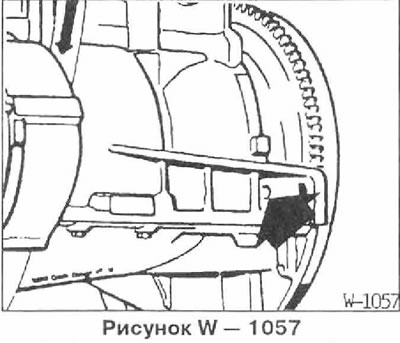
Fix the crankshaft in the top dead center position with the appropriate rod. To do this, insert the rod through the hole "arrow" in the engine block into the hole in the flywheel.
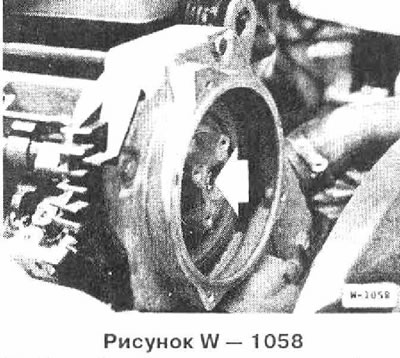
Loosen, without unscrewing, the camshaft toothed pulley mounting bolt. This requires a special key.
See Figure W - 1059
Loosen the tension roller nut 2, move the roller inward and thereby loosen the tension of the toothed belt.
Remove the timing belt.
Caution: After removing the timing belt, do not disturb the top dead center position of the engine if possible.
Installation
Caution: When applying the timing belt, neither the camshaft nor the intermediate shaft should be out of position. Otherwise, severe engine damage may occur or the engine will not develop full power. After tensioning the timing belt, it is recommended to check the installation of the crankshaft and camshaft again.
Unscrew the cylinder head cover, remove the camshaft cover.
Check the position of the camshaft. At service stations, the camshaft is locked with device 113 11 90. The camshaft is in the top dead center position when the cams of cylinder 4 intersect. The cams intersect if they are facing upward symmetrically to the left and right relative to the edge of the cylinder head of an inclined engine.
Slightly tighten the camshaft toothed pulley bolts with a tightening torque of 1-3 Nm. Turn the camshaft pulley in the direction of engine rotation until it stops, with the protrusion entering the groove.
Slightly tighten the timing belt tension roller nut so that the tension roller can still move. 3
Place the timing belt on the camshaft timing pulley and then on the tension roller, pulling the belt from the crankshaft pulley.
Note: The toothed belt must be located in the middle of all pulleys.
Set the timing belt tension measuring device to "0".
Place the measuring device between the toothed pulleys of the crankshaft and camshaft so that both outer rollers are adjacent to the back of the toothed belt, and the middle finger is positioned between the belt teeth. See the operating instructions for the measuring device.
Use a hex key to move the tension roller to the left, thereby tightening the timing belt.
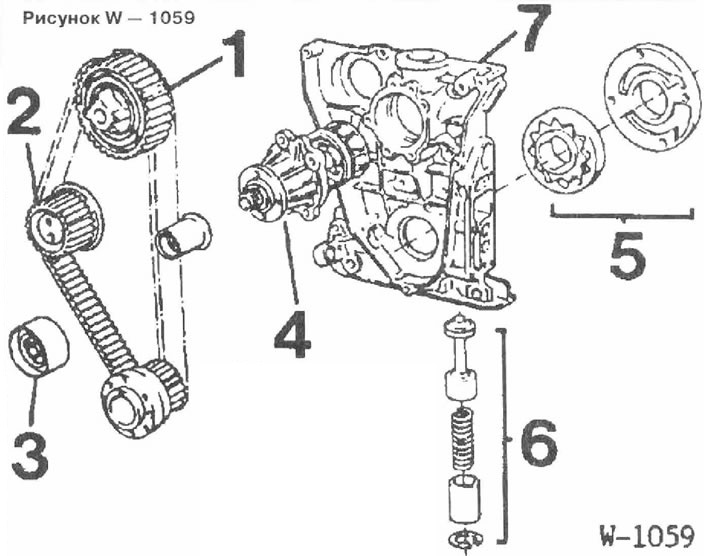
1 Timing pulley of the camshaft
2 Tension roller
3 Idler pulley
4 Water pump
5 Oil pump
6 Oil pressure regulating valve
7 Timing mechanism housing cover
Specified value when using the BMW 112080 measuring instrument: 45-50 scale divisions.
Tighten the tension roller to a torque of 22 Nm.
Tighten the camshaft pulley to a torque of 60 + 5 Nm.
Caution: Remove the engine locking rod, camshaft locking tool and measuring instrument.
Turn the engine by the crankshaft pulley at least 2 turns (in the direction of engine rotation).
Again, fix the crankshaft and camshaft in the top dead center position as described above.
Loosen the camshaft timing pulley bolts again.
Install the BMW 112080 measuring device.
Loosen the tension roller fastening and briefly tighten the toothed belt to 45-50 divisions on the instrument scale.
After this, set the tension roller to the final value of 32 + 2 scale divisions.
Tighten the tension roller to a torque of 22 Nm.
Tighten the camshaft pulley to a torque of 60 + 5 Nm.
Caution: Remove the engine locking rod, camshaft locking tool and measuring instrument.
After tensioning the timing belt, it is recommended to check the position of the crankshaft and camshaft again.
Install the camshaft housing and cylinder head cover,
Screw on the upper timing belt cover, paying attention to the position of the centering bushings.
Screw on the lower timing belt cover, after checking the integrity of the gasket and replacing it if necessary.
Insert the thermostat into the housing, check the integrity of the sealing rings, replace if necessary.
Clean the contact surfaces, screw on the thermostat housing with a new gasket,
Fill with coolant, remove air from the cooling system.
Place the vibration damper on the crankshaft, aligning the damper hole exactly with the centering pin. Tighten the vibration damper fastening with a torque of 23 Nm.
Apply and tighten the V-belt.
Tighten nuts and bolts 1-3 in Figure W-1056.
Install the camshaft toothed pulley cover, having first checked the integrity of the cover sealing ring and, if necessary, replacing it.
Install the rotor and distributor cap. Installation is performed in the reverse order.
Insert the ignition wires into the guides.
Insert the cable channel into the cylinder head.
Install spark plug caps in firing order for cylinders 1-3-4-2.
Insert the fan casing with the left and right bars into the mount. Insert the spacer clamps from the top left and right and secure them by hammering in the plastic pins.
Install the fan.
Attention: In the absence of adjustment and measuring devices (abroad, in case of an accident) temporarily tighten the toothed belt so that the belt can deflect by 5-10 mm in the area between the toothed pulley of the camshaft and the tension roller. At the earliest opportunity, the belt should be tensioned using a measuring device. Until then, avoid high engine speeds.
This article is available at russian, bulgarian, belarusian, ukrainian, serbian, croatian, romanian, polish, slovak, hungarian
Article verified: Polikarpov Saveliy
Share information:
Previous articles
БМВ E34: Engine repair
Next articles
Similar articles on other types of BMW cars:
Removal and installation the timing belt BMW 3 Series E30 (1982-1994)
Removal and installation the timing belt BMW 3 Series E36 (1990-2000)
Removal and installation the timing belt cover BMW 7 Series E38 (1994-2001)
Timing Chain Covers — Removal and Installation BMW 7 Series E32 (1986-1994)
Lower timing belt cover BMW X3 E83 (2003-2010)
Removal and installation the alternator drive belt BMW X5 E53 (1999-2006)
Removal and installation the timing belt BMW 3 Series E30 (1982-1994)
Removal and installation the timing belt BMW 3 Series E36 (1990-2000)
Removal and installation the timing belt cover BMW 7 Series E38 (1994-2001)
Timing Chain Covers — Removal and Installation BMW 7 Series E32 (1986-1994)
Lower timing belt cover BMW X3 E83 (2003-2010)
Removal and installation the alternator drive belt BMW X5 E53 (1999-2006)
Link in different formats to this page
Visitor comments
No comments yet
- General information
- Governing bodies
- Manual
- Maintenance
- Power unit
- Engine repair
- Lubrication system
- Cooling system
- Ignition system
- Supply system
- Injection system (gasoline)
- Injection system (diesel)
- Exhaust system
- Transmission
- Clutch
- Car gearbox
- Front axle
- Rear axle
- Chassis
- Steering
- Brake system
- Wheels and tires
- Body
- Interior
- Exterior
- Heating system
- Electrical equipment
- Equipment and devices
- Power devices
- Windscreen wipers
- Electrical circuits
- General information
- Manual
- Maintenance
- Power unit
- Engine repair
- Ignition system
- Engine lubrication system
- Cooling system
- Fuel system (gasoline)
- Fuel system (diesel)
- Exhaust system
- Transmission
- Clutch
- Car gearbox
- Chassis
- Front and rear suspension
- Steering
- Brake system
- Body
- Exterior
- Interior
- Electrical equipment
- Heating system
- Equipment and devices
- Power devices
- Electrical circuits
- General information
- Manual
- Maintenance
- Power unit
- Engine in a car
- Engine overhaul
- Cooling system
- Supply system
- Ignition system
- Control system
- Transmission
- Clutch
- Manual gearbox
- Automatic gearbox
- Transmission line
- Chassis
- Steering
- Front suspension
- Rear suspension
- Brake system
- Body
- Body elements
- Car care and painting
- Electrical equipment
- Heater and air conditioner
- Equipment and devices
- Starter and generator
- Electrical circuits
- General information
- Operation and maintenance
- Specifications
- Power unit
- Engine repair
- Cooling and lubrication system
- Supply system
- Ecotronic power supply system
- Fuel injection system
- Ignition system
- Transmission
- Clutch
- Gearbox BMW 242/4
- Gearbox Getrag 262/8
- Gearbox Getrag 265/6
- Automatic gearbox
- Cardan gear
- Rear axle
- Chassis
- Steering
- Front suspension
- Rear suspension
- Brake system
- Electrical equipment
- Equipment and devices
- Electrical circuits