



- Home
- BMW 3 Series
- E21
- Transmission
- Cardan and rear axle
- Rear axle assembly
Rear axle assembly (BMW 3 Series E21)
Adjusting the distance between the end of the drive gear and the differential axle
The driving and driven gears of the main transmission are matched to each other in terms of noise and contact and are marked identically accordingly. In addition, the deviation of the actual distance between the end of the driving gear and the differential axis from the nominal value in hundredths of a millimeter with the sign "+" or "-" is marked on the driving gear.
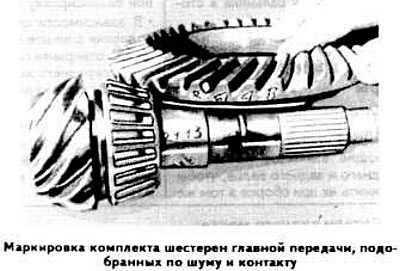
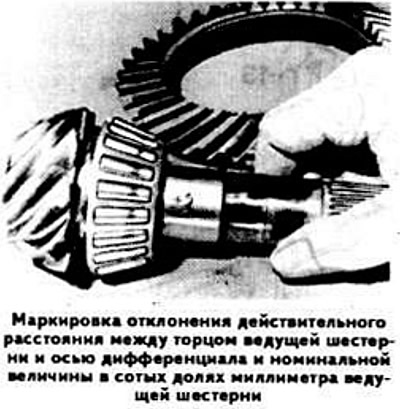
The "+" sign indicates that the correction to the nominal value on the drive gear should be added to the actual distance between the end of the drive gear and the differential axis, and the "-" sign indicates that it should be subtracted from the actual distance.
Press the outer ring of the inner bearing with the adjusting ring "X" removed during disassembly and the outer ring of the outer bearing of the drive gear into the sockets of the rear axle housing.
Press the new rear bearing onto the drive gear until it stops.
Insert the drive pinion into the axle housing and press the new front bearing onto it using the 23 1 300 mandrel and the 23 2 150 sleeve. The compression sleeve is not installed on the drive pinion at this stage.
Press the flange without the seal onto the drive gear using the 23 1 300 mandrel.
Tighten the drive gear flange mounting nut to a torque of at least 150 N·m and measure the torque of the drive gear bearings, which should be within 180–300 N·cm.
Determine the value of "Y" using the indicator (see picture), using for this purpose a device with an indicator and a support ring respectively: for bridges with differential bearing cap fastening with four bolts - 33 1 381 and 33 1 382, and with fastening with six bolts - 33 1 191 and 33 1 192.
Support values for axles with four-bolt differential bearing caps
The value of "C" (distance between the end of the pinion gear and the differential axle): 11.02 mm.
The value "B" (support ring thickness 33 1 382): 9.00 mm.
Bearing Values for Axles with Six-Bolt Differential Bearing Caps
The value of "C" (distance between the end of the pinion gear and the differential axle): 9.02 mm.
The value "B" (support ring thickness 33 1 192): 7.00 mm.
Determining the thickness of the drive gear adjusting ring
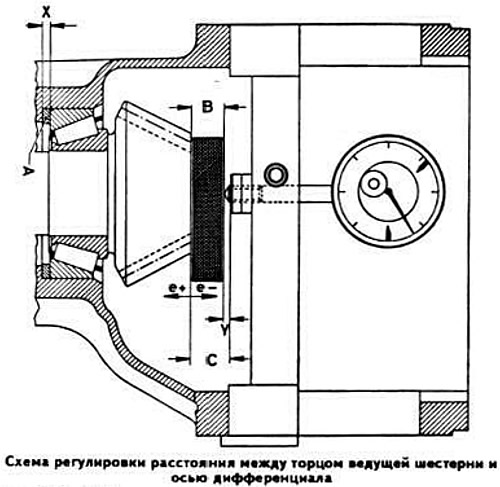
Determine the calculated value "C1" of the distance between the end of the drive gear and the differential axis using the formula:
C1 = C + e+,
where:
C is the reference value of the distance between the end of the drive gear and the differential axis, equal to 11.02 mm;
e+ — correction to the nominal value of the distance between the end of the drive gear and the differential axis, marked on the drive gear, equal to +0.07 mm.
C1 = 11.02 mm + 0.07 mm = 11.09 mm
Determine the actual value "C2" of the distance between the end of the drive gear and the differential axis using the formula:
C2 = B + Y,
where:
B is the thickness of the support ring, equal to 9.00 mm;
Y is the value set using the indicator, which, for example, is equal to 2.06 mm.
C2 = 9.00 mm + 2.06 mm = 11.06 mm
Determine the value "A" using the formula:
A = C1 - C2,
where:
A is the distance between the front end of the inner bearing of the drive gear and the end of the bridge housing socket for the adjusting ring.
A = 11.09 mm - 11.06 mm = 0.03 mm
Determine the thickness "S" of the adjusting ring using the formula:
S = X - A,
where:
X is the thickness of the adjusting ring installed in the bridge housing socket, equal to, for example, 3.76 mm.
S = 3.76 mm - 0.03 mm = 3.73 mm
In this case, install adjusting rings with a total thickness of 3.73 mm. If the calculated value "C1" is greater than the actual value "C2", then when determining the thickness "S" of the adjusting ring, it is necessary to subtract the value "A" from the value "X" and vice versa.
Remove the drive pinion from the axle housing and press the outer ring of the rear bearing of the drive pinion out of the housing socket.
Install the adjusting rings of the required thickness, press in the outer race of the rear bearing and insert the drive pinion with the new compression sleeve put on into the axle housing.
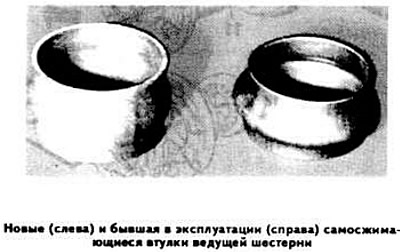
Install a new pinion oil seal.
Press the flange onto the end of the pinion gear and tighten the flange mounting nut to a torque of at least 150 N·m. Measure the torque of the pinion gear bearings, which should be 20 N·cm greater than the value determined during disassembly. A greater excess indicates excessive tightening of the pinion gear flange mounting nut. In this case, remove the pinion gear, replace the compression sleeve, tighten the flange mounting nut again, and check the torque of the pinion gear bearings.
Lock the drive gear flange mounting nut by bending the tabs of the lock washer.
Install the driven gear on the differential box in accordance with the mark made during disassembly.
Tighten the bolts securing the driven gear and differential box, after applying a special adhesive such as Loctite to the threads. The bolts securing the driven gear should be replaced each time the differential is disassembled.
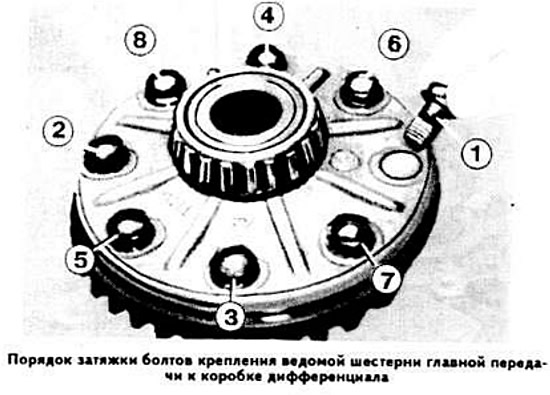
Check the condition of the differential bearing cap seals and replace them if necessary.
Insert the differential box into the rear axle housing.
Install the differential bearing cover without the adjusting ring and tighten the mounting bolts.
Install the differential bearing cover also without the adjusting ring on the other side of the crankcase and gradually tighten the mounting bolts until the bearing turning resistance moment, measured by a dynamometer, is within 200–280 N·cm.
Measure the gap between the differential bearing cap and the axle housing, thereby determining the total thickness of the adjusting rings installed under the bearing caps. Example. Let's assume that the gap between the differential bearing cap and the axle housing is 1.8 mm. To get the thickness of the adjusting ring installed under each bearing cap, divide the specified value by two, i.e. 1.8 mm: 2 = 0.9 mm.
Adjusting the lateral clearance in the engagement of the main gear gears
Attach a device with an indicator to the bridge housing and measure the lateral clearance between the teeth of the driving and driven gears, which should be within 0.08–0.13 mm.
If the clearance is not correct, adjust it by moving the differential bearing cap adjusting rings from one side of the axle housing to the other, without changing the overall thickness of the adjusting rings.
Checking the contact of the working surface of the main gear teeth
To finally check the quality of the engagement of the main transmission gears, check the contact of the working surface of their teeth.
Lubricate the working surfaces of the driven gear teeth with a thin layer of lead oxide and check the contact of the working surface of the teeth of the driving and driven gears; in this case, on the Gleason main gear, the contact spot of the teeth is checked on the teeth of the driven gear, and on the Klingeinberg main gear, on the teeth of the driving gear.
(Original publication posted on the website www.bmwman.ru)
This article is available at russian, bulgarian, belarusian, ukrainian, serbian, croatian, romanian, polish, slovak, hungarian
Article verified: Polikarpov Saveliy
Share information:
Previous articles
БМВ E21: Cardan and rear axle
Next articles
Similar articles on other types of BMW cars:
Rear Axle Specifications BMW 5 Series E12 (1972-1981)
Rear axle propeller shaft BMW 5 Series E39 (1995-2003)
Changing the oil in the main gear (rear axle) BMW 7 Series E32 (1986-1994)
Removal and installation the rear axle gearbox BMW 7 Series E38 (1994-2001)
Checking the oil level in the rear axle gearbox and bringing it up to… BMW X3 E83 (2003-2010)
Replacing the rear axle beam assembly BMW X5 E53 (1999-2006)
Rear Axle Specifications BMW 5 Series E12 (1972-1981)
Rear axle propeller shaft BMW 5 Series E39 (1995-2003)
Changing the oil in the main gear (rear axle) BMW 7 Series E32 (1986-1994)
Removal and installation the rear axle gearbox BMW 7 Series E38 (1994-2001)
Checking the oil level in the rear axle gearbox and bringing it up to… BMW X3 E83 (2003-2010)
Replacing the rear axle beam assembly BMW X5 E53 (1999-2006)
Link in different formats to this page
Visitor comments
No comments yet
- General information
- Manual
- Maintenance
- Power unit
- Engine repair
- Cooling system
- Power system (gasoline)
- Injection system (gasoline)
- Fuel system (diesel)
- Exhaust system
- Ignition system
- Charge and launch systems
- Transmission
- Car gearbox
- Clutch and drive shafts
- Chassis
- Brake system
- Suspension front and rear
- Steering
- Body
- Body care and repair
- Exterior
- Interior
- Electrical equipment
- Troubleshooting
- Lighting and signaling
- Equipment and devices
- Heater and air conditioner
- Electrical circuits
- General information
- Manual
- Repair on the road
- Weekly checks
- Maintenance
- Troubleshooting
- Power unit
- 4 cylinder engines
- 6 cylinder engines
- Engine overhaul
- Cooling and heating
- Fuel and exhaust system
- Starting and charging system
- Ignition system
- Transmission
- Clutch
- Mechanical gearbox
- Automatic gearbox
- Cardan and drive shafts
- Chassis
- Brake system
- Wheel suspension
- Steering
- Body
- Exterior
- Interior
- Electrical equipment
- Equipment and devices
- Electrical circuits
- General information
- Maintenance
- Power unit
- Engine repair
- Cooling system
- Ignition system
- Supply system
- Fuel injection system
- Exhaust system
- Transmission
- Clutch
- Car gearbox
- Front and rear axle
- Chassis
- Steering
- Brake system
- Body
- Exterior
- Interior
- Electrical equipment
- Heating system
- Equipment and devices
- Power devices
- Electrical circuits
- Power unit
- M10/M20 engine
- M40 engine
- Ignition system
- Lubrication system
- Cooling system
- Supply system
- Fuel injection
- Exhaust system
- Transmission
- Clutch
- Manual gearbox
- Front axle
- Rear axle
- Chassis
- Steering
- Brake system
- Body
- Exterior
- Interior
- Electrical equipment
- Heating system
- Equipment and devices
- Electrical circuits
- General information
- Specifications
- Operation and maintenance
- 4-cylinder engine
- Engine repair
- Cooling and lubrication system
- Supply system
- Ignition system
- 6-cylinder engine
- Engine repair
- Cooling and lubrication system
- Supply system
- Fuel injection system
- Ignition system
- Transmission
- Clutch
- 4-speed manual gearbox
- 5-speed manual gearbox
- Automatic gearbox
- Cardan and rear axle
- Chassis
- Steering
- Front suspension
- Rear suspension
- Brake system
- Electrical equipment
- Equipment and devices
- Electrical circuits