
- Home
- BMW 3 Series
- E30
- Power unit
- Fuel injection
- Checking the idle speed and CO content
Checking the idle speed and CO content (BMW 3 Series E30)
Please note: When the Motronic system is installed, the idle speed is controlled electronically and cannot be adjusted.
L-/LE-Jetronic
Connect the devices for measuring the number of revolutions and CO content in accordance with their operating instructions.
Warm up the engine to operating temperature. Oil temperature should be at least 60°C.
Check the ignition timing (see section "Checking and adjusting the ignition timing").
Check the tightness of the intake system. To do this, use a brush to wet all the joints of the intake device with gasoline. If you briefly increase the engine speed, air will be sucked in at the places of loose contact. Localize and eliminate leaks.
Warning: Do not inhale fuel vapors - poison! Do not allow gasoline to splash onto hot parts or the ignition system. Fire hazard!
Check the air filter element.
Turn off all electrical consumers.
Disconnect the crankcase ventilation hose from the cylinder head cover and route it so that only outside air can be sucked in.
Check the engine idle speed. For the specified value, see the table in the "Ignition System" section. If there are any deviations, adjust the idle speed with the adjusting screw at the throttle stop.
Check the CO content. For the specified value, see the table in the "Ignition system" section.
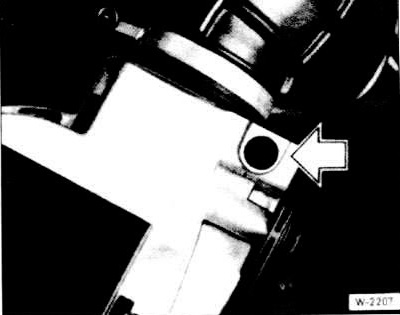
If the CO content deviates from the specified value, remove the seal from the CO content adjustment screw on the air flow meter.
Disconnect the hose from the throttle valve branch pipe that goes to the container with activated carbon and close the hose and fitting with plugs.
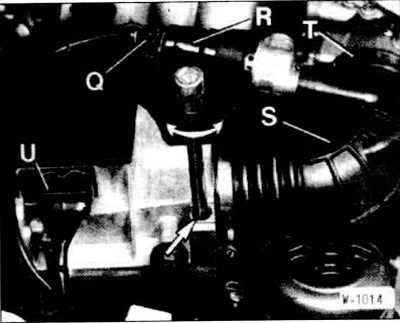
Adjust the set value of the CO content by turning the adjusting screw (arrow). This requires a 5 mm Allen key, such as the HAZET 2100-5. Turning it clockwise increases the CO content, and turning it counterclockwise decreases it.
After completing the adjustment, install a new seal.
Check the enrichment mode at partial loads. To do this, disconnect and plug the vacuum hose from the discharge valve. The CO content should increase significantly to approximately 2.5%. Then reconnect the hose.
Turn off the measuring instruments.
Connect the engine crankcase ventilation hose.
Adjusting the throttle cable
Caution: The gas cable is sensitive to bending and requires special care when installing. Even a slight bend can cause it to break later. Therefore, it is prohibited to install cables with bends.
Press the gas pedal all the way down (full throttle position) and fix it in this position with a suitable board inserted between the pedal and the seat.
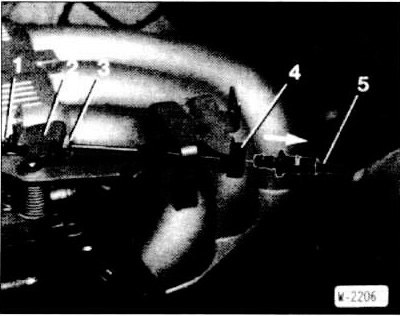
Press the throttle lever "2" to the full throttle position and screw in the adjusting nut "1" until the throttle cable is tensioned.
Disconnecting the throttle cable from the throttle lever
Apply gas with throttle lever "2" to relieve the throttle cable nipple.
Compress the clamp "3" and push it away from the throttle lever.
Disconnect the throttle cable through the slot on the throttle lever.
Pull the cable sheath "5" out of the rubber tip "4", use a screwdriver to press the rubber tip out of the holder and pull the cable out through the slot in the holder.
Connection
Insert the gas cable through the slot into the hole in the throttle lever, install and press the bracket.
Apply a little gas with the throttle lever, insert the cable into the hole in the holder, press the rubber tip and insert the cable sheath into it.
Check the throttle cable adjustment.
Checking the performance of the fuel pump
Connect a voltmeter to the fuel pump.
Disconnect the fuel pump relay.
Short-circuit terminals -87b- and "30" on the multi-pin connector, the pump should start working, and the voltage on the pump should be at least 11.5 V. Otherwise, check the battery, wiring and connection points.
Connect an ammeter between terminals -87b- and "30" on the multi-pin connector. The fuel pump consumption must not exceed the following values:
- 318i cars with K-Jetronic: 9.5 A;
- cars with L-Jetronic OME produced before August 1985: 6.5 A;
- released since September 1985: 5 A.
Disconnect the fuel supply hose from the pressure regulator and lower the hose into a measuring cup with a capacity of about 3 liters.
Jumper terminals -87b- and "30" on the multi-pin connector and let the fuel pump run for about 30 seconds. Amount of fuel pumped out:
- 318i cars with L-Jetronic, 320i: 700 cm³;
- 325e, 325i: 850 cm³.
If the fuel pump performance is lower, replace the fuel filter and check the performance again. If the performance is still insufficient, replace the fuel pump.
This article is available at russian, bulgarian, belarusian, ukrainian, serbian, croatian, romanian, polish, slovak, hungarian
Article verified: Polikarpov Saveliy
Share information:
Previous articles
БМВ E30: Fuel injection
Next articles
Similar articles on other types of BMW cars:
Checking the idle speed and CO content BMW 5 Series E34 (1988-1996)
Checking and adjusting engine idle speed and CO levels BMW 5 Series E28 (1981-1988)
Idle speed control valve — checking, removing and installing BMW 7 Series E32 (1986-1994)
Bleeding the cooling system and checking it for leaks (M54, N46, N47,… BMW X3 E83 (2003-2010)
Checking and adjusting idle speed and CO levels BMW X5 E53 (1999-2006)
Checking the idle speed and CO content BMW 5 Series E34 (1988-1996)
Checking and adjusting engine idle speed and CO levels BMW 5 Series E28 (1981-1988)
Idle speed control valve — checking, removing and installing BMW 7 Series E32 (1986-1994)
Bleeding the cooling system and checking it for leaks (M54, N46, N47,… BMW X3 E83 (2003-2010)
Checking and adjusting idle speed and CO levels BMW X5 E53 (1999-2006)
Link in different formats to this page
Visitor comments
No comments yet
- General information
- Manual
- Maintenance
- Power unit
- Engine repair
- Cooling system
- Power system (gasoline)
- Injection system (gasoline)
- Fuel system (diesel)
- Exhaust system
- Ignition system
- Charge and launch systems
- Transmission
- Car gearbox
- Clutch and drive shafts
- Chassis
- Brake system
- Suspension front and rear
- Steering
- Body
- Body care and repair
- Exterior
- Interior
- Electrical equipment
- Troubleshooting
- Lighting and signaling
- Equipment and devices
- Heater and air conditioner
- Electrical circuits
- General information
- Manual
- Repair on the road
- Weekly checks
- Maintenance
- Troubleshooting
- Power unit
- 4 cylinder engines
- 6 cylinder engines
- Engine overhaul
- Cooling and heating
- Fuel and exhaust system
- Starting and charging system
- Ignition system
- Transmission
- Clutch
- Mechanical gearbox
- Automatic gearbox
- Cardan and drive shafts
- Chassis
- Brake system
- Wheel suspension
- Steering
- Body
- Exterior
- Interior
- Electrical equipment
- Equipment and devices
- Electrical circuits
- General information
- Maintenance
- Power unit
- Engine repair
- Cooling system
- Ignition system
- Supply system
- Fuel injection system
- Exhaust system
- Transmission
- Clutch
- Car gearbox
- Front and rear axle
- Chassis
- Steering
- Brake system
- Body
- Exterior
- Interior
- Electrical equipment
- Heating system
- Equipment and devices
- Power devices
- Electrical circuits
- Power unit
- M10/M20 engine
- M40 engine
- Ignition system
- Lubrication system
- Cooling system
- Supply system
- Fuel injection
- Exhaust system
- Transmission
- Clutch
- Manual gearbox
- Front axle
- Rear axle
- Chassis
- Steering
- Brake system
- Body
- Exterior
- Interior
- Electrical equipment
- Heating system
- Equipment and devices
- Electrical circuits
- General information
- Specifications
- Operation and maintenance
- 4-cylinder engine
- Engine repair
- Cooling and lubrication system
- Supply system
- Ignition system
- 6-cylinder engine
- Engine repair
- Cooling and lubrication system
- Supply system
- Fuel injection system
- Ignition system
- Transmission
- Clutch
- 4-speed manual gearbox
- 5-speed manual gearbox
- Automatic gearbox
- Cardan and rear axle
- Chassis
- Steering
- Front suspension
- Rear suspension
- Brake system
- Electrical equipment
- Equipment and devices
- Electrical circuits