
- Home
- BMW 3 Series
- E46
- Chassis
- Suspension front and rear
- Disassembling the shock absorber strut / removing and installing the shock absorber / spring
Disassembling the shock absorber strut / removing and installing the shock absorber / spring (BMW 3 Series E46)
Shock absorber strut. Upper mount
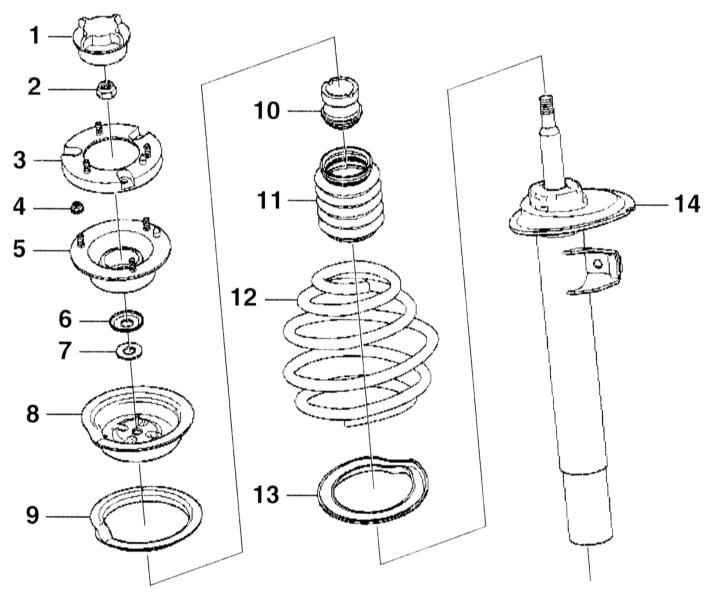
1 - lid
2 — nut M14, 65 Nm
3 — adapter. Designed for bad roads only (East Europe)
4 — nut M8, 25 Nm
5 - support
6 - protective cuff
7 - washer
8 - upper spring plate
9 — upper spring support
10 - plastic spring
11 — case
12 — spring
13 - lower spring support
14 — shock absorber
15 — nut. Designed for bad roads only (East Europe)
Springs on the same axle must only be replaced in pairs and with the same BMW number. The number is stamped on the end of the spring.
When replacing, it is necessary to install shock absorbers of only one design and the same design. The designation is given on the sticker located on the shock absorber pipe. The second line of the sticker indicates the part number, the third line indicates the chassis design code: 4Z / 6Z-Sport - 4/6-cylinder engine sports chassis. The bottom line indicates R or L for the right or left shock absorber, respectively, when looking in the direction of travel.
Removal
1. Remove the shock absorber strut, refer to Section Removal and installation the shock absorber strut.
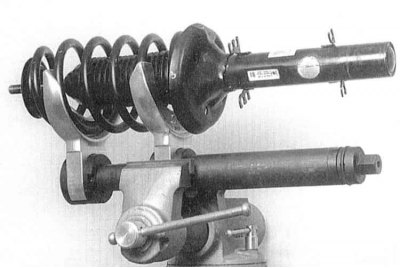
2. To remove the shock absorber, it is necessary to compress the spring. The spring is compressed using a device, for example, HAZET 4900. The specified device must be clamped in a vice, as shown in the illustration. To protect the surface of the spring, it is necessary to use HAZET plastic pads.
Never remove the shock absorber unless the spring is compressed.
Insert the compression tool into the spring coils so that the coils are securely gripped and the tool cannot slip out. The tool is under a lot of stress, so only a reliable tool should be used. Never compress the tool with wire. There is a risk of accident!
The device should be compressed only until the support is unloaded. In no case should the device be compressed to the stop, i.e. the spring coils should not touch each other.

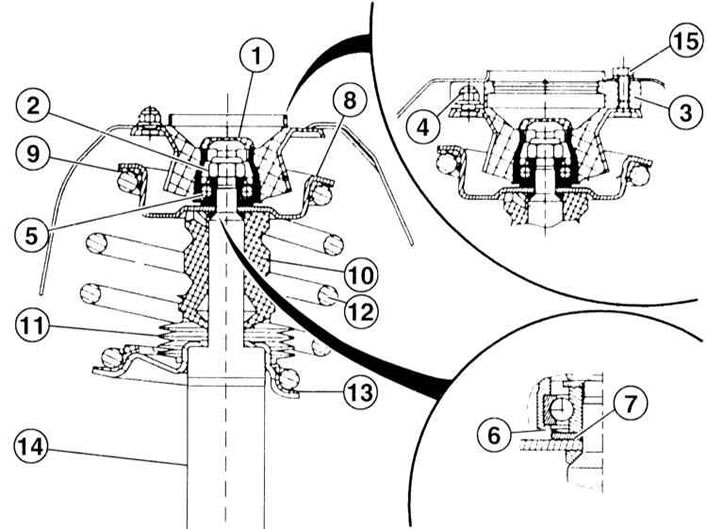
3. Unscrew the fastening nut with an open-end wrench, while holding the rod from turning with a socket wrench.
The nut has a large loosening moment. If necessary, the nut can be moved by hitting the wrench with a hammer. 1 - torque wrench, 2 - compression device, BMW-31-2-210.
4. Remove the support with the sealing ring and washer.
5. Remove the upper spring plate.
6. Remove the shock absorber from the spring.
If only the spring needs to be replaced, slowly release the spring. If only the shock absorber needs to be replaced, the spring should remain compressed.
7. Remove the plastic spring, boot and lower spring pad.
Installation
8. The new spring has a protective coating against corrosion. Before installation, check the protective coating of the springs and restore it if necessary.
9. Check for damage to the cover, plastic spring and spring pads. Replace if necessary.
10. Insert the shock absorber with the lower spring pad, plastic spring and boot into the compressed spring.
11. Assemble the shock absorber strut. Make sure that the spring fits against the protrusions of the lower and upper spring plates.
12. Thread the new self-locking nut flush onto the shock absorber rod.
13. Slowly loosen the spring so that it rests against the plates. Make sure that the spring pad is in the correct position (rectangular grooves).
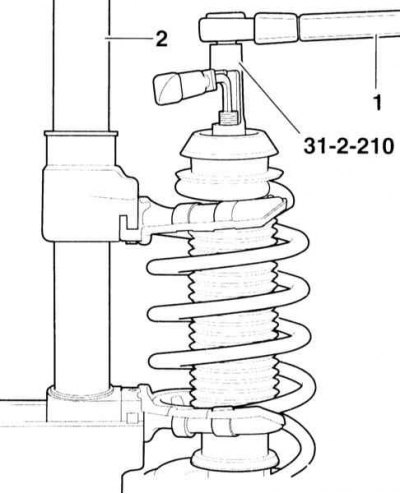
14. Tighten the fastening nut to a torque of 65 N·m, holding the rod from turning. To maintain the tightening torque, the service station uses the BMW-312210 or HAZET-2927 head.
15 Loosen the spring completely and remove the device.
16. Install the shock absorber strut in place.
This article is available at russian, bulgarian, belarusian, ukrainian, serbian, croatian, romanian, polish, slovak, hungarian
Article verified: Sevastyanov Nikolay
Share information:
Previous articles
БМВ E46: Suspension front and rear
Next articles
Similar articles on other types of BMW cars:
Disassembling the shock absorber strut and shock absorber / removing… BMW 5 Series E34 (1988-1996)
Disassembling the shock absorber strut / shock absorber / removing… BMW 5 Series E39 (1995-2003)
Shock absorber strut — removal and installation BMW 7 Series E32 (1986-1994)
Removal and installation the anti-roll bar and its strut BMW 7 Series E38 (1994-2001)
Disassembling the left or right front shock absorber strut BMW X3 E83 (2003-2010)
Replacing the rear shock absorber spring BMW X5 E53 (1999-2006)
Link in different formats to this page
Visitor comments
No comments yet
- General information
- Manual
- Maintenance
- Power unit
- Engine repair
- Cooling system
- Power system (gasoline)
- Injection system (gasoline)
- Fuel system (diesel)
- Exhaust system
- Ignition system
- Charge and launch systems
- Transmission
- Car gearbox
- Clutch and drive shafts
- Chassis
- Brake system
- Suspension front and rear
- Steering
- Body
- Body care and repair
- Exterior
- Interior
- Electrical equipment
- Troubleshooting
- Lighting and signaling
- Equipment and devices
- Heater and air conditioner
- Electrical circuits
- General information
- Manual
- Repair on the road
- Weekly checks
- Maintenance
- Troubleshooting
- Power unit
- 4 cylinder engines
- 6 cylinder engines
- Engine overhaul
- Cooling and heating
- Fuel and exhaust system
- Starting and charging system
- Ignition system
- Transmission
- Clutch
- Mechanical gearbox
- Automatic gearbox
- Cardan and drive shafts
- Chassis
- Brake system
- Wheel suspension
- Steering
- Body
- Exterior
- Interior
- Electrical equipment
- Equipment and devices
- Electrical circuits
- General information
- Maintenance
- Power unit
- Engine repair
- Cooling system
- Ignition system
- Supply system
- Fuel injection system
- Exhaust system
- Transmission
- Clutch
- Car gearbox
- Front and rear axle
- Chassis
- Steering
- Brake system
- Body
- Exterior
- Interior
- Electrical equipment
- Heating system
- Equipment and devices
- Power devices
- Electrical circuits
- Power unit
- M10/M20 engine
- M40 engine
- Ignition system
- Lubrication system
- Cooling system
- Supply system
- Fuel injection
- Exhaust system
- Transmission
- Clutch
- Manual gearbox
- Front axle
- Rear axle
- Chassis
- Steering
- Brake system
- Body
- Exterior
- Interior
- Electrical equipment
- Heating system
- Equipment and devices
- Electrical circuits
- General information
- Specifications
- Operation and maintenance
- 4-cylinder engine
- Engine repair
- Cooling and lubrication system
- Supply system
- Ignition system
- 6-cylinder engine
- Engine repair
- Cooling and lubrication system
- Supply system
- Fuel injection system
- Ignition system
- Transmission
- Clutch
- 4-speed manual gearbox
- 5-speed manual gearbox
- Automatic gearbox
- Cardan and rear axle
- Chassis
- Steering
- Front suspension
- Rear suspension
- Brake system
- Electrical equipment
- Equipment and devices
- Electrical circuits