
Table of contents: Removal ↓ Installation ↓
- Home
- BMW 3 Series
- E46
- Chassis
- Suspension front and rear
- Removal and installation the shock absorber strut
Removal and installation the shock absorber strut (BMW 3 Series E46)
Removal
The operation of lifting and installing the vehicle on stands is associated with danger! Therefore, before carrying out the operation, read the Section Jacking and towing
1. Mark the position of the corresponding front wheel relative to the hub with paint. This will allow the balanced wheel to be installed in its original position during assembly. Loosen the wheel mounting bolts with the car on the ground. Raise the front of the car, place it on stands and remove the front wheel.
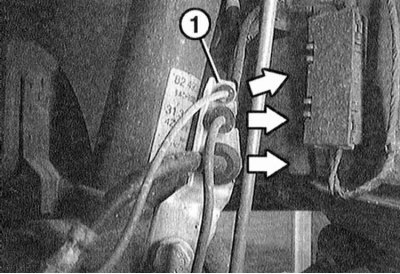
2. Remove the cable and brake hose from the holder "1" on the shock absorber strut.
3. Loosen the mounting bolts and remove the caliper from the guide from the steering knuckle and tie it with wire to the body, refer to Section Removal and installation the front brake guide.
Do not disconnect the brake hose. Otherwise, you will have to bleed the brake system during installation.
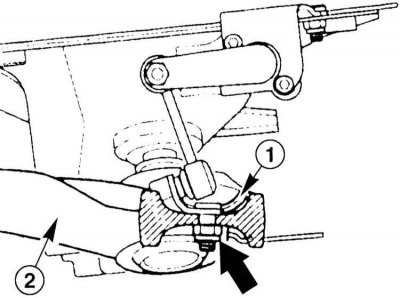
4. Vehicles with xenon lamps: Remove the corner "1" of the headlight range adjustment corner joint from the transverse arm "2".
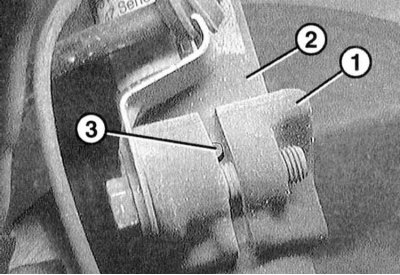
5. Unscrew nut "1" of the rocking support "2" from the shock absorber strut. At the same time, hold the planes of the hinge pin with wrench "3".
6. Unscrew the nut "1" and the steering rod end "2" from the steering arm "3", refer to Section Removal and installation the steering rod end.
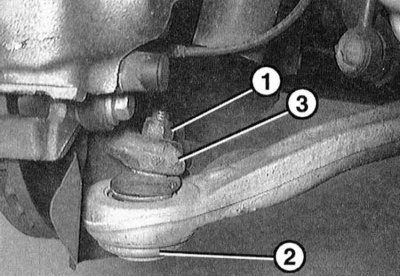
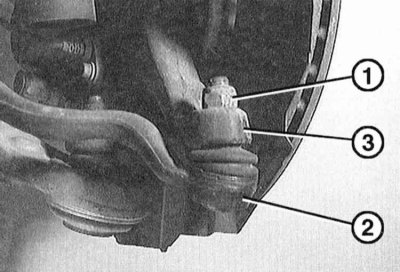
7. Unscrew nut "1" and remove joint "2" from pivot arm "3" using a puller, for example, HAZET 779-1.
8. Tie the pivot arm with wire so that it does not fall.
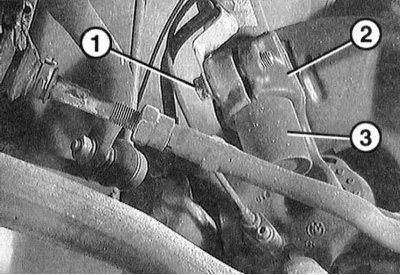
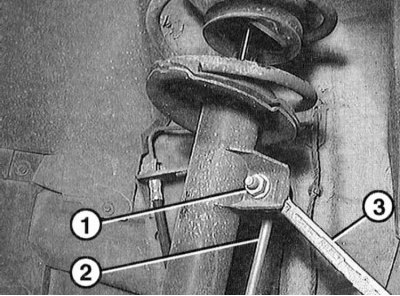
9. Loosen bolt "1" a few turns and remove pivot arm "2" downwards from shock absorber strut "3".
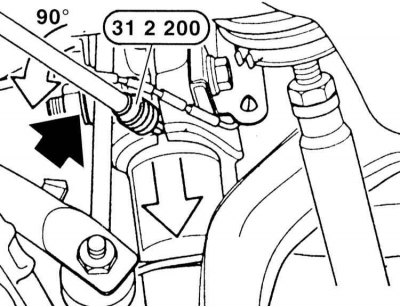
10. If the pivot arm cannot be removed (bottom arrow), release the slot of the rotary lever and fix the position of the tool. The service station uses a special tool BMW-31-2-200 or KLANN KL-0101 for this purpose. Insert the tool into the slot and turn it at an angle of 90°.
11. Support the shock absorber strut from below with a garage lift so that it does not fall when the upper mount is loosened.
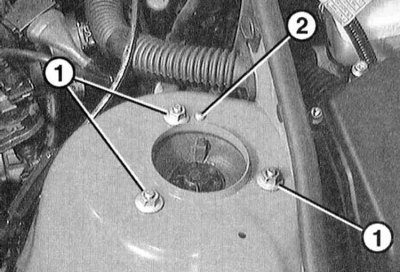
12. Unscrew the three nuts securing the shock absorber support support "1".
If the shock absorber support does not have a centering pin "2" or a corresponding hole, you can unscrew only one nut. Mark the position of the threaded pin in relation to the wheel arch as accurately as possible, so that the previous wheel alignment is maintained after installation.
13. Remove the shock absorber strut from the wheel arch.
Installation
14. Carefully insert the shock absorber strut into the wheel arch. The centering pin must enter the corresponding hole in the strut support. Screw new nuts onto the pins and tighten them to a torque of 25 N·m.
If the shock absorber strut support does not have a centering pin "2" or a corresponding hole, align the strut according to the marking applied during removal.
15. Place the steering knuckle "1" on the shock absorber strut "2" so that the centering pin "3" enters the slot of the steering knuckle.
16. Place the knuckle on the strut until it stops and tighten the bolt to a torque of 80 N·m.
17. Insert the joint into the steering knuckle and secure with a new nut to a torque of 65 Nm.
18. Connect the tie rod end to the steering knuckle and tighten with a new nut to a torque of 65 N·m.
19. Secure the rocker support with a new self-locking nut to a torque of 65 Nm on the shock absorber strut. At the same time, hold the hinge pin with a wrench to prevent it from turning.
20. Vehicles with xenon lamps: Install the beam range adjustment bracket on the cross arm.
21. Press the cable and brake hose with rubber supports into the holder.
22. Install the caliper, refer to Section Removal and installation the front brake guide.
23. Install the front wheel so that the markings applied during removal match. Pre-lubricate the centering belt of the wheel disk on the hub with a thin layer of bearing grease. Do not lubricate the wheel mounting bolts. Replace rusty bolts. Tighten the bolts. Lower the car onto the wheels and tighten the bolts crosswise to a torque of 100 N·m.
This article is available at russian, bulgarian, belarusian, ukrainian, serbian, croatian, romanian, polish, slovak, hungarian
Article verified: Sevastyanov Nikolay
Share information:
Previous articles
БМВ E46: Suspension front and rear
Next articles
Similar articles on other types of BMW cars:
Removal and installation the shock absorber strut BMW 5 Series E34 (1988-1996)
Removal and installation the shock absorber strut BMW 5 Series E39 (1995-2003)
Shock absorber strut — removal and installation BMW 7 Series E32 (1986-1994)
Removal and installation the anti-roll bar and its strut BMW 7 Series E38 (1994-2001)
Shock absorber strut BMW X3 E83 (2003-2010)
Replacing the front shock absorber strut BMW X5 E53 (1999-2006)
Link in different formats to this page
Visitor comments
No comments yet
- General information
- Manual
- Maintenance
- Power unit
- Engine repair
- Cooling system
- Power system (gasoline)
- Injection system (gasoline)
- Fuel system (diesel)
- Exhaust system
- Ignition system
- Charge and launch systems
- Transmission
- Car gearbox
- Clutch and drive shafts
- Chassis
- Brake system
- Suspension front and rear
- Steering
- Body
- Body care and repair
- Exterior
- Interior
- Electrical equipment
- Troubleshooting
- Lighting and signaling
- Equipment and devices
- Heater and air conditioner
- Electrical circuits
- General information
- Manual
- Repair on the road
- Weekly checks
- Maintenance
- Troubleshooting
- Power unit
- 4 cylinder engines
- 6 cylinder engines
- Engine overhaul
- Cooling and heating
- Fuel and exhaust system
- Starting and charging system
- Ignition system
- Transmission
- Clutch
- Mechanical gearbox
- Automatic gearbox
- Cardan and drive shafts
- Chassis
- Brake system
- Wheel suspension
- Steering
- Body
- Exterior
- Interior
- Electrical equipment
- Equipment and devices
- Electrical circuits
- General information
- Maintenance
- Power unit
- Engine repair
- Cooling system
- Ignition system
- Supply system
- Fuel injection system
- Exhaust system
- Transmission
- Clutch
- Car gearbox
- Front and rear axle
- Chassis
- Steering
- Brake system
- Body
- Exterior
- Interior
- Electrical equipment
- Heating system
- Equipment and devices
- Power devices
- Electrical circuits
- Power unit
- M10/M20 engine
- M40 engine
- Ignition system
- Lubrication system
- Cooling system
- Supply system
- Fuel injection
- Exhaust system
- Transmission
- Clutch
- Manual gearbox
- Front axle
- Rear axle
- Chassis
- Steering
- Brake system
- Body
- Exterior
- Interior
- Electrical equipment
- Heating system
- Equipment and devices
- Electrical circuits
- General information
- Specifications
- Operation and maintenance
- 4-cylinder engine
- Engine repair
- Cooling and lubrication system
- Supply system
- Ignition system
- 6-cylinder engine
- Engine repair
- Cooling and lubrication system
- Supply system
- Fuel injection system
- Ignition system
- Transmission
- Clutch
- 4-speed manual gearbox
- 5-speed manual gearbox
- Automatic gearbox
- Cardan and rear axle
- Chassis
- Steering
- Front suspension
- Rear suspension
- Brake system
- Electrical equipment
- Equipment and devices
- Electrical circuits