
Table of contents: Removal ↓ Installation ↓
- Home
- BMW 3 Series
- E46
- Power unit
- Fuel system (diesel)
- Removal and installation injectors
Removal and installation injectors (BMW 3 Series E46)
Damaged injectors can cause strong shocks during engine operation, reminiscent of an engine with damaged bearings. If such phenomena occur, start the engine at idle speed and loosen the union nuts of the high-pressure pipes one by one. If the shocks disappear when unscrewing any nut, this indicates a defect in the corresponding injector. The injector is checked using a pressure gauge (work of the service station).
The first signs of a faulty injector are as follows:
1. Remove the intake manifold, refer to Section Removal and installation the intake manifold.
2. Clean the high pressure fuel lines with cold cleaner.
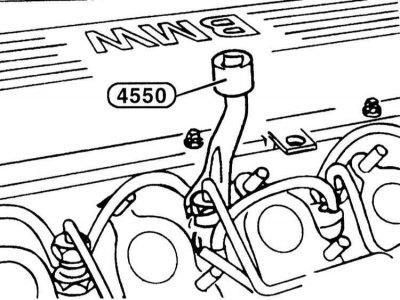
3. Remove the high-pressure fuel lines. To do this, use a spanner, such as HAZET 4550, to unscrew the union nuts on the injectors and the high-pressure fuel pump.
4. Cover the holes with protective caps or film with rubber bands to prevent dirt from getting into them.
5. Disconnect the cable going to the fourth cylinder injector.
6. Disconnect the drain hoses between the nozzles using pliers.
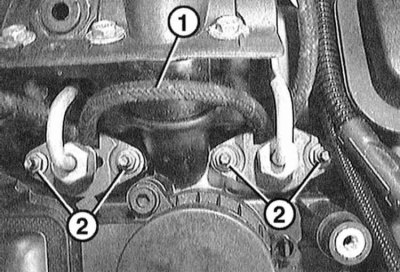
7. Disconnect the clamps securing the injectors "2" and remove the injectors.
The tool can be made as follows. Cut off the old nozzle at a distance of about 5 cm behind the union nut. Solder the M6 nut to the cut end of the pipeline with hard solder.
8. Screw the tool onto the injector and attach the impact puller to the soldered nut. Pull out the injector.
9. Remove the heat shield.
10. Be sure to install a new heat shield gasket between the cylinder head and the injector.
11. Insert the nozzle.
12. Connect the cable of the fourth injector.
13. Install the clamping clamps on the injectors. Tighten the clamping nuts to a torque of 10 N·m.
14. Install new drain hoses between the injectors.
15. Secure the high-pressure fuel lines to the injectors and high-pressure fuel pump with a torque of 25 N·m.
16. Install the intake manifold, refer to Section Removal and installation the intake manifold.
The first signs of a faulty injector are as follows:
- Engine power loss;
- Excessively black exhaust gases;
- Thick blue smoke on cold start;
- High fuel consumption;
- Engine overheating;
- Knocking in one or more cylinders;
- Incomplete combustion.
Removal
1. Remove the intake manifold, refer to Section Removal and installation the intake manifold.
2. Clean the high pressure fuel lines with cold cleaner.
3. Remove the high-pressure fuel lines. To do this, use a spanner, such as HAZET 4550, to unscrew the union nuts on the injectors and the high-pressure fuel pump.
4. Cover the holes with protective caps or film with rubber bands to prevent dirt from getting into them.
5. Disconnect the cable going to the fourth cylinder injector.
6. Disconnect the drain hoses between the nozzles using pliers.
7. Disconnect the clamps securing the injectors "2" and remove the injectors.
If the nozzle is not removed, you can use an impact puller. To use it, you need to make a special tool that is screwed onto the nozzle.
The tool can be made as follows. Cut off the old nozzle at a distance of about 5 cm behind the union nut. Solder the M6 nut to the cut end of the pipeline with hard solder.
8. Screw the tool onto the injector and attach the impact puller to the soldered nut. Pull out the injector.
9. Remove the heat shield.
Installation
10. Be sure to install a new heat shield gasket between the cylinder head and the injector.
11. Insert the nozzle.
The injector with the needle displacement sensor is always inserted into the fourth, i.e. rear cylinder. It can be recognized by the attached cable.
12. Connect the cable of the fourth injector.
13. Install the clamping clamps on the injectors. Tighten the clamping nuts to a torque of 10 N·m.
14. Install new drain hoses between the injectors.
15. Secure the high-pressure fuel lines to the injectors and high-pressure fuel pump with a torque of 25 N·m.
16. Install the intake manifold, refer to Section Removal and installation the intake manifold.
This article is available at russian, bulgarian, belarusian, ukrainian, serbian, croatian, romanian, polish, slovak, hungarian
Article verified: Sevastyanov Nikolay
Share information:
Previous articles
БМВ E46: Fuel system (diesel)
Next articles
Similar articles on other types of BMW cars:
Removal and installation valve injectors BMW 5 Series E39 (1995-2003)
Removal and installation the oil pan BMW 5 Series E12 (1972-1981)
Injectors — removal and installation BMW 7 Series E32 (1986-1994)
Removal and installation of fuel distribution line and injectors BMW 7 Series E38 (1994-2001)
Pistons — removal and installation BMW X3 E83 (2003-2010)
Removal and installation of injectors BMW X5 E53 (1999-2006)
Link in different formats to this page
Visitor comments
No comments yet
- General information
- Manual
- Maintenance
- Power unit
- Engine repair
- Cooling system
- Power system (gasoline)
- Injection system (gasoline)
- Fuel system (diesel)
- Exhaust system
- Ignition system
- Charge and launch systems
- Transmission
- Car gearbox
- Clutch and drive shafts
- Chassis
- Brake system
- Suspension front and rear
- Steering
- Body
- Body care and repair
- Exterior
- Interior
- Electrical equipment
- Troubleshooting
- Lighting and signaling
- Equipment and devices
- Heater and air conditioner
- Electrical circuits
- General information
- Manual
- Repair on the road
- Weekly checks
- Maintenance
- Troubleshooting
- Power unit
- 4 cylinder engines
- 6 cylinder engines
- Engine overhaul
- Cooling and heating
- Fuel and exhaust system
- Starting and charging system
- Ignition system
- Transmission
- Clutch
- Mechanical gearbox
- Automatic gearbox
- Cardan and drive shafts
- Chassis
- Brake system
- Wheel suspension
- Steering
- Body
- Exterior
- Interior
- Electrical equipment
- Equipment and devices
- Electrical circuits
- General information
- Maintenance
- Power unit
- Engine repair
- Cooling system
- Ignition system
- Supply system
- Fuel injection system
- Exhaust system
- Transmission
- Clutch
- Car gearbox
- Front and rear axle
- Chassis
- Steering
- Brake system
- Body
- Exterior
- Interior
- Electrical equipment
- Heating system
- Equipment and devices
- Power devices
- Electrical circuits
- Power unit
- M10/M20 engine
- M40 engine
- Ignition system
- Lubrication system
- Cooling system
- Supply system
- Fuel injection
- Exhaust system
- Transmission
- Clutch
- Manual gearbox
- Front axle
- Rear axle
- Chassis
- Steering
- Brake system
- Body
- Exterior
- Interior
- Electrical equipment
- Heating system
- Equipment and devices
- Electrical circuits
- General information
- Specifications
- Operation and maintenance
- 4-cylinder engine
- Engine repair
- Cooling and lubrication system
- Supply system
- Ignition system
- 6-cylinder engine
- Engine repair
- Cooling and lubrication system
- Supply system
- Fuel injection system
- Ignition system
- Transmission
- Clutch
- 4-speed manual gearbox
- 5-speed manual gearbox
- Automatic gearbox
- Cardan and rear axle
- Chassis
- Steering
- Front suspension
- Rear suspension
- Brake system
- Electrical equipment
- Equipment and devices
- Electrical circuits