

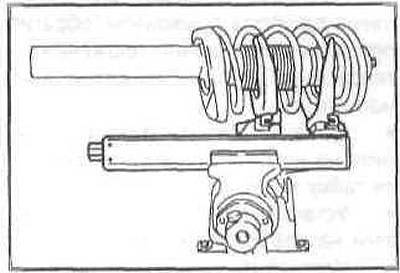
Elements of depreciation
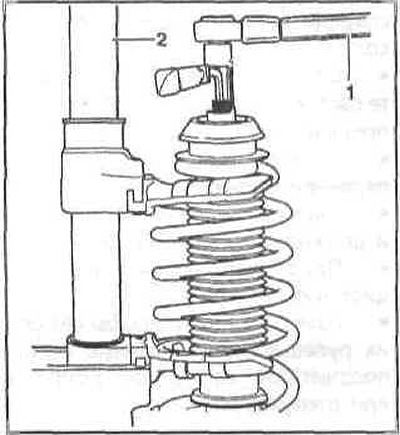
1 - shock absorber;
2 — case;
3 - support;
4 - upper spring support;
5 — nut (tightening torque with piston rod with external hexagon — 65 Nm, tightening torque with piston rod with internal hexagon — 45 Nm);
6 - protective cap;
7 — upper spring plate;
8 - plastic spring;
9 — spring;
10 - lower spring support;
11 - nut;
12 — bolt (only in the version for driving on bad roads);
14 — ring (for full piston rod);
15 - sealing ring;
16 - washer;
17 - washer;
18 — bolt.
Disassembling the shock absorber/removing and installing the shock absorber/spring
Note: Replace shock absorber struts on one axle only in pairs with exactly the same ones with BMW identification numbers. The number is on the strut.
Removal
Remove the shock absorber strut.
To remove the shock absorber, you need to compress the spring with a suitable compressor. Use a plastic lining to protect the surface of the spring.
Caution: Never remove the shock absorber until the spring has been removed.
Attention: The compressor must be installed on the spring coils so that it securely grips them and cannot slip off the spring. The spring is compressed with great force, so only a reliable device must be used. Never tie the spring with wire - this is dangerous.
Loosen the fastening nut with a bent open-end wrench, while holding the piston rod, depending on the design, with either a hex key or an 11 open-end wrench.
Note: The nut is tightened to a high torque, so if necessary, loosen it by hitting it with a hammer on the wrench.
Remove the washer.
Remove the support with the sealing key and the washer.
Remove the upper spring plate with support, as well as the spring, or remove the shock absorber from the spring.
Note: If you only need to replace the spring, slowly loosen it. If you only need to replace the shock absorber, the spring remains compressed.
Remove the plastic spring, rubber boot and lower spring plate.
Installation
The new spring is coated with a protective compound against corrosion. Before installation, check the integrity of the coating and, if necessary, restore it in the right places.
Check the rubber boot, plastic spring and spring supports for damage and replace if necessary.
Insert the shock absorber with the lower spring plate, plastic spring and boot into the compressed spring.
Assemble the shock absorber strut, following the drawings. Make sure that the ends of the spring enter the recesses of the upper and lower spring plates. Tighten the new self-locking nut a few turns.
Slowly release the spring until it enters the spring plates. Make sure the spring supports are seated correctly (rectangular notches).
Tighten the mounting nut to 65 Nm (if the piston rod has a recess for a hex key, then 45 Nm), while holding the piston rod. To ensure the correct tightening torque, a special set of wrenches is used in workshops.
Release the spring completely and remove the compressor.
Install the shock absorber strut.
[The original text can be read on the website: «BMWMAN»]