
The clutch consists of a clutch pressure plate, a clutch driven plate and a release bearing.
pressure plate (basket) The clutch is bolted to the flywheel, which in turn is connected to the engine crankshaft. Between the clutch pressure plate and the flywheel is the clutch disc, which is pressed against the flywheel by the pressure plate. The driven disk is centered on the splined primary (input) shaft of a manual transmission.
When you press the clutch pedal (disengaging the clutch) With the help of a hydraulic drive, the clutch release lever is pressed against the pressure plate spring and presses on its petals. In this case, the clutch pressure plate is released, and the driven plate is no longer pressed against the flywheel. No power is transferred from the engine to the gearbox.
The clutch on all models is hydraulically actuated. The hydraulic clutch system uses brake fluid and is provided with brake fluid from a common reservoir with the brake system.
Each time the clutch is engaged and disengaged, the clutch disc wears a little due to friction. Thus, the driven disk is a wear part, and its average service life is more than 100 thousand kilometers. The wear rate depends mainly on the load (trailer towing) and driving style. The clutch is maintenance-free, because it self-regulates.
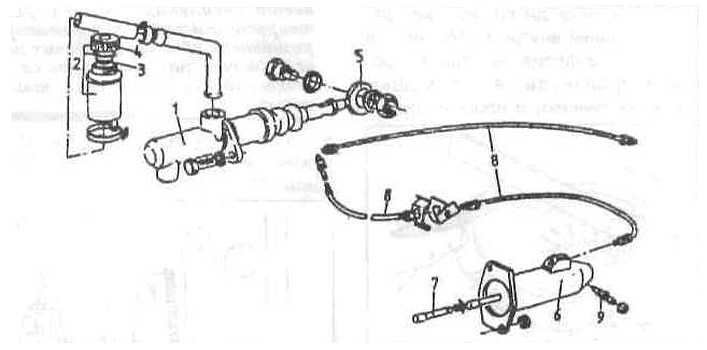
clutch drive
1 - main cylinder;
2 - tank;
3 - filter;
4 - cork;
5 - thrust;
6 - working cylinder;
7 - pusher;
8 - pipeline;
9 - air release valve.
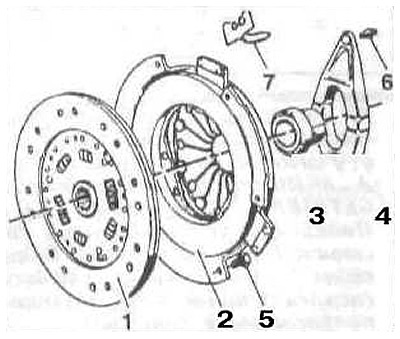
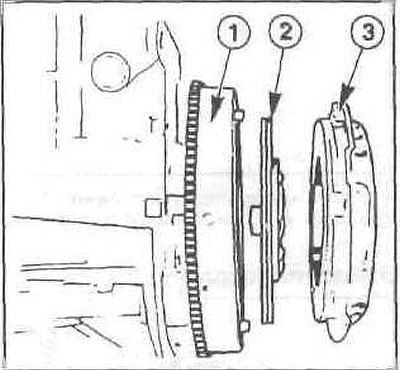
Clutch elements
1 - driven disk;
2 - pressure plate (basket) clutch;
3 - release bearing;
4 - clutch release lever;
5 - fastening bolt;
6 - ball pin;
7 - spring clip.
Withdrawal
Remove the gearbox.
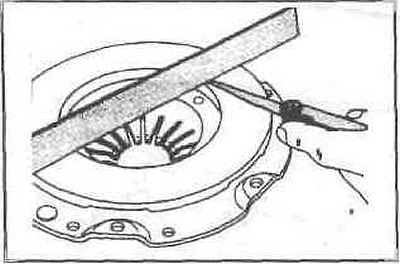
Fasten the flywheel to the ring gear with a screwdriver and a rod or with a special tool (1). Loosen the clutch pressure plate mounting bolts 1-1.5 turns in turn until the pressure plate loosens.
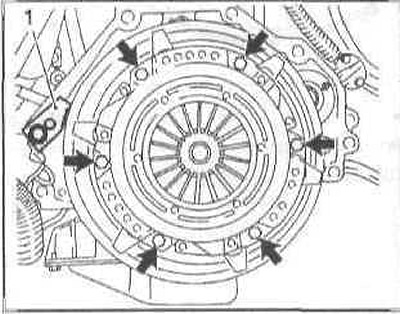
Attention: When the bolts are almost completely unscrewed, the diaphragm may be damaged (dish-shaped) spring and dowel pins between pressure plate and flywheel due to misalignment.
Finally, completely unscrew the bolts.
Remove the pressure and driven clutch discs.
Attention: The pressure plate and driven plate must not fall when removed, otherwise problems with gear shifting and clutch operation may occur after installation.
Wipe and clean the flywheel.
Examination
Check the pressure plate for burn marks and scratches and replace if necessary.
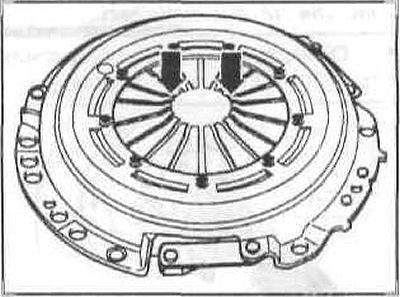
Check the diaphragm spring for damage (arrows).
Check spring connections between pressure plate and cover (casing) for the presence of cracks, tightness of fastening of rivets. Clutch discs with damaged or loose rivets must be replaced.
Check the working surface of the pressure plate for deep scratches, burn marks and wear. Pressure plates that are deformed inwards by more than 0.3 mm must not be installed. Checking is carried out using a steel ruler and flat probes.
Check the flywheel for signs of overheating and scratches and replace if necessary. After each unscrewing, the fastening bolts must be replaced. If the old flywheel is installed, then replace the bolts and tighten them crosswise with a torque of 105 Nm.
Wipe the clutch pressure plate and flywheel with very fine sandpaper.
Oily or mechanically damaged clutch discs must be replaced.
Gently compress the clutch disc linings with a vise and measure the thickness with a caliper. The minimum thickness of the linings should reach 7.5 mm, and if this is not the case, then replace the clutch disc. The same applies to the scratches on the linings.
Have a workshop check the runout of the clutch disc. Lateral runout of the disc should be no more than 0.5 mm.
Attention: This check is only necessary when the previous driven plate is being installed and the clutch has not previously disengaged correctly.
Remove the release bearing from the transmission tube and check it.
Check the ball bearing in the crankshaft for ease of movement. If necessary, remove the bearing with an internal puller and replace with a new one.
Installation
Attention: Before installing a new clutch, remove the protective anti-corrosion coating from the working surfaces of the pressure plate and flywheel with a solvent (if the flywheel is new).
Install slave drive (2) and clutch pressure plate (3) flywheel (1).
Attention: The flat side of the driven plate must be directed towards the pressure plate. Driven disc labeled GETRIEBESEITE (checkpoint side). The inscription in the installed state must also be visible. Place the clutch pressure plate on the appropriate guide pins.
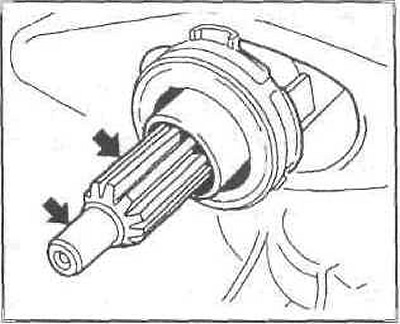
The driven disc must be centered during installation using a suitable mandrel (1) or old input shaft.
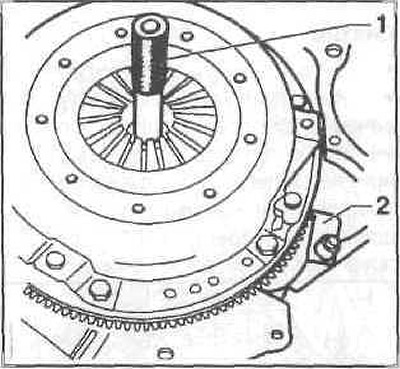
Tighten the clutch pressure plate mounting bolts 1 to 1.5 turns at a time in turn.
When tightening the bolts, make sure that the pressure plate is attracted to the flywheel evenly and without distortion.
The tightening torque is determined by the class of bolts that is stamped on their heads:
- threaded bolts M8 class 8.8 - 25 Nm;
- class 10.9 -35 Nm.
Pull out the centering tool.
If installed, remove the tool from the flywheel.
Lubricate the splines of the input shaft of the gearbox with grease, applying it in a thin layer. Do not use too much grease, otherwise it may get on the working surfaces of the clutch disc, resulting in poor clutch performance.
Install the gearbox.
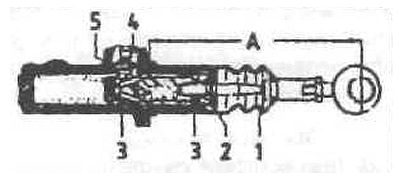
Clutch Master Cylinder
1 - anther;
2 - safety ring;
3 - cuffs;
4 - sealing plug;
5 - washer;
A \u003d 140 + 0.5 mm - adjusting size.