



- Home
- BMW 3 Series
- E30
- Electrical equipment
- Equipment and devices
- Removal and installation the radio
Removal and installation the radio (BMW 3 Series E30)
Factory-installed radios come with different mounting options.
If the receiver has a quick-release mount, it allows for quick removal and installation of the radio. However, this can only be done with a special tool that is supplied with the radio or is available for sale. The presence of a quick-release device is usually determined by the presence of 2 or 4 holes on the front panel.
Disconnect the ground wire from the battery.
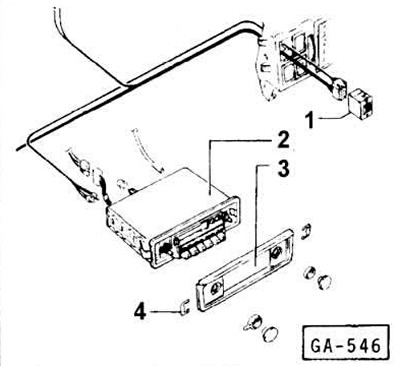
1 Tuning knob
2 Radio receiver
3 Front panel
4 Mounting bracket
Remove both control handles and the decorative washers located underneath them.
Use a narrow screwdriver to press upwards the fixing springs of the front panel on the control axes.
Remove the front panel. Then insert the clips on the back of the panel into the recesses again. The bent tabs of the locking springs should be on top and facing the front of the front panel.
Loosen the screws on each side near the adjustment axes and remove the retaining plates.
Remove the radio.
Disconnect the ground and positive battery power (+) connectors, as well as the speakers and automatic antenna from the rear of the radio (if any) and pull out the antenna cable itself.
Connect all wires and the antenna to the appropriate sockets on the back side.
Insert the radio into the dashboard. The radio is fixed with its back side on the support.
Insert the retaining brackets next to the axes of the adjustment elements and secure them with screws. Do not tighten the screws too much.
Install the front panel with the retaining springs. Press the tabs of the retaining springs with a narrow screwdriver so that the panel fits into place.
Place decorative washers on both adjustment axes.
Put on the control handles.
Connect the ground wire to the battery.
Turn on the radio and check its operation.
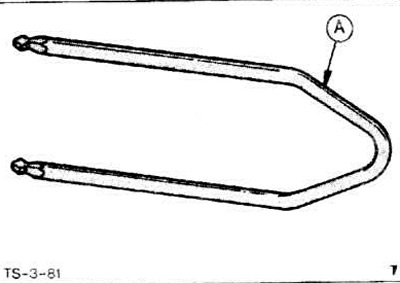
Insert two "A" brackets into the holes on the left and right of the front panel. If there are no holes, remove the control knobs and the front panel. Insert the pull-out brackets.
Pull the radio receiver out evenly with the pullers, while slightly pressing the pullers outward (from the radio). When removing the radio, do not tilt it.
Label the speaker connectors (left/right) with adhesive tape and disconnect. Pull out the antenna. Disconnect the connectors of the wire B (+) and ground. When installing a digital radio receiver, disconnect the piezoelectric connector (terminal 30). If available, disconnect the automatic antenna connector.
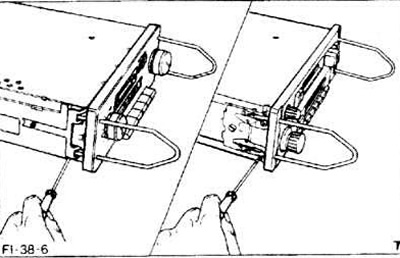
Remove the pullers. To do this, press the locks with a screwdriver.
Connect the wires and antenna to the back of the radio.
Insert the radio into the dashboard until the latches click into place.
If it was removed, install the overlay and adjustment knobs.
Connect the ground wire to the battery.
Turn on the radio and check its operation.
Disconnect the ground wire from the battery.
Carefully remove the radio cover with a screwdriver.
Remove the rotary knob.
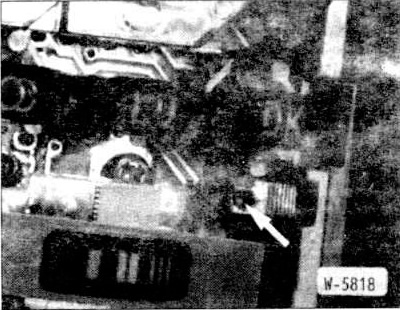
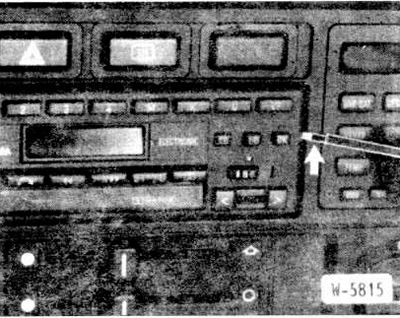
The radio is supplied with hooks for releasing the locks. Insert the hooks into the left and right clamps (arrow).
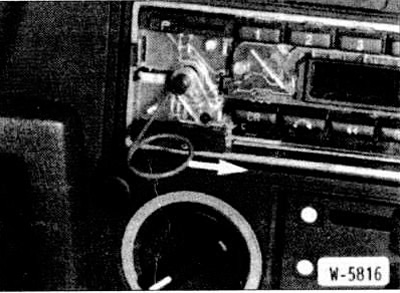
Move both hooks towards the center.
Remove the radio.
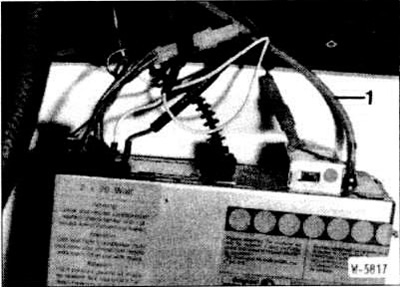
Disconnect the antenna and all connectors from the back of the radio.
Connect the antenna to the rear of the radio and connect the following connectors: B (+) and ground connector, electronics and lighting power connector, speaker connector, automatic antenna connector (if any), adapter connector.
Insert the radio receiver, the clamps will lock automatically.
Place the overlay and insert the rotary knob.
Connect the ground wire to the battery.
Turn on the radio and check its operation.
[The website served as the basis for the text: «BMWMan»]
If the receiver has a quick-release mount, it allows for quick removal and installation of the radio. However, this can only be done with a special tool that is supplied with the radio or is available for sale. The presence of a quick-release device is usually determined by the presence of 2 or 4 holes on the front panel.
Removal
Disconnect the ground wire from the battery.
Radio Bavaria/S
1 Tuning knob
2 Radio receiver
3 Front panel
4 Mounting bracket
Remove both control handles and the decorative washers located underneath them.
Use a narrow screwdriver to press upwards the fixing springs of the front panel on the control axes.
Remove the front panel. Then insert the clips on the back of the panel into the recesses again. The bent tabs of the locking springs should be on top and facing the front of the front panel.
Loosen the screws on each side near the adjustment axes and remove the retaining plates.
Remove the radio.
Disconnect the ground and positive battery power (+) connectors, as well as the speakers and automatic antenna from the rear of the radio (if any) and pull out the antenna cable itself.
Installation
Connect all wires and the antenna to the appropriate sockets on the back side.
Insert the radio into the dashboard. The radio is fixed with its back side on the support.
Insert the retaining brackets next to the axes of the adjustment elements and secure them with screws. Do not tighten the screws too much.
Install the front panel with the retaining springs. Press the tabs of the retaining springs with a narrow screwdriver so that the panel fits into place.
Place decorative washers on both adjustment axes.
Put on the control handles.
Note: When putting on the handles, the mute mode may be activated. If necessary, press the handle again.
Connect the ground wire to the battery.
Turn on the radio and check its operation.
Note: If you are installing an additional radio receiver, tune the antenna. To do this, tune to a weak medium-wave transmitter and use a small screwdriver to achieve the best reception by turning the antenna compensation screw (top right on the front panel of the radio).
Removal with extractor snobs. Bavaria Cassette III, Europa digital
Insert two "A" brackets into the holes on the left and right of the front panel. If there are no holes, remove the control knobs and the front panel. Insert the pull-out brackets.
Pull the radio receiver out evenly with the pullers, while slightly pressing the pullers outward (from the radio). When removing the radio, do not tilt it.
Label the speaker connectors (left/right) with adhesive tape and disconnect. Pull out the antenna. Disconnect the connectors of the wire B (+) and ground. When installing a digital radio receiver, disconnect the piezoelectric connector (terminal 30). If available, disconnect the automatic antenna connector.
Remove the pullers. To do this, press the locks with a screwdriver.
Installation
Connect the wires and antenna to the back of the radio.
Insert the radio into the dashboard until the latches click into place.
If it was removed, install the overlay and adjustment knobs.
Connect the ground wire to the battery.
Turn on the radio and check its operation.
Radio receiver Bavaria Elektronic
Removal
Disconnect the ground wire from the battery.
Carefully remove the radio cover with a screwdriver.
Remove the rotary knob.
The radio is supplied with hooks for releasing the locks. Insert the hooks into the left and right clamps (arrow).
Move both hooks towards the center.
Remove the radio.
Disconnect the antenna and all connectors from the back of the radio.
Installation
Connect the antenna to the rear of the radio and connect the following connectors: B (+) and ground connector, electronics and lighting power connector, speaker connector, automatic antenna connector (if any), adapter connector.
Insert the radio receiver, the clamps will lock automatically.
Place the overlay and insert the rotary knob.
Connect the ground wire to the battery.
Turn on the radio and check its operation.
[The website served as the basis for the text: «BMWMan»]
This article is available at russian, bulgarian, belarusian, ukrainian, serbian, croatian, romanian, polish, slovak, hungarian
Article verified: Polikarpov Saveliy
Share information:
Previous articles
БМВ E30: Equipment and devices
Next articles
Similar articles on other types of BMW cars:
Removal and installation the radio BMW 5 Series E34 (1988-1996)
Removal and installation radio BMW 5 Series E39 (1995-2003)
Cylinder Head Cover — Removal and Installation BMW 7 Series E32 (1986-1994)
Pistons — removal and installation BMW X3 E83 (2003-2010)
Removal and installation the engine BMW X5 E53 (1999-2006)
Removal and installation the radio BMW 5 Series E34 (1988-1996)
Removal and installation radio BMW 5 Series E39 (1995-2003)
Cylinder Head Cover — Removal and Installation BMW 7 Series E32 (1986-1994)
Pistons — removal and installation BMW X3 E83 (2003-2010)
Removal and installation the engine BMW X5 E53 (1999-2006)
Link in different formats to this page
Visitor comments
No comments yet
- General information
- Manual
- Maintenance
- Power unit
- Engine repair
- Cooling system
- Power system (gasoline)
- Injection system (gasoline)
- Fuel system (diesel)
- Exhaust system
- Ignition system
- Charge and launch systems
- Transmission
- Car gearbox
- Clutch and drive shafts
- Chassis
- Brake system
- Suspension front and rear
- Steering
- Body
- Body care and repair
- Exterior
- Interior
- Electrical equipment
- Troubleshooting
- Lighting and signaling
- Equipment and devices
- Heater and air conditioner
- Electrical circuits
- General information
- Manual
- Repair on the road
- Weekly checks
- Maintenance
- Troubleshooting
- Power unit
- 4 cylinder engines
- 6 cylinder engines
- Engine overhaul
- Cooling and heating
- Fuel and exhaust system
- Starting and charging system
- Ignition system
- Transmission
- Clutch
- Mechanical gearbox
- Automatic gearbox
- Cardan and drive shafts
- Chassis
- Brake system
- Wheel suspension
- Steering
- Body
- Exterior
- Interior
- Electrical equipment
- Equipment and devices
- Electrical circuits
- General information
- Maintenance
- Power unit
- Engine repair
- Cooling system
- Ignition system
- Supply system
- Fuel injection system
- Exhaust system
- Transmission
- Clutch
- Car gearbox
- Front and rear axle
- Chassis
- Steering
- Brake system
- Body
- Exterior
- Interior
- Electrical equipment
- Heating system
- Equipment and devices
- Power devices
- Electrical circuits
- Power unit
- M10/M20 engine
- M40 engine
- Ignition system
- Lubrication system
- Cooling system
- Supply system
- Fuel injection
- Exhaust system
- Transmission
- Clutch
- Manual gearbox
- Front axle
- Rear axle
- Chassis
- Steering
- Brake system
- Body
- Exterior
- Interior
- Electrical equipment
- Heating system
- Equipment and devices
- Electrical circuits
- General information
- Specifications
- Operation and maintenance
- 4-cylinder engine
- Engine repair
- Cooling and lubrication system
- Supply system
- Ignition system
- 6-cylinder engine
- Engine repair
- Cooling and lubrication system
- Supply system
- Fuel injection system
- Ignition system
- Transmission
- Clutch
- 4-speed manual gearbox
- 5-speed manual gearbox
- Automatic gearbox
- Cardan and rear axle
- Chassis
- Steering
- Front suspension
- Rear suspension
- Brake system
- Electrical equipment
- Equipment and devices
- Electrical circuits