
- Home
- BMW 3 Series
- E46
- Transmission
- Clutch and drive shafts
- Removal and installation the clutch
Removal and installation the clutch (BMW 3 Series E46)
The BMW 3 Series uses a self-adjusting clutch (SAC - Self Adjusting Clutch). When removing and installing this clutch, it is essential to press the pressure plate with a special BMW tool. A similar tool is also available from KLANN. In addition, a special BMW or KLANN centering rod is required to install the driven disk. The workflow using the BMW tool is described here. If the KLANN tool is used, its description must be followed.
Removal
1. Remove the manual transmission, refer to Section Removal and installation of manual transmission.
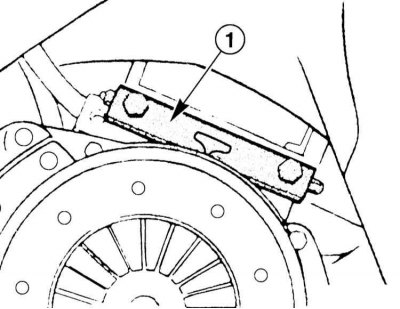
2. Fix the engine flywheel to the toothed ring with a screwdriver and rod or a special BMW "1" tool. There is a similar tool from KLANN KL-0110.
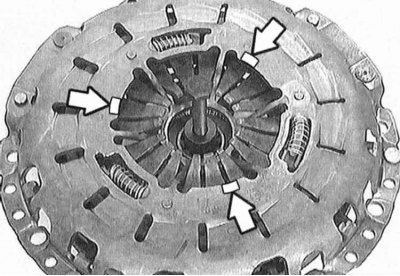
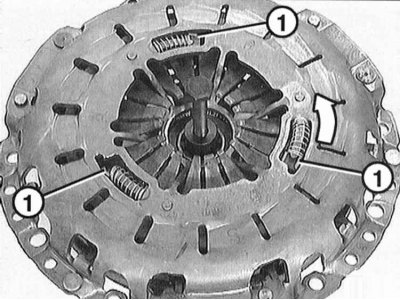
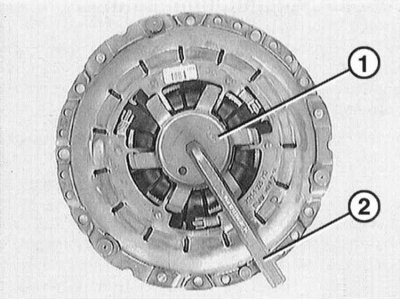
The special tool BMW 21 2 160 or KLANN KL-0500-10 may only be installed at the points shown in the illustration, otherwise the clutch may be damaged.
The illustration shows the clutch with the centering rod inserted. The tool is not yet inserted.

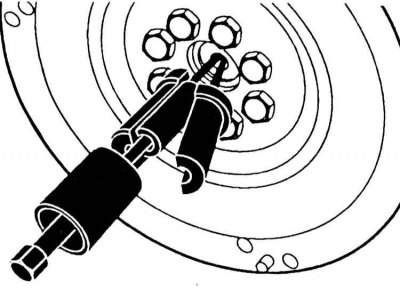
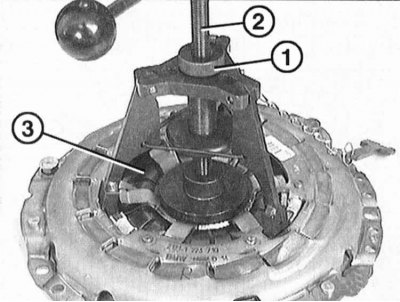
3. Insert the pre-compression device, refer to the illustration. Tighten the screw "1" and check the reliability of its position.
4. Screw in screw "2" so that springs "3" are compressed to the stop. Loosen the clutch basket mounting bolts sequentially by 1 - 1.5 turns so as to relieve the pressure plate.
If all the bolts are unscrewed at once, the springs and pins of the clutch basket and flywheel may be damaged due to the distortion.
5. Finally, completely unscrew all bolts.
6. Remove the clutch basket and driven disc.
Do not drop the basket and driven disk when removing, otherwise, after assembly, malfunctions in the clutch may occur.
7. Wipe the flywheel.
Examination
1. Check the flywheel for scoring. If any, the flywheel should be replaced. After each removal, new special bolts should be installed. Tighten the flywheel-to-crankshaft mounting bolts crosswise to the torques given in the Specifications.
2. Check the ease of rotation of the guide bearing (radial ball bearing). Otherwise, remove the bearing with a puller, for example, KLANN KL-0043-31, and press the new bearing in until it stops with a hammer and brass rod.
3. Remove the clutch release bearing from the support pipe on the manual transmission and check, refer to Section Removal and installation the clutch release bearing.
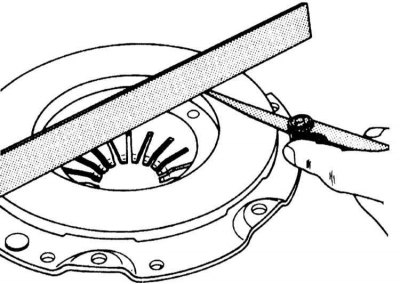
4. Check the adjacent surface of the pressure plate for cracks, overheating and wear. A pressure plate with a deflection of up to 0.3 mm inward can be installed. Check with a ruler and feeler gauge.
5. Clean the pressure plate and flywheel with micrometer sandpaper.
6. Check the clutch basket springs for damage.
7. Replace an oily or mechanically damaged disc.
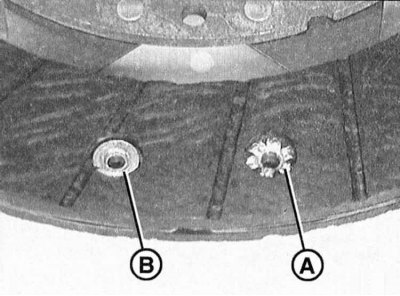
8. Measure the thickness of the friction linings of the driven disk with a caliper. To do this, measure the distance between the friction surface and the heads of the rivets "A".
The distance should be measured at the closing head "A" and not at the rivet insert head "B". The distance should remain at least 1.0 mm. Otherwise, the disc must be replaced.
Installation
When installing new parts, remove the anti-corrosion varnish only from the friction surfaces of the pressure plate and flywheel. Do not soak the clutch basket in solvent or blow it with compressed air, as otherwise the operation of the clutch adjustment mechanism is not guaranteed.
Installing a used clutch basket
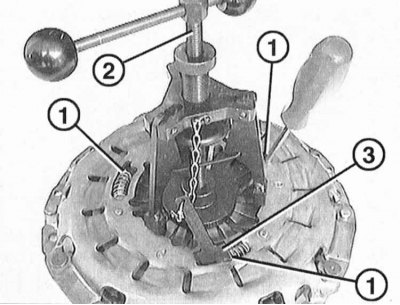
1. Move the adjusting ring back. To do this, place the clutch basket together with the pre-tensioning tool on a clean lining. Fix the adjusting ring with a screwdriver at one of the grooves "1"
2. Loosen screw "2" of the preload tool so that the adjusting ring can be turned with a screwdriver.
3. Turn the adjustment ring at the pressure elements "1" to the left until it stops using a screwdriver.
4. Insert the lock "3" into the groove. This will fix the adjusting ring.
5. Turn the tensioning tool screw until the diaphragm spring in the basket is pressed until it stops.
6. Insert the clutch disc into the flywheel.

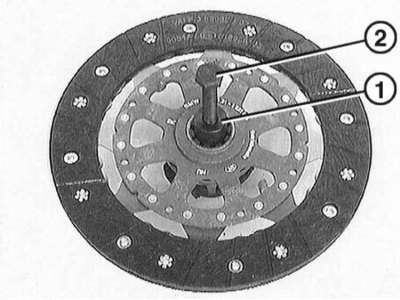
7. Center the clutch disc in the flywheel using tool "1", for example, BMW 21 2 142 or KLANN KL-0500.
8. Place the clutch basket on the corresponding pins. Tighten the clutch basket mounting bolts sequentially by 1 - 1.5 turns until it is secured. Make sure that when tightening the bolts, the clutch basket sits on the flywheel evenly. The tightening torque depends on the strength class of the bolts, which is stamped on the bolt head. Refer to Specifications.
9. Loosen the screw with the preload tool until the spring in the basket is completely unloaded. Loosen screw "1" and remove the tool.

10. Remove the centering device with bolt "2" from the driven disk. To do this, screw in the bolt and pull it.
Installing a new clutch basket
11. Insert the driven disk into the flywheel.

12. Center the clutch disc in the flywheel using tool "1" for the pilot bearing in the crankshaft, for example, tool BMW 21 2 142 or KLANN KL-0500.
13. Place the clutch basket on the corresponding pins. Tighten the clutch basket mounting bolts sequentially by 1 - 1.5 turns so that the disc is secured. Make sure that when tightening the bolts, the clutch basket is pulled into the flywheel evenly. The tightening torque depends on the strength class of the bolts, which is stamped on the bolt head, refer to the Specifications.
The locking element "1" may only be removed when the clutch basket is secured. Unscrew the locking element with the 14 mm socket wrench "2" by turning it clockwise.
When the locking element is turned out, the diaphragm spring may make a characteristic noise, which should not be paid attention to.
14. Pull the centering device out of the driven disk with the bolt. To do this, screw in the bolt and pull it.
15. Remove the centering tool from the flywheel.
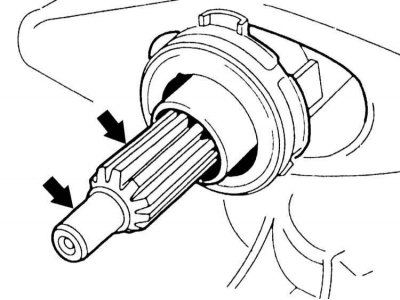
16. Lubricate the grooves of the splined connection of the manual transmission input shaft with a thin layer of grease "ESSO UNIREX".
Do not apply too much grease, otherwise it may get on the friction surfaces of the clutch and cause failures in the clutch. The required amount of grease is approximately the size of a grain of rice. Then move the driven disk on the manual transmission shaft in different directions so that the hub moves easily along the shaft. Remove excess grease.
17. Install the manual transmission, refer to Section Removal and installation of manual transmission.
This article is available at russian, bulgarian, belarusian, ukrainian, serbian, croatian, romanian, polish, slovak, hungarian
Article verified: Sevastyanov Nikolay
Share information:
Previous articles
БМВ E46: Clutch and drive shafts
Next articles
Similar articles on other types of BMW cars:
Removal and installation the clutch master cylinder BMW 5 Series E12 (1972-1981)
Removal and installation the fan and fan clutch BMW 5 Series E34 (1988-1996)
Removal and installation the clutch pedal BMW 7 Series E38 (1994-2001)
Fan/Fan Clutch — Removal and Installation BMW 7 Series E32 (1986-1994)
Removal and installation the clutch master cylinder BMW X3 E83 (2003-2010)
Removal and installation the clutch BMW X5 E53 (1999-2006)
Link in different formats to this page
Visitor comments
No comments yet
- General information
- Manual
- Maintenance
- Power unit
- Engine repair
- Cooling system
- Power system (gasoline)
- Injection system (gasoline)
- Fuel system (diesel)
- Exhaust system
- Ignition system
- Charge and launch systems
- Transmission
- Car gearbox
- Clutch and drive shafts
- Chassis
- Brake system
- Suspension front and rear
- Steering
- Body
- Body care and repair
- Exterior
- Interior
- Electrical equipment
- Troubleshooting
- Lighting and signaling
- Equipment and devices
- Heater and air conditioner
- Electrical circuits
- General information
- Manual
- Repair on the road
- Weekly checks
- Maintenance
- Troubleshooting
- Power unit
- 4 cylinder engines
- 6 cylinder engines
- Engine overhaul
- Cooling and heating
- Fuel and exhaust system
- Starting and charging system
- Ignition system
- Transmission
- Clutch
- Mechanical gearbox
- Automatic gearbox
- Cardan and drive shafts
- Chassis
- Brake system
- Wheel suspension
- Steering
- Body
- Exterior
- Interior
- Electrical equipment
- Equipment and devices
- Electrical circuits
- General information
- Maintenance
- Power unit
- Engine repair
- Cooling system
- Ignition system
- Supply system
- Fuel injection system
- Exhaust system
- Transmission
- Clutch
- Car gearbox
- Front and rear axle
- Chassis
- Steering
- Brake system
- Body
- Exterior
- Interior
- Electrical equipment
- Heating system
- Equipment and devices
- Power devices
- Electrical circuits
- Power unit
- M10/M20 engine
- M40 engine
- Ignition system
- Lubrication system
- Cooling system
- Supply system
- Fuel injection
- Exhaust system
- Transmission
- Clutch
- Manual gearbox
- Front axle
- Rear axle
- Chassis
- Steering
- Brake system
- Body
- Exterior
- Interior
- Electrical equipment
- Heating system
- Equipment and devices
- Electrical circuits
- General information
- Specifications
- Operation and maintenance
- 4-cylinder engine
- Engine repair
- Cooling and lubrication system
- Supply system
- Ignition system
- 6-cylinder engine
- Engine repair
- Cooling and lubrication system
- Supply system
- Fuel injection system
- Ignition system
- Transmission
- Clutch
- 4-speed manual gearbox
- 5-speed manual gearbox
- Automatic gearbox
- Cardan and rear axle
- Chassis
- Steering
- Front suspension
- Rear suspension
- Brake system
- Electrical equipment
- Equipment and devices
- Electrical circuits