
- Home
- BMW 3 Series
- E46
- Transmission
- Clutch and drive shafts
- Removal and installation drive shafts
Removal and installation drive shafts (BMW 3 Series E46)
Drive shaft with protective covers
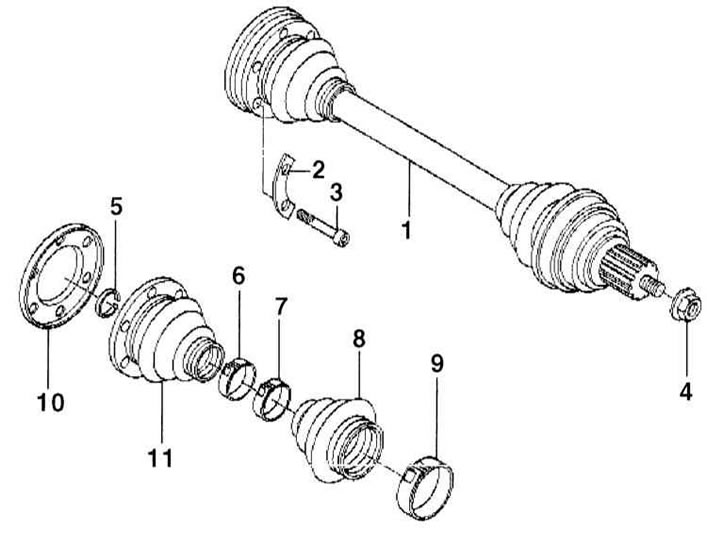
1 — drive shaft. Joint diameter - 93 mm
2 - bar
3 - cylindrical screw or Torx
4 - hub mounting nut
5 - retaining ring
6 — hose clamp. Small diameter, for attaching the inner cover
7 — hose clamp. Small diameter, for attaching the outer cover
8 - outer cover
9 — hose clamp. Large diameter, for attaching the outer cover
10 — lid
11 — inner cover
Removal
The drive shafts are different lengths. The shorter drive shaft is on the left, the longer one is on the right. If both drive shafts are removed, they must be marked before removal.
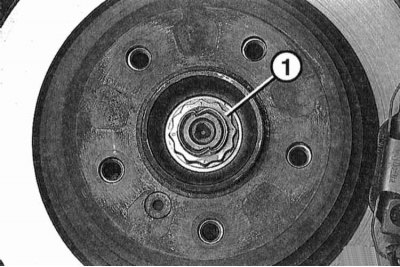
1. Use a chisel to knock off the planes and unscrew the flange nut "1".
The nut sits very tightly. Therefore, for safety reasons, unscrew the nut when the car is standing on its wheels. To prevent the wheel from turning, ask an assistant to press the brake pedal.
2. Mark the position of the corresponding rear wheel relative to the hub with paint. This will allow the balanced wheel to be installed in its original position during assembly. Loosen the wheel mounting bolts with the car on the ground. Raise the rear of the car, place it on stands and remove the rear wheel.
3. Disconnect the exhaust system from the rear, lower it and support it.

4. Disconnect the anti-roll bar "1" from the rear suspension beam (arrow on the illustration) and pull it down. Note: Only the left mount is shown in the illustration.
5. Remove the flange nut from the drive shaft.
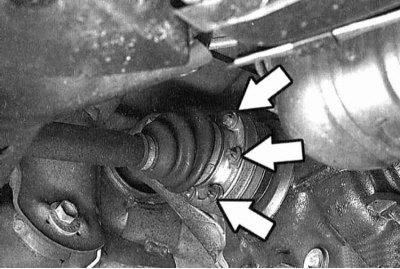
6. Unscrew six (arrows in the illustration). Press it away from the driven flange and hang it up, securing it with wire.
Only three mounting screws are visible in the illustration.
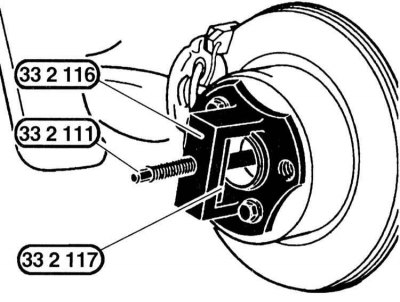
7. For this purpose, the appropriate or BMW tool is required, see illustration. The puller 332116 is secured with two wheel mounting bolts and the screw 33211 is screwed into the drive shaft by screwing into the threaded element 332117. As a result, the drive shaft is pressed out.
8. Remove the drive shaft.
Installation
1. Bring the drive shaft in and hang it on the wire.
2. Pull in the drive shaft using, for example, the bridge 332116 and the screw 332119 with the screw sleeve 332115. In this case, first screw the screw onto the drive shaft. On the other side of the screw, screw the threaded sleeve onto it and turn it towards the bridge. In this way, the drive shaft is pulled into the hub. Make sure that the splines of the drive shaft and the hub match before pulling in.
3. Lightly lubricate the mating surface of the nut and screw it on.
4. Position the drive shaft against the differential. Install the Torx socket head cap screws and tighten to 65 Nm.
5. Remove the wire from the axle.
6. Raise the stabilizer and secure it.
7. Install the rear exhaust system, refer to Section Removal and installation of the exhaust system.
8. Install the rear wheel so that the markings applied during removal match. Pre-lubricate the centering belt of the wheel disk on the hub with a thin layer of bearing grease. Do not lubricate the wheel mounting bolts. Replace rusty bolts. Tighten the bolts. Lower the car onto the wheels.
9. Tighten the flange nut to 250 Nm. To secure the wheel, have an assistant press the brake pedal.
10. Chisel the nut, thus securing it from unscrewing, for which, using a punch, press the flange of the nut into the groove of the drive shaft.
11. Tighten the wheel mounting bolts crosswise to a torque of 100 Nm.
12. Secure the stabilizer, for which ensure the vehicle is unladen, refer to Section Removal and installation the rear shock absorber.
This article is available at russian, bulgarian, belarusian, ukrainian, serbian, croatian, romanian, polish, slovak, hungarian
Article verified: Sevastyanov Nikolay
Share information:
Previous articles
БМВ E46: Clutch and drive shafts
Next articles
Similar articles on other types of BMW cars:
Removal and installation drive shafts BMW 5 Series E28 (1981-1988)
Removal and installation of primary and secondary shafts BMW 5 Series E12 (1972-1981)
Drive shafts — removal and installation BMW 7 Series E32 (1986-1994)
Removal and installation drive shafts BMW 7 Series E38 (1994-2001)
Pistons — removal and installation BMW X3 E83 (2003-2010)
Removal and installation the alternator drive belt BMW X5 E53 (1999-2006)
Link in different formats to this page
Visitor comments
No comments yet
- General information
- Manual
- Maintenance
- Power unit
- Engine repair
- Cooling system
- Power system (gasoline)
- Injection system (gasoline)
- Fuel system (diesel)
- Exhaust system
- Ignition system
- Charge and launch systems
- Transmission
- Car gearbox
- Clutch and drive shafts
- Chassis
- Brake system
- Suspension front and rear
- Steering
- Body
- Body care and repair
- Exterior
- Interior
- Electrical equipment
- Troubleshooting
- Lighting and signaling
- Equipment and devices
- Heater and air conditioner
- Electrical circuits
- General information
- Manual
- Repair on the road
- Weekly checks
- Maintenance
- Troubleshooting
- Power unit
- 4 cylinder engines
- 6 cylinder engines
- Engine overhaul
- Cooling and heating
- Fuel and exhaust system
- Starting and charging system
- Ignition system
- Transmission
- Clutch
- Mechanical gearbox
- Automatic gearbox
- Cardan and drive shafts
- Chassis
- Brake system
- Wheel suspension
- Steering
- Body
- Exterior
- Interior
- Electrical equipment
- Equipment and devices
- Electrical circuits
- General information
- Maintenance
- Power unit
- Engine repair
- Cooling system
- Ignition system
- Supply system
- Fuel injection system
- Exhaust system
- Transmission
- Clutch
- Car gearbox
- Front and rear axle
- Chassis
- Steering
- Brake system
- Body
- Exterior
- Interior
- Electrical equipment
- Heating system
- Equipment and devices
- Power devices
- Electrical circuits
- Power unit
- M10/M20 engine
- M40 engine
- Ignition system
- Lubrication system
- Cooling system
- Supply system
- Fuel injection
- Exhaust system
- Transmission
- Clutch
- Manual gearbox
- Front axle
- Rear axle
- Chassis
- Steering
- Brake system
- Body
- Exterior
- Interior
- Electrical equipment
- Heating system
- Equipment and devices
- Electrical circuits
- General information
- Specifications
- Operation and maintenance
- 4-cylinder engine
- Engine repair
- Cooling and lubrication system
- Supply system
- Ignition system
- 6-cylinder engine
- Engine repair
- Cooling and lubrication system
- Supply system
- Fuel injection system
- Ignition system
- Transmission
- Clutch
- 4-speed manual gearbox
- 5-speed manual gearbox
- Automatic gearbox
- Cardan and rear axle
- Chassis
- Steering
- Front suspension
- Rear suspension
- Brake system
- Electrical equipment
- Equipment and devices
- Electrical circuits