
Table of contents: Removal ↓ Installation ↓
- Home
- BMW 3 Series
- E46
- Transmission
- Car gearbox
- Removal and installation the propeller shaft
Removal and installation the propeller shaft (BMW 3 Series E46)
Two different driveshaft designs are installed: a two-piece driveshaft with a central bearing and a driveshaft with two central bearings and one additional constant velocity joint. Note the difference when removing.
1. Raise and support the vehicle. Remove the exhaust system, refer to Section Removal and installation of the exhaust system.
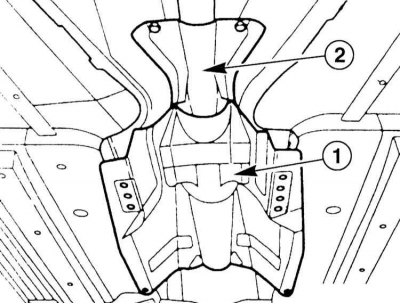
2. Loosen the mounting bolts and remove heat shields "1" and "2" from the bottom.
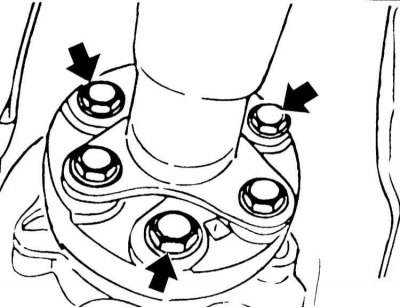
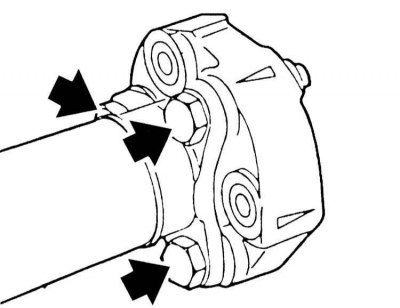
3. Loosen the mounting bolts and disconnect the elastic coupling from the gearbox (arrows in the illustration). While doing this, hold the cardan shaft with a strap wrench to prevent it from turning.
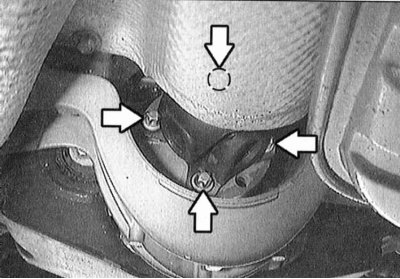
4. Loosen the mounting bolts and disconnect the propeller shaft from the rear axle gearbox (arrows in the illustration). Note: To install the cardan shaft in its previous position, mark the relative positions of the cardan shaft and gearbox flanges with paint.
5. Loosen the threaded ring a few turns (arrow on the illustration) on the sliding element using a large spanner. If such a spanner is not available, loosen the threaded ring with a gas wrench.
6. Press the flange of the cardan shaft with a screwdriver from the rear axle gearbox. In this case, the cardan shaft moves at the sliding element (arrow on the illustration).
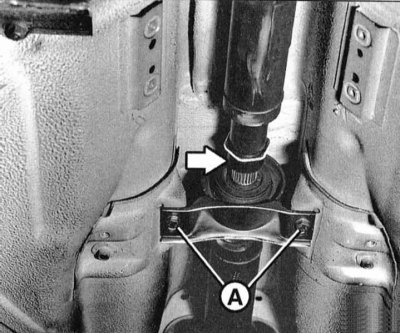
7. Loosen the center bearing mounting bolts "A", refer to the illustration.
8. Cardan shaft, consisting of three parts: Similarly, unscrew the second threaded ring at the central bearing. Press the front flange of the cardan shaft back, while the cardan shaft moves.
9. The cardan shaft consists of three parts: Unscrew the bolts securing the second central bearing to the bottom.
10. Slightly tilt the cardan shaft down at the central bearing and remove it from the centering journal on the gearbox.
If there is vibration and noise coming from the cardan shaft, it must be balanced at a service station. In addition, it is necessary to find out whether the joints are in good condition. There are service stations that specialize in repairing cardan shafts.
11. Replace the elastic coupling if it is deformed or has pores. To do this, unscrew the mounting bolts (arrows in the illustration). Insert the new coupling so that the arrows on the circle point towards the corresponding flange levers.
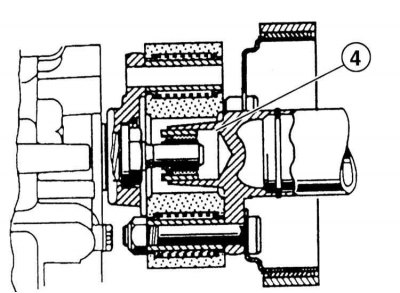
12. Before installation, visually inspect the centering element "4" of the cardan shafts. Lubricate the centering element with grease "MOLYKOTE LONGTHERM 2 PLUS" or "OPTIMOL OLISTAMOLY 2". Replace the damaged element at a service station.
13. Insert the cardan shaft first from the front into the centering element and secure with bolts, but do not tighten.
14. Place the cardan shaft with the extended joint on the rear axle gearbox flange.
15. Lightly tighten the threaded ring at the sliding element of the propeller shaft to a torque of 10 Nm.
16. Tighten the nuts securing the cardan shaft to the gearbox evenly to the torque values specified in the Specifications. Use new self-locking nuts.
17. Tighten the cardan shaft to the gearbox flange with new self-locking nuts. The tightening torque depends on the strength class of the bolts, which is stamped on the head (refer to Specifications).
18. Secure the central bearing to the bottom with a torque of 20 Nm.
19. The cardan shaft consists of three parts: Secure the second central bearing to the bottom with a torque of 20 Nm. Tighten the threaded ring with a torque of 10 Nm.
20. Secure the exhaust heat shield. Install the exhaust system, refer to Section Removal and installation of the exhaust system.
Removal
The operation of lifting and installing the vehicle on stands is associated with danger! Therefore, before carrying out the operation, read the Section Jacking and towing
1. Raise and support the vehicle. Remove the exhaust system, refer to Section Removal and installation of the exhaust system.
2. Loosen the mounting bolts and remove heat shields "1" and "2" from the bottom.
3. Loosen the mounting bolts and disconnect the elastic coupling from the gearbox (arrows in the illustration). While doing this, hold the cardan shaft with a strap wrench to prevent it from turning.
4. Loosen the mounting bolts and disconnect the propeller shaft from the rear axle gearbox (arrows in the illustration). Note: To install the cardan shaft in its previous position, mark the relative positions of the cardan shaft and gearbox flanges with paint.
5. Loosen the threaded ring a few turns (arrow on the illustration) on the sliding element using a large spanner. If such a spanner is not available, loosen the threaded ring with a gas wrench.
6. Press the flange of the cardan shaft with a screwdriver from the rear axle gearbox. In this case, the cardan shaft moves at the sliding element (arrow on the illustration).
7. Loosen the center bearing mounting bolts "A", refer to the illustration.
While doing this, hold the cardan shaft so that it does not fall. Do not drop the shaft into the joints. In particular, at the constant velocity joint, the shaft can crush the rubber boot.
8. Cardan shaft, consisting of three parts: Similarly, unscrew the second threaded ring at the central bearing. Press the front flange of the cardan shaft back, while the cardan shaft moves.
9. The cardan shaft consists of three parts: Unscrew the bolts securing the second central bearing to the bottom.
10. Slightly tilt the cardan shaft down at the central bearing and remove it from the centering journal on the gearbox.
Protect the constant velocity joint of the cardan shaft from contamination with a cover or a plastic bag.
Installation
If there is vibration and noise coming from the cardan shaft, it must be balanced at a service station. In addition, it is necessary to find out whether the joints are in good condition. There are service stations that specialize in repairing cardan shafts.
11. Replace the elastic coupling if it is deformed or has pores. To do this, unscrew the mounting bolts (arrows in the illustration). Insert the new coupling so that the arrows on the circle point towards the corresponding flange levers.
12. Before installation, visually inspect the centering element "4" of the cardan shafts. Lubricate the centering element with grease "MOLYKOTE LONGTHERM 2 PLUS" or "OPTIMOL OLISTAMOLY 2". Replace the damaged element at a service station.
13. Insert the cardan shaft first from the front into the centering element and secure with bolts, but do not tighten.
14. Place the cardan shaft with the extended joint on the rear axle gearbox flange.
15. Lightly tighten the threaded ring at the sliding element of the propeller shaft to a torque of 10 Nm.
16. Tighten the nuts securing the cardan shaft to the gearbox evenly to the torque values specified in the Specifications. Use new self-locking nuts.
17. Tighten the cardan shaft to the gearbox flange with new self-locking nuts. The tightening torque depends on the strength class of the bolts, which is stamped on the head (refer to Specifications).
18. Secure the central bearing to the bottom with a torque of 20 Nm.
19. The cardan shaft consists of three parts: Secure the second central bearing to the bottom with a torque of 20 Nm. Tighten the threaded ring with a torque of 10 Nm.
20. Secure the exhaust heat shield. Install the exhaust system, refer to Section Removal and installation of the exhaust system.
This article is available at russian, bulgarian, belarusian, ukrainian, serbian, croatian, romanian, polish, slovak, hungarian
Article verified: Sevastyanov Nikolay
Share information:
Previous articles
БМВ E46: Car gearbox
Next articles
Similar articles on other types of BMW cars:
Removal and installation the propeller shaft BMW 5 Series E34 (1988-1996)
Removal and installation the propeller shaft BMW 5 Series E39 (1995-2003)
Removal and installation the cardan shaft and elastic coupling BMW 7 Series E38 (1994-2001)
Cylinder Head Cover — Removal and Installation BMW 7 Series E32 (1986-1994)
Half shaft — removal and installation of the left or right half shaft BMW X3 E83 (2003-2010)
Removal and installation the front axle drive shaft BMW X5 E53 (1999-2006)
Link in different formats to this page
Visitor comments
No comments yet
- General information
- Manual
- Maintenance
- Power unit
- Engine repair
- Cooling system
- Power system (gasoline)
- Injection system (gasoline)
- Fuel system (diesel)
- Exhaust system
- Ignition system
- Charge and launch systems
- Transmission
- Car gearbox
- Clutch and drive shafts
- Chassis
- Brake system
- Suspension front and rear
- Steering
- Body
- Body care and repair
- Exterior
- Interior
- Electrical equipment
- Troubleshooting
- Lighting and signaling
- Equipment and devices
- Heater and air conditioner
- Electrical circuits
- General information
- Manual
- Repair on the road
- Weekly checks
- Maintenance
- Troubleshooting
- Power unit
- 4 cylinder engines
- 6 cylinder engines
- Engine overhaul
- Cooling and heating
- Fuel and exhaust system
- Starting and charging system
- Ignition system
- Transmission
- Clutch
- Mechanical gearbox
- Automatic gearbox
- Cardan and drive shafts
- Chassis
- Brake system
- Wheel suspension
- Steering
- Body
- Exterior
- Interior
- Electrical equipment
- Equipment and devices
- Electrical circuits
- General information
- Maintenance
- Power unit
- Engine repair
- Cooling system
- Ignition system
- Supply system
- Fuel injection system
- Exhaust system
- Transmission
- Clutch
- Car gearbox
- Front and rear axle
- Chassis
- Steering
- Brake system
- Body
- Exterior
- Interior
- Electrical equipment
- Heating system
- Equipment and devices
- Power devices
- Electrical circuits
- Power unit
- M10/M20 engine
- M40 engine
- Ignition system
- Lubrication system
- Cooling system
- Supply system
- Fuel injection
- Exhaust system
- Transmission
- Clutch
- Manual gearbox
- Front axle
- Rear axle
- Chassis
- Steering
- Brake system
- Body
- Exterior
- Interior
- Electrical equipment
- Heating system
- Equipment and devices
- Electrical circuits
- General information
- Specifications
- Operation and maintenance
- 4-cylinder engine
- Engine repair
- Cooling and lubrication system
- Supply system
- Ignition system
- 6-cylinder engine
- Engine repair
- Cooling and lubrication system
- Supply system
- Fuel injection system
- Ignition system
- Transmission
- Clutch
- 4-speed manual gearbox
- 5-speed manual gearbox
- Automatic gearbox
- Cardan and rear axle
- Chassis
- Steering
- Front suspension
- Rear suspension
- Brake system
- Electrical equipment
- Equipment and devices
- Electrical circuits