
- Home
- BMW 5 Series
- E12
- Power unit
- Ignition system
- Features of removal and installation of the ignition distributor sensor
Features of removal and installation of the ignition distributor sensor (BMW 5 Series E12)
Removal
Don't forget to disconnect the wire between the proximity sensor and the connector that connects the ignition distributor sensor to the switch.
Make sure that the spring latches are not attracted by the permanent magnet.
Installation
Turn the ignition distributor rotor counterclockwise so as to maintain dimension "A" 3.5 cm to the mark on the distributor sensor body (see photo).
Insert the distributor into the bracket.
Set the ignition timing.
Replacing the contactless ignition distributor sensor
Remove the rotor and dust shield.
Remove the vacuum advance regulator.
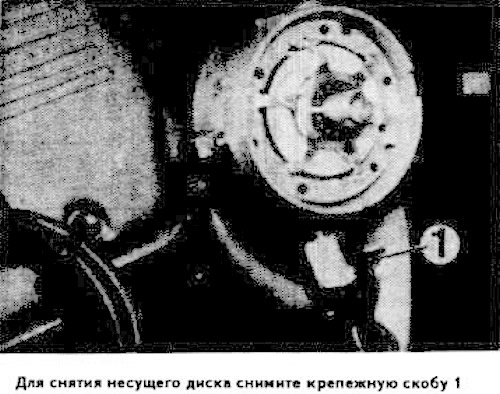
Remove the mounting bracket 1 and carefully pull out the carrier disk in a straight line.
Turn the rotor so that its teeth coincide with the stator teeth and measure the gap "A" (see photo), which should be equal to 0.35-0.70 mm.
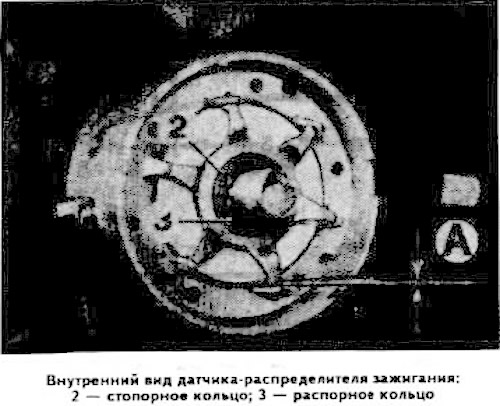
Remove retaining ring 2.
Remove spacer ring 3.
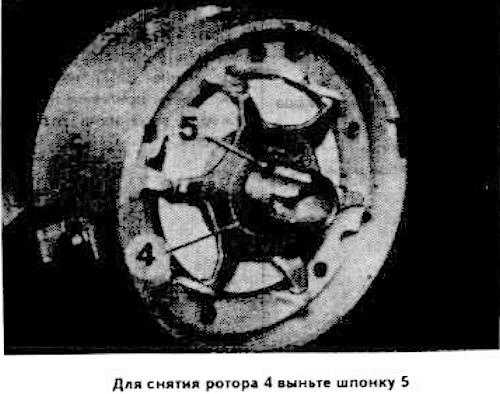
Carefully remove rotor 4 using two screwdrivers inserted from opposite sides, after first removing key 5.
Remove thrust washer 7.
Remove the three screws securing the proximity sensor bracket (shown by arrows in the photo).
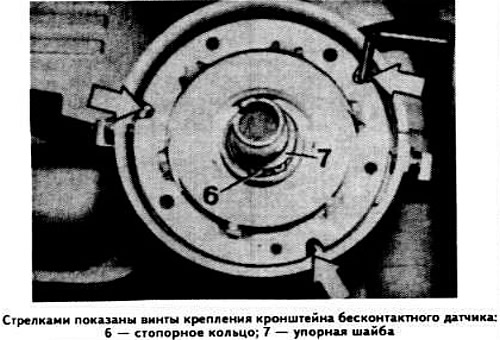
Remove retaining ring 6.
Press the fastening brackets and remove the bracket with the contactless sensor.
Remove the proximity sensor from the bracket.
The installation of a new contactless sensor is carried out in the reverse order of removal, taking into account the following:
- direct the sensor petal leads towards the cutout on the carrier disk;
- when installing the rotor, align the cutout of its sleeve with the groove of the shaft;
- when installing the vacuum regulator, turn the stator to the left.
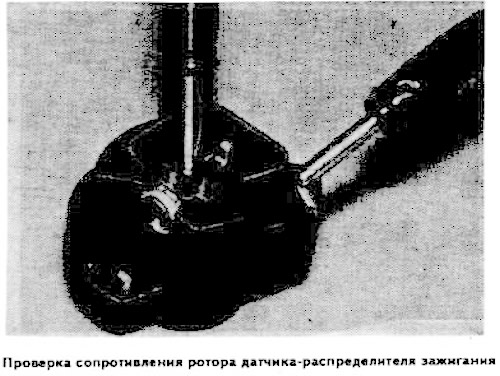
Checking the ignition distributor sensor
Check the resistance of the distributor rotor (see photo). The resistance of the rotor with the interference suppression resistor should be 5000 Ohms.
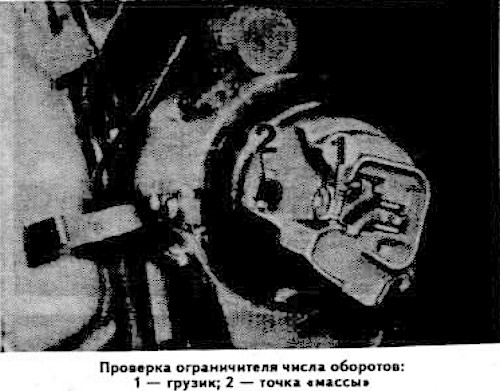
Check that the speed limiter is activated when the ignition current is shorted to ground 2 by regulator weight 1.
This article is available at russian, bulgarian, belarusian, ukrainian, serbian, croatian, romanian, polish, slovak, hungarian
Article verified: Polikarpov Saveliy
Share information:
Previous articles
БМВ E12: Ignition system
Next articles
Similar articles on other types of BMW cars:
Removal and installation the contact ignition distributor BMW 3 Series E21 (1975-1983)
Removal and installation the ignition distributor BMW 3 Series E30 (1982-1994)
Heater Temperature Sensor — Removal and Installation BMW 7 Series E32 (1986-1994)
Removal and installation the fuel rail pressure sensor BMW 7 Series E38 (1994-2001)
Pistons — removal and installation BMW X3 E83 (2003-2010)
Removal and installation the ignition coil BMW X5 E53 (1999-2006)
Link in different formats to this page
Visitor comments
No comments yet
- General information
- Governing bodies
- Manual
- Maintenance
- Power unit
- Engine repair
- Lubrication system
- Cooling system
- Ignition system
- Supply system
- Injection system (gasoline)
- Injection system (diesel)
- Exhaust system
- Transmission
- Clutch
- Car gearbox
- Front axle
- Rear axle
- Chassis
- Steering
- Brake system
- Wheels and tires
- Body
- Interior
- Exterior
- Heating system
- Electrical equipment
- Equipment and devices
- Power devices
- Windscreen wipers
- Electrical circuits
- General information
- Manual
- Maintenance
- Power unit
- Engine repair
- Ignition system
- Engine lubrication system
- Cooling system
- Fuel system (gasoline)
- Fuel system (diesel)
- Exhaust system
- Transmission
- Clutch
- Car gearbox
- Chassis
- Front and rear suspension
- Steering
- Brake system
- Body
- Exterior
- Interior
- Electrical equipment
- Heating system
- Equipment and devices
- Power devices
- Electrical circuits
- General information
- Manual
- Maintenance
- Power unit
- Engine in a car
- Engine overhaul
- Cooling system
- Supply system
- Ignition system
- Control system
- Transmission
- Clutch
- Manual gearbox
- Automatic gearbox
- Transmission line
- Chassis
- Steering
- Front suspension
- Rear suspension
- Brake system
- Body
- Body elements
- Car care and painting
- Electrical equipment
- Heater and air conditioner
- Equipment and devices
- Starter and generator
- Electrical circuits
- General information
- Operation and maintenance
- Specifications
- Power unit
- Engine repair
- Cooling and lubrication system
- Supply system
- Ecotronic power supply system
- Fuel injection system
- Ignition system
- Transmission
- Clutch
- Gearbox BMW 242/4
- Gearbox Getrag 262/8
- Gearbox Getrag 265/6
- Automatic gearbox
- Cardan gear
- Rear axle
- Chassis
- Steering
- Front suspension
- Rear suspension
- Brake system
- Electrical equipment
- Equipment and devices
- Electrical circuits