
Table of contents: Examination ↓ Replacing the CV joint and its…↓
- Home
- BMW 5 Series
- E28
- Transmission
- Transmission line
- Checking and replacing CV joints and their protective covers
Checking and replacing CV joints and their protective covers (BMW 5 Series E28)
Some automotive dealers supply replacement "split" type boot covers that can be installed without removing the drive shaft from the vehicle (they wrap easily around the hinge after cutting off the old cover). It's very convenient; however, the authors of this Manual still recommend removing the drive shaft, cleaning the CV joint from dirt and moisture, which shorten its service life, and installing a new one-piece protective cover.
If you notice signs of CV joint wear (usually caused by damage to protective covers), they should be replaced - both joints can be replaced individually.
Fully restored drive shafts can be purchased on an exchange basis, which will help save a lot of time and effort. In any case, before dismantling the car, find out the cost and availability of all parts.
Examination
The CV joints and their boots should be inspected regularly, and whenever you raise the vehicle. Jack up the vehicle and support it securely on axle stands. Inspect the CV joint boots for cracks, leaks, and broken clamp bands. If grease leaks through a hole or crack in the boot, it will cause premature wear of the CV joint and require replacement. Replace damaged boots immediately. Grasp each drive shaft in turn, rotate them in both directions, and move them in and out to check for play, indicating worn splines or loose joints.
Replacing the CV joint and its protective cover
1. Remove the driveshaft (see section Removal and installation the propeller shaft).
2. Open the clips of the protective covers, remove them and discard them.
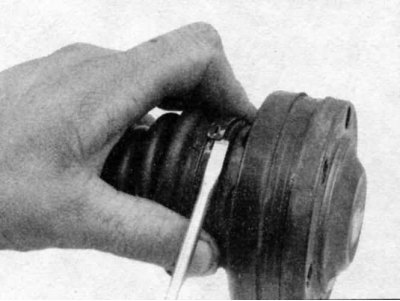
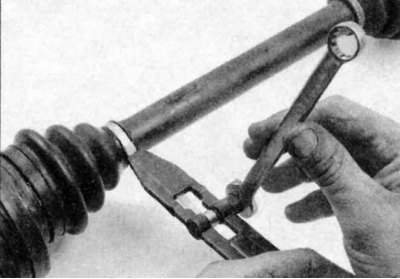
3. Open the large clip of the protective cover...
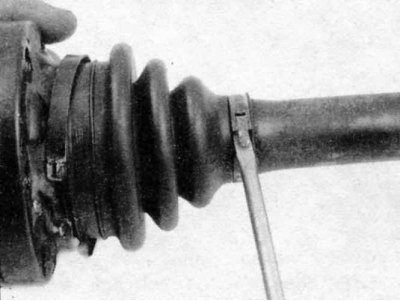
...then the small clip, then remove and discard both.
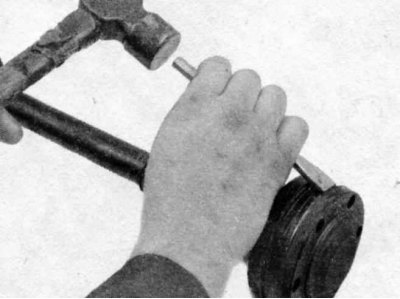
4. Knock off the protective cover from the CV joint using a hammer and chisel.
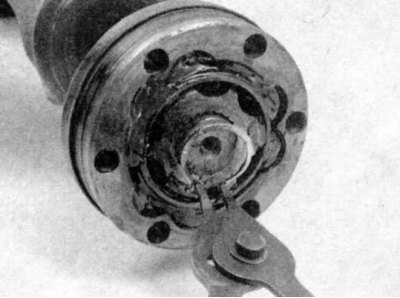
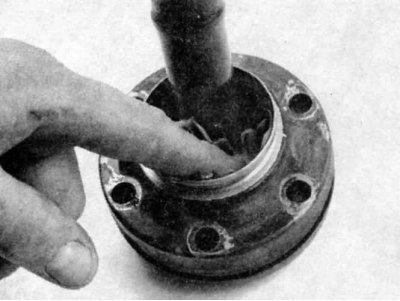
5. Remove the large snap ring that holds the CV joint to the drive shaft using a pair of snap ring pliers.
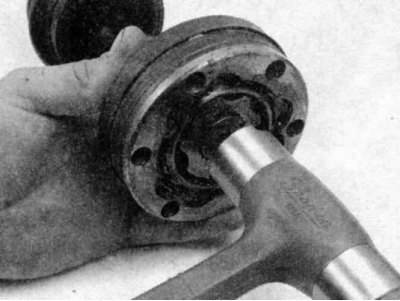
6. Tap the end of the drive shaft gently (just not on the CV joint collars) and separate the shaft from the joint.
7. Remove the old protective cover from the drive shaft.
8. Thoroughly wash the CV joint in solvent. Rinse off all the old grease and blow out the solvent with compressed air if possible.
Wear safety glasses when using compressed air.
9. Inspect the CV joint for deep scratches, grooves, cavities and other signs of wear. If the CV joint is damaged, replace it.
10. Wrap the splines on the end of the drive shaft with tape to protect the new boots from damage when installing them.
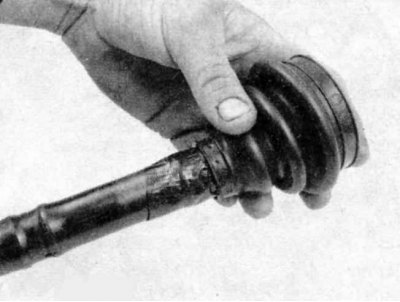
11. Install new covers, then remove the tape.
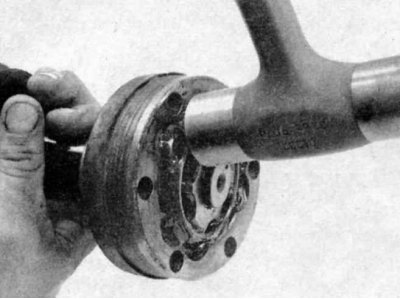
12. Carefully tap the CV joint onto the drive shaft - use a soft-faced hammer to avoid damaging the collar. Install the retaining ring.
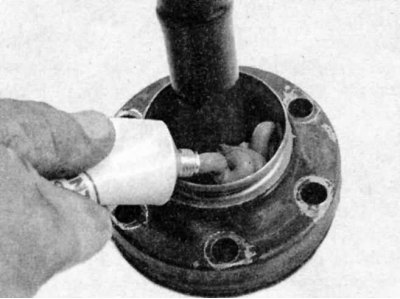
13. Fill the cavity in the rear part of the joint with special grease...
...and push the grease into the joint.
14. Install the protective boot into the groove on the drive shaft and place the small clamp and tighten it with a special tool for tightening the strips (available at any auto parts store).
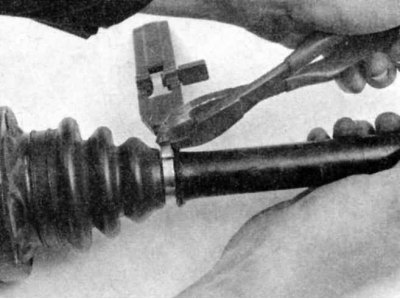
15. Bend the end of the clamp back and cut off the excess.
16. Fill the rest of the joint with special grease (see illustrations above). Push it into the hinge and then install the protective cover.
17. Install the large clamp and tighten it (see illustrations above).
18. Install the drive shaft (see section Removal and installation drive shafts).
Read the original source on the website: «www.bmwman.ru»
This article is available at russian, bulgarian, belarusian, ukrainian, serbian, croatian, romanian, polish, slovak, hungarian
Article verified: Zhuravleva Isolda
Share information:
Previous articles
БМВ E28: Transmission line
Next articles
Similar articles on other types of BMW cars:
Checking the condition of the protective covers of the drive shafts BMW 3 Series E46 (1998-2006)
Checking the level and replacing the oil in the automatic transmission BMW 3 Series E21 (1975-1983)
Checking the condition of the protective covers of the CV joints of… BMW 7 Series E38 (1994-2001)
Valve guides — checking and replacing BMW 7 Series E32 (1986-1994)
Replacing the intake camshaft BMW X3 E83 (2003-2010)
Replacing the drive shaft protective covers BMW X5 E53 (1999-2006)
Link in different formats to this page
Visitor comments
No comments yet
- General information
- Governing bodies
- Manual
- Maintenance
- Power unit
- Engine repair
- Lubrication system
- Cooling system
- Ignition system
- Supply system
- Injection system (gasoline)
- Injection system (diesel)
- Exhaust system
- Transmission
- Clutch
- Car gearbox
- Front axle
- Rear axle
- Chassis
- Steering
- Brake system
- Wheels and tires
- Body
- Interior
- Exterior
- Heating system
- Electrical equipment
- Equipment and devices
- Power devices
- Windscreen wipers
- Electrical circuits
- General information
- Manual
- Maintenance
- Power unit
- Engine repair
- Ignition system
- Engine lubrication system
- Cooling system
- Fuel system (gasoline)
- Fuel system (diesel)
- Exhaust system
- Transmission
- Clutch
- Car gearbox
- Chassis
- Front and rear suspension
- Steering
- Brake system
- Body
- Exterior
- Interior
- Electrical equipment
- Heating system
- Equipment and devices
- Power devices
- Electrical circuits
- General information
- Manual
- Maintenance
- Power unit
- Engine in a car
- Engine overhaul
- Cooling system
- Supply system
- Ignition system
- Control system
- Transmission
- Clutch
- Manual gearbox
- Automatic gearbox
- Transmission line
- Chassis
- Steering
- Front suspension
- Rear suspension
- Brake system
- Body
- Body elements
- Car care and painting
- Electrical equipment
- Heater and air conditioner
- Equipment and devices
- Starter and generator
- Electrical circuits
- General information
- Operation and maintenance
- Specifications
- Power unit
- Engine repair
- Cooling and lubrication system
- Supply system
- Ecotronic power supply system
- Fuel injection system
- Ignition system
- Transmission
- Clutch
- Gearbox BMW 242/4
- Gearbox Getrag 262/8
- Gearbox Getrag 265/6
- Automatic gearbox
- Cardan gear
- Rear axle
- Chassis
- Steering
- Front suspension
- Rear suspension
- Brake system
- Electrical equipment
- Equipment and devices
- Electrical circuits