
Table of contents: Examination ↓ Replacement ↓
- Home
- BMW 5 Series
- E28
- Transmission
- Transmission line
- Checking and replacing the center bearing
Checking and replacing the center bearing (BMW 5 Series E28)
Examination
The center bearing consists of a ball bearing assembly surrounded by a rubber cushion. The bearing assembly is pressed onto the rear end of the front section of the driveshaft and secured with a snap ring. The center bearing is protected on both sides by dust caps, but water and dirt can still get into the bearing and destroy it. Vibrations from the driveshaft can also cause the bearing to fail. In order to thoroughly inspect the center bearing, the driveshaft must be removed (see section Removal and installation the propeller shaft). Conversely, every time you remove the driveshaft for any reason, take the opportunity to inspect the bearing. Rotate the bearing and check how freely it rotates. If the bearing rotates with difficulty, or there is a feeling that sand has gotten inside, replace it. Also inspect the rubber cushion. If it is cracked or worn, replace it.
Replacement
1. Apply alignment marks to the front and rear sections of the driveshaft.
2. Loosen the screws and remove the clamping sleeve, then separate the driveshaft sections. Remove the rubber bushing, washer and clamping sleeve from the front driveshaft section.
3. Check the condition of the rubber bushing of the spline coupling. If it is torn or cracked, replace it.
4. Remove the center bearing retaining ring and dust boot.
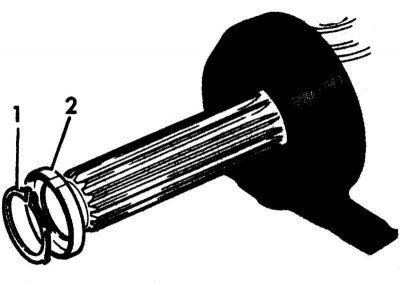
1 - Retaining ring
2 — Dust cover
5. Using a puller, remove the bearing assembly.
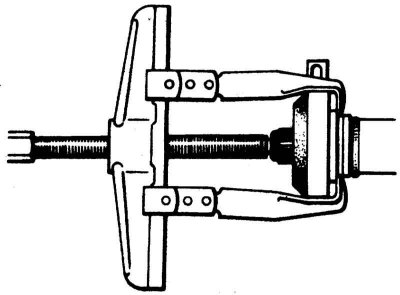
6. When installing the puller on the center bearing assembly, make sure that it pulls the hub; if it pulls on the outer ring of the assembly, it can cause the rubber to rupture, which will require replacing the entire bearing assembly.
7. If it is necessary to replace a bearing or support, the assembly will have to be taken to a car service workshop, since a press is required to disassemble and assemble the bearing and support.
8. Make sure the boot is still on the driveshaft, then press the center support assembly onto the shaft until it is flush with the boot.
9. On models with a driveshaft equipped with splined sections, install the clamping sleeve, washer and rubber bushing onto the front section of the shaft. Lubricate the splines with molybdenum disulfide grease, then assemble the driveshaft. Make sure the marks are aligned correctly. Do not tighten the clamping sleeve until the driveshaft is completely installed.
10. Install the cardan shaft (see section Removal and installation the propeller shaft).
11. On models with a driveshaft without splined sections, apply a special locking compound to the threads of the driveshaft crosspiece holder mounting bolt, then tighten the bolt to the required torque.
12. On models with a splined driveshaft, tighten the clamping sleeve to the required torque.
This article is available at russian, bulgarian, belarusian, ukrainian, serbian, croatian, romanian, polish, slovak, hungarian
Article verified: Zhuravleva Isolda
Share information:
Previous articles
БМВ E28: Transmission line
Next articles
Similar articles on other types of BMW cars:
Checking the level and replacing the oil in the automatic transmission BMW 3 Series E21 (1975-1983)
Checking the front wheel bearing play BMW 3 Series E36 (1990-2000)
Replacing the oil filter (center bolt design) BMW 7 Series E32 (1986-1994)
Checking the condition and replacing hoses and tubes in the engine… BMW 7 Series E38 (1994-2001)
Replacing the intake camshaft BMW X3 E83 (2003-2010)
Checking the engine oil level and replacing it BMW X5 E53 (1999-2006)
Link in different formats to this page
Visitor comments
No comments yet
- General information
- Governing bodies
- Manual
- Maintenance
- Power unit
- Engine repair
- Lubrication system
- Cooling system
- Ignition system
- Supply system
- Injection system (gasoline)
- Injection system (diesel)
- Exhaust system
- Transmission
- Clutch
- Car gearbox
- Front axle
- Rear axle
- Chassis
- Steering
- Brake system
- Wheels and tires
- Body
- Interior
- Exterior
- Heating system
- Electrical equipment
- Equipment and devices
- Power devices
- Windscreen wipers
- Electrical circuits
- General information
- Manual
- Maintenance
- Power unit
- Engine repair
- Ignition system
- Engine lubrication system
- Cooling system
- Fuel system (gasoline)
- Fuel system (diesel)
- Exhaust system
- Transmission
- Clutch
- Car gearbox
- Chassis
- Front and rear suspension
- Steering
- Brake system
- Body
- Exterior
- Interior
- Electrical equipment
- Heating system
- Equipment and devices
- Power devices
- Electrical circuits
- General information
- Manual
- Maintenance
- Power unit
- Engine in a car
- Engine overhaul
- Cooling system
- Supply system
- Ignition system
- Control system
- Transmission
- Clutch
- Manual gearbox
- Automatic gearbox
- Transmission line
- Chassis
- Steering
- Front suspension
- Rear suspension
- Brake system
- Body
- Body elements
- Car care and painting
- Electrical equipment
- Heater and air conditioner
- Equipment and devices
- Starter and generator
- Electrical circuits
- General information
- Operation and maintenance
- Specifications
- Power unit
- Engine repair
- Cooling and lubrication system
- Supply system
- Ecotronic power supply system
- Fuel injection system
- Ignition system
- Transmission
- Clutch
- Gearbox BMW 242/4
- Gearbox Getrag 262/8
- Gearbox Getrag 265/6
- Automatic gearbox
- Cardan gear
- Rear axle
- Chassis
- Steering
- Front suspension
- Rear suspension
- Brake system
- Electrical equipment
- Equipment and devices
- Electrical circuits