
- Home
- BMW 7 Series
- E32
- Chassis
- Brake system
- Parking brake
Parking brake (BMW 7 Series E32)
Removal and installation parking brake shoes
Removal
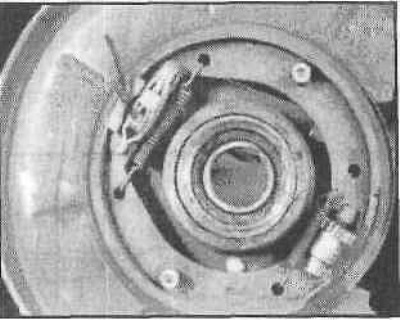
Remove the rear brake disc.
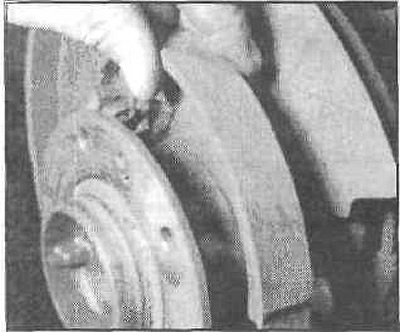
Unhook the front return spring using a special clamp. Check the spring. Replace a corroded or stretched spring.
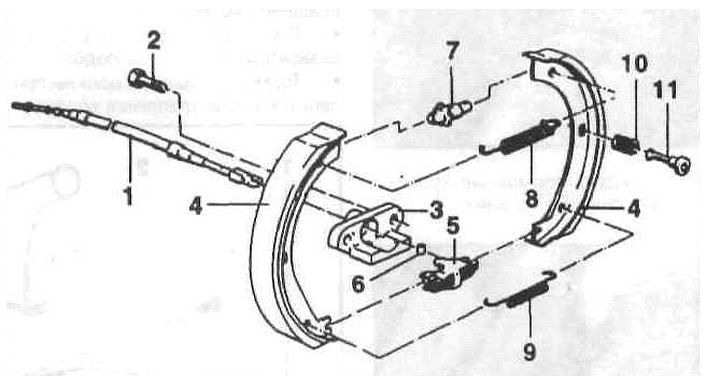
1 - cable in sheath;
2 - bolt;
3 - support;
4 - brake shoe;
5 - spacer;
6 - finger;
7 - adjusting bolt;
8 - upper tension spring;
9 - lower tension spring;
10 - pressure spring;
11 — mounting pin.
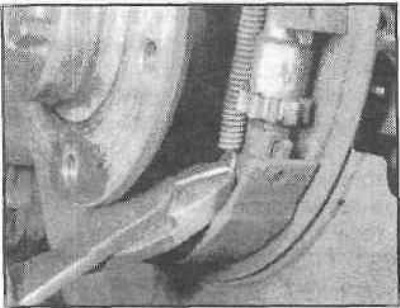
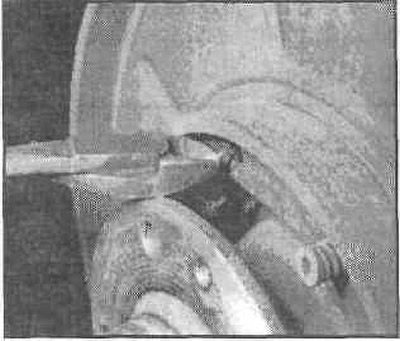
Press the retaining spring slightly with a 5mm Allen key, turn it 90° and remove the spring from the brake shoe.
Remove the other shoe mounting spring in the same way.
Spread the brake pads at the top and remove them downwards.
Check the strut for ease of movement and remove it if necessary.
Installation
Always replace the pads on both wheels at the same time.
Lubricate the contact surfaces and the spacer pin with a thin layer of grease.
Attach a spacer with a pin at the top to the parking brake cable.
Ensure easy movement of the brake shoe adjuster by lubricating the threads with a thin layer of molybdenum grease and turning the threaded connection.
Insert the shoe adjuster at the bottom between the shoes. Attach the return spring (more subtle) down to the pads.
Insert the brake pads. The pads should fit into the recesses in the spacer at the top.
Press the two brake shoe mounting springs with a 5 mm Allen key while turning them 90°. When installed, the mark on the bolt head should be aligned with the wheel's rotation axis.
Clamp the upper brake shoe return spring.
The brake pads must fit snugly against the brake pad support.
Install the brake disc and rear wheel.
Adjust the parking brake.
Caution: If the parking brake shoes have been replaced, they must be run in on an empty road as follows: drive at 40 km/h and gently apply the parking brake until light braking begins. Maintaining speed, apply the parking brake one click and drive another 400 m. Release the parking brake and let it cool. It is recommended to perform this running in process approximately 4 times a year, regardless of whether the shoes are replaced, as this will remove corrosion and compensate for the wear of the shoes.
Adjusting the parking brake
The parking brake is completely independent from the main brake system. Because of this, the parking brake wears out much less. Due to corrosion of the brake drum or contamination of the pads, the friction efficiency decreases. If old pads are adjusted, then the parking brake must be run in for this.
Adjustment of the parking brake is necessary in the following cases:
- replacing parking brake pads;
- replacement of brake drums; rearrangement of the adjustment device;
- lever stroke too large (more than 10 clicks).
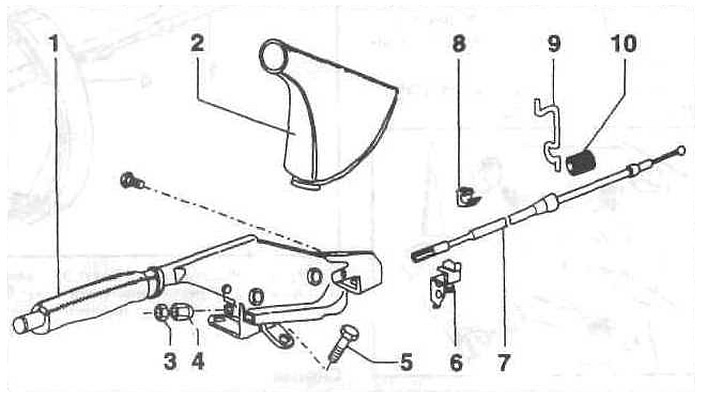
1 - parking brake lever;
2 — casing;
3 — lock nut;
4 - adjusting nut;
5 - Hexagon head bolt;
6 — Parking brake indicator lamp switch;
7 — parking brake cable;
8 - clamping clamp;
9 — Parking brake cable holder;
10 — tip.
Caution: Parking brake cables and any damaged parking brake components must move freely.
Remove one wheel bolt on each rear wheel.
Raise and support the vehicle from behind.
Pull the parking brake lever cover up at the top and pull it off.
Note: The workshop uses a special tool to adjust the parking brake. It consists of two socket wrenches located inside each other and can fit different lock nuts and adjusting nuts. If such a tool is not available, remove the cover from the parking brake lever, if necessary, remove the center console.
Remove the parking brake lever cover. To do this, loosen the screws, having previously removed the protective caps. To remove the cover, pull it back from the side at the top, towards the driver's seat and remove it.
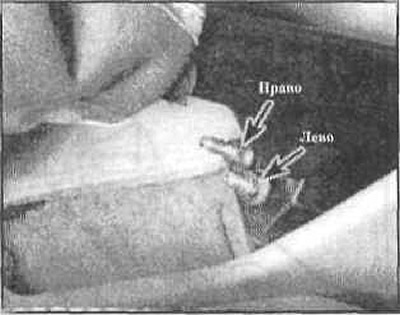
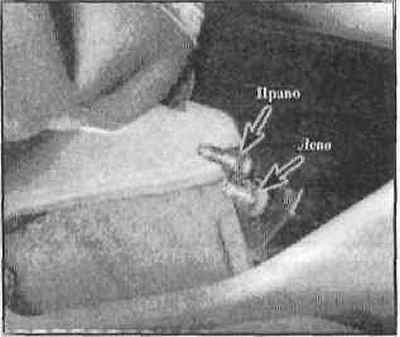
Loosen the two locknuts and adjusting bolts (arrows) on the parking brake cable. Loosen the cables completely.
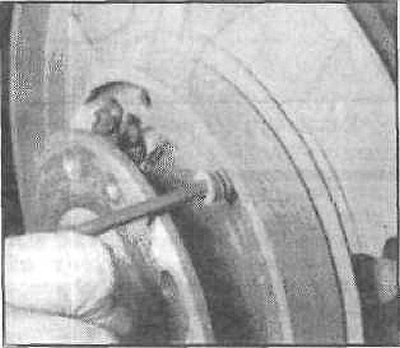
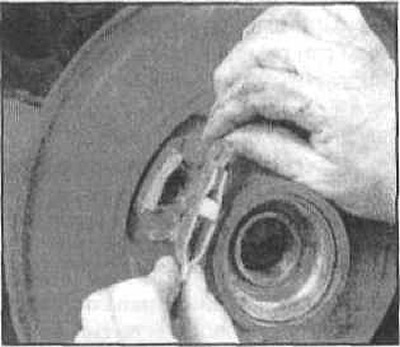
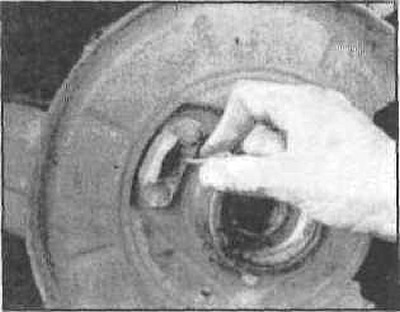
Remove one wheel bolt completely from each wheel. Rotate the wheel until the bolt hole points straight down. Shine a flashlight into the bolt hole; the adjusting nut should be visible.
Note: There is no need to remove the wheel.
Rotate the adjusting nut wheel with a screwdriver to set the parking brake shoes so that the wheel cannot be turned by hand. Then turn the adjusting nut back 8 teeth. If the adjusting nut on the left side of the car rotates in the "down" direction, the brake shoes will lie against the drum. On the right side, you need to rotate the nut in the opposite direction to achieve the same effect.
After adjustment, check if the wheels rotate freely, if necessary, turn the adjusting nut a little more in the opposite direction. The wheels should rotate freely in any case.
Adjust the parking brake cable. To do this, tighten the parking brake lever by 4 clicks (teeth) and screw the adjusting nuts onto the cable so that both rear wheels can still be turned by hand with the same force. Release the parking brake lever and check whether the wheels rotate freely. Repeat the adjustment if necessary.
Release the parking brake lever completely.
Turn on the ignition. The parking brake indicator lamp should not light.
Tighten the parking brake lever one click. There should be no braking effect on the rear wheels, otherwise you will need to repeat the parking brake adjustment. The parking brake indicator light may come on.
Tighten the parking brake lever two clicks. The indicator lamp should now light, otherwise bend the contact for the switch on the parking brake lever.
Turn off the ignition.
Tighten the locknuts while holding the adjusting nuts.
Insert the side cover of the parking brake lever and secure it with screws. Insert the screw covers.
Hook the front parking brake lever cover at the bottom and insert it at the top.
Lower the car.
Tighten the two rear wheel mounting bolts to 100 Nm.
Removal and installation the parking brake lever
Removal
Remove the center (middle) console.
Completely loosen the parking brake cable locknuts and adjusting nuts.
Pull the wire off the parking brake indicator switch.
Loosen the parking brake lever mounting bolts and remove the lever.
Installation
Insert the parking brake cable into the parking brake lever, install the lever and secure it with bolts.
Tighten the parking brake cable nuts by hand.
Adjust the parking brake.
Turn on the ignition. The parking brake indicator lamp should go out when the parking brake is released. If this is not the case, adjust the parking brake indicator lamp switch.
Install the center console.
Removal and installation the parking brake cable
Removal
Remove the parking brake lever.
Remove the parking brake shoes.
Remove the parking brake shoe spacer by pushing out the pin.
Remove the parking brake cable support by unscrewing the bolts (if necessary).
Unhook the parking brake cable and pull it out of the protective tube.
Installation
Route the parking brake cable to the parking brake lever and to the rear wheel brakes.
Caution: When installing the cable into the protective tube, make sure that the cable support fits snugly against the protective tube.
Insert the parking brake cable into the plastic clamp.
Insert the cable support into the parking brake cable and secure it to the brake mechanism carrier plate with two bolts.
Assemble the parking brake mechanism.
Set the parking brake lever.
Adjust the parking brake.
This article is available at russian, bulgarian, belarusian, ukrainian, serbian, croatian, romanian, polish, slovak, hungarian
Article verified: Sevastyanov Nikolay
Share information:
Previous articles
БМВ E32: Brake system
Next articles
Similar articles on other types of BMW cars:
Parking brake parts BMW 3 Series E21 (1975-1983)
Parking brake device BMW 3 Series E36 (1990-2000)
Parking brake mechanism parts for BMW models «525» and «528» BMW 5 Series E12 (1972-1981)
Checking the parking brake BMW 5 Series E34 (1988-1996)
Parking brake cables BMW X3 E83 (2003-2010)
Parking brake BMW X5 E53 (1999-2006)
Link in different formats to this page
Visitor comments
No comments yet
- General information
- Introduction to guide
- Manual
- Maintenance
- Power unit
- Engine M60/1, M60/2 (petrol)
- M62 engine (petrol)
- M57 engine (diesel)
- M67 engine (diesel)
- Cooling system
- Fuel system (petrol)
- Fuel system (diesel)
- Exhaust system
- Ignition and control systems
- Charge and launch systems
- Transmission
- Clutch
- Mechanical gearbox
- Automatic gearbox
- Cardan and drive shafts
- Chassis
- Brake system
- Front suspension
- Rear suspension
- Steering
- Body
- Exterior
- Interior
- Electrical equipment
- Equipment and devices
- Lighting
- Heating and air conditioning
- Electrical circuits
- General information
- Care and maintenance
- Power unit
- Minor engine repair
- Engine overhaul
- Lubrication system
- Cooling system
- Ignition system
- Supply system
- Injection system (petrol)
- Injection system (diesel)
- Exhaust system
- Transmission
- Clutch
- Manual gearbox
- Automatic gearbox
- Cardan gear
- Rear axle and shafts
- Chassis
- Front suspension
- Rear suspension
- Steering
- Wheels and tires
- Brake system
- Body
- Body elements
- Electrical equipment
- Equipment and devices
- Electrical circuits