
Table of contents: Removal ↓ Installation ↓
- Home
- BMW 7 Series
- E32
- Power unit
- Lubrication system
- Oil pan — removal and installation
Oil pan — removal and installation (BMW 7 Series E32)
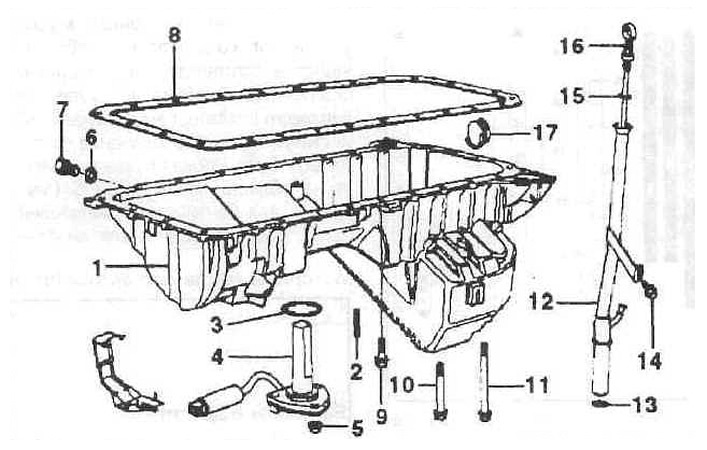
Oil pan of the M52 series engine
1 - oil pan;
2 - hairpin;
3 - sealing ring;
4 - oil level sensor;
5 - nut;
6 - sealing ring size Al2x15.5-AL;
7 - oil drain bolt;
8 — oil pan gasket;
9-11 — bolts;
12 — oil dipstick guide tube;
13 — sealing ring;
14 - Hexagon head bolt;
15 - sealing ring;
16 — oil dipstick;
17 — cover.
Removal
Disconnect the ground cable from the battery.
Note: Due to lack of space to remove the oil pan, both engine mounts must be loosened and the front axle beam must be lowered.
Remove the air cleaner housing with the intake duct from the air cleaner housing with the intake duct from the throttle body and take it out.
Raise and support the vehicle with stands. Remove the lower engine compartment splash guard.
Drain the engine oil.
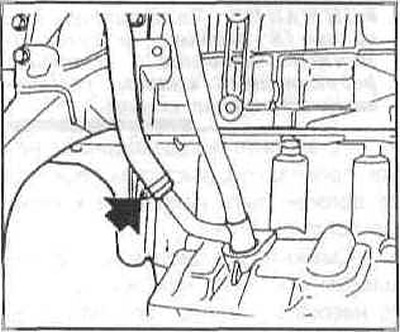
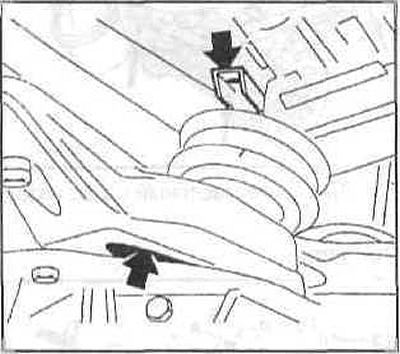
Remove the oil return hose from the oil separator on the dipstick guide tube by loosening the clamp.
Remove the dipstick tube bolt from the holder. Pull the guide tube up out of the oil pan, paying attention to the sealing ring.
Attach the engine to the winch (lift) and lift it up. If there is no lift, pull the appropriate wire through the eyes on the engine, thread a powerful pipe through the cable and support it on suitable stands or in the wing supports.
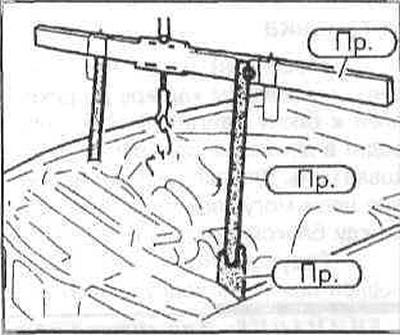
Caution: Do not rest the pipe on the fenders! Slowly lift the engine, making sure that the wires and hoses are not stretched or pinched. The engine lift is installed on the left and right.
Slowly raise the engine with a jack about 5 mm.
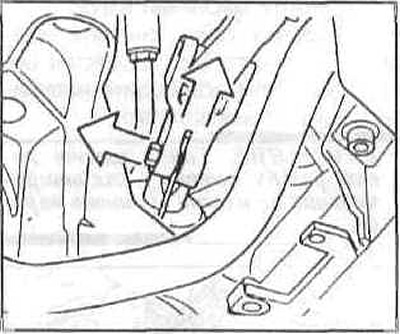
Disconnect the steering shaft from the steering gear (rack). To do this, unscrew the clamp bolt and remove the cardan joint from the steering gear.
Remove the power steering pump mounting bolts and hang it on the engine with the attached mechanisms using a piece of wire.
Caution: The hoses remain connected to the power steering pump, otherwise fluid will leak out. If the hydraulic system parts are exposed, great care must be taken to clean them, as dirt that gets inside can cause the power steering to fail.
Loosen the right and left engine mounts at the top by approximately four turns.
From the bottom of the vehicle, remove the lower nuts from both engine mounts.
If present, unhook the oil lines from the holders on the oil pan.
Disconnect the oil level sensor plug from the oil pan.
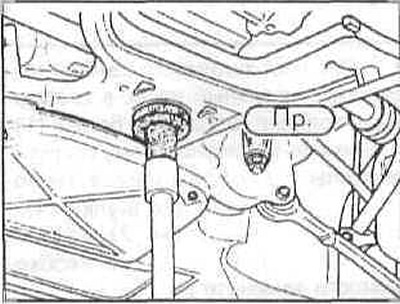
Support the front axle beam with a floor jack and a special support. The special device is shown in the figure.
Loosen the front axle beam mounting bolts and lower it as low as possible.
Note: There is no need to disconnect the steering gear and front suspension arms from the front axle beam.
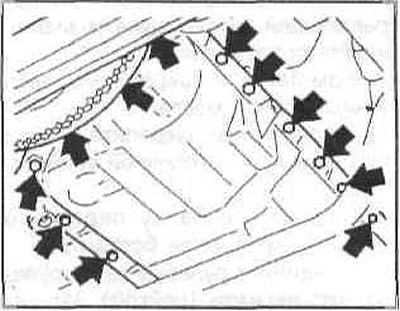
Unscrew the crankcase mounting bolts at the front and rear.
Tilt the oil pan and pull it back.
Note: If you cannot pull out the crankcase, remove the anti-roll bars on the left and right and lower the rear axle beam even more.
Installation
Clean the mating surfaces of the oil pan and cylinder block.
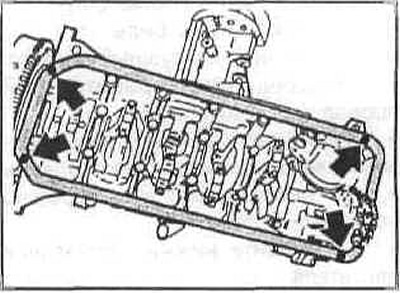
Apply elastic sealant to the joints on the sprocket housing cover and on the cover. The sealant layer should be about 3 mm wide and 2 mm high.
Apply grease to the new oil pan gasket and check that it is seated correctly.
Caution: The gasket must always be replaced.
Install the oil pan.
Screw in the crankcase bolts, but do not tighten them yet. First tighten the bolts on the gearbox, then on the engine. Finally, tighten the bolts to 10 Nm, i.e. not too much. If you overtighten the bolts, the gasket will be compressed and will have a leak.
If present, insert the oil lines into the mounts on the crankcase. Insert the dipstick guide tube with the O-ring and secure with the bolt. A damaged O-ring must always be replaced.
Attach the oil return hose from the oil separator to the dipstick guide tube and secure it with a clamp.
Wind and secure the oil level sensor plug.
Install and secure the anti-roll bar links.
Raise the front axle beam and secure it with bolts.
Connect the steering shaft to the steering gear (rack). Tighten the clamp bolt to 20 Nm.
Lower the engine, remove the lift. Tighten the fasteners both engine supports with a moment of 6m.
Please note: The following tightening torques are used to tighten nuts/bolts and engine fasteners: parts with M8 threads are tightened to 25 Nm, and those with M40 threads are tightened to 45 Nm.
Install the power steering pump.
Fill the engine with oil. There are two marks on the dipstick that indicate the amount of oil in the engine. The difference between the minimum and maximum levels is 1 liter. Lower the car. Install the air filter. Connect the negative cable to the battery.
After the test drive, check the oil pan for tightness and, if necessary, carefully tighten the bolts.
Install the lower engine splash shield.
This article is available at russian, bulgarian, belarusian, ukrainian, serbian, croatian, romanian, polish, slovak, hungarian
Article verified: Sevastyanov Nikolay
Share information:
Previous articles
БМВ E32: Lubrication system
Next articles
Similar articles on other types of BMW cars:
Removal and installation the contact ignition distributor BMW 3 Series E21 (1975-1983)
Removal and installation the oil pan BMW 5 Series E12 (1972-1981)
Pistons — removal and installation BMW X3 E83 (2003-2010)
Removal and installation the engine BMW X5 E53 (1999-2006)
Removal and installation the contact ignition distributor BMW 3 Series E21 (1975-1983)
Removal and installation the oil pan BMW 5 Series E12 (1972-1981)
Pistons — removal and installation BMW X3 E83 (2003-2010)
Removal and installation the engine BMW X5 E53 (1999-2006)
Link in different formats to this page
Visitor comments
No comments yet
- General information
- Introduction to guide
- Manual
- Maintenance
- Power unit
- Engine M60/1, M60/2 (petrol)
- M62 engine (petrol)
- M57 engine (diesel)
- M67 engine (diesel)
- Cooling system
- Fuel system (petrol)
- Fuel system (diesel)
- Exhaust system
- Ignition and control systems
- Charge and launch systems
- Transmission
- Clutch
- Mechanical gearbox
- Automatic gearbox
- Cardan and drive shafts
- Chassis
- Brake system
- Front suspension
- Rear suspension
- Steering
- Body
- Exterior
- Interior
- Electrical equipment
- Equipment and devices
- Lighting
- Heating and air conditioning
- Electrical circuits
- General information
- Care and maintenance
- Power unit
- Minor engine repair
- Engine overhaul
- Lubrication system
- Cooling system
- Ignition system
- Supply system
- Injection system (petrol)
- Injection system (diesel)
- Exhaust system
- Transmission
- Clutch
- Manual gearbox
- Automatic gearbox
- Cardan gear
- Rear axle and shafts
- Chassis
- Front suspension
- Rear suspension
- Steering
- Wheels and tires
- Brake system
- Body
- Body elements
- Electrical equipment
- Equipment and devices
- Electrical circuits