
Table of contents: Removal ↓ Installation ↓
- Home
- BMW 7 Series
- E32
- Transmission
- Cardan gear
- Cardan transmission — removal and installation
Cardan transmission — removal and installation (BMW 7 Series E32)
The models described may be equipped with cardan shafts of various designs: most cardan shafts have a front coupling sleeve. Another design - instead of a coupling sleeve, there is an additional constant velocity joint (CV joint). The differences are indicated in the description of removal.
Raise and support the vehicle.
Remove the exhaust system completely.
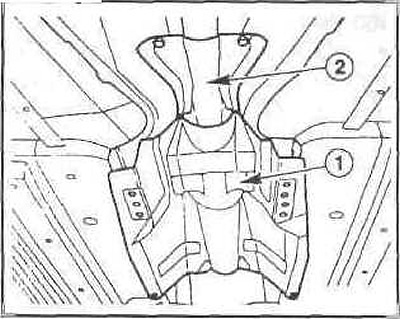
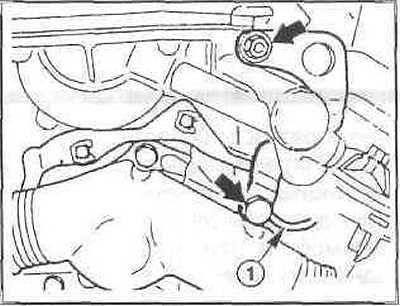
Loosen the bolts and remove the heat shields (1) and (2) of the bottoms.
Loosen the bolts and remove the coupling from the gearbox. The cardan shaft must be held with a suitable strap wrench to prevent the shaft from turning.

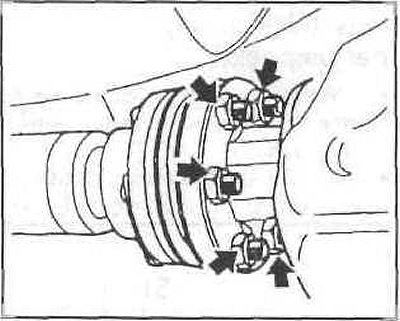
Unscrew the nuts securing the propeller shaft to the rear axle flange.
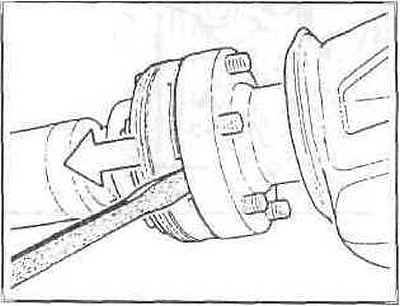
Press the CV joint along the grooves of the flange using a screwdriver.
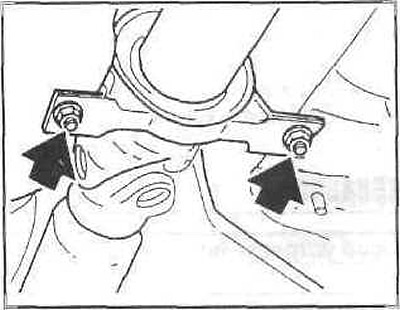
Holding the middle (support) bearing, unscrew the nuts.
Tilt the propeller shaft down at the center support and pull it out of the centering pins on the gearbox.
If there are vibrations and noises coming from the cardan shaft, it needs to be balanced in a workshop. In addition, it is necessary to check whether the joints are damaged.
Replace the coupling when it is worn out by unscrewing the bolts (arrows). Install the new coupling so that the arrows on the circumference point towards the flange levers.
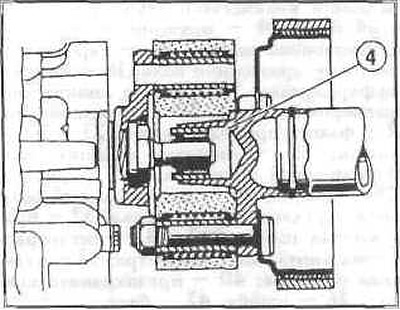
Before installation, check the alignment of the cardan shaft (4) on the coupling sleeve, lubricate the centering element with grease if necessary. Replace the damaged centering element.
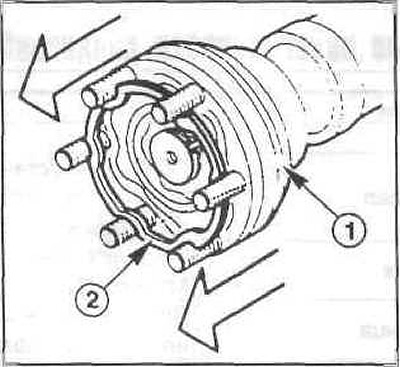
Pull out the CV joint (1) as far as it will go. Fill the CV joint with grease when the grease is used up or lost. Use only special grease.
Replace the gasket (2). Before doing this, degrease the sealing surfaces on the CV joint and on the drive flange with alcohol.
Place the propeller shaft with the CV joint tightened onto the rear axle flange.
Install the coupling onto the gearbox flange.
Tightening torque:
Install the heat shield for the exhaust system.
Install the exhaust system. Lower the vehicle.
Removal
Raise and support the vehicle.
Remove the exhaust system completely.
Loosen the bolts and remove the heat shields (1) and (2) of the bottoms.
Loosen the bolts and remove the coupling from the gearbox. The cardan shaft must be held with a suitable strap wrench to prevent the shaft from turning.
Unscrew the nuts securing the propeller shaft to the rear axle flange.
Press the CV joint along the grooves of the flange using a screwdriver.
Holding the middle (support) bearing, unscrew the nuts.
Tilt the propeller shaft down at the center support and pull it out of the centering pins on the gearbox.
Attention: The CV joint of the cardan shaft must be protected from contamination with a plastic bag.
Installation
If there are vibrations and noises coming from the cardan shaft, it needs to be balanced in a workshop. In addition, it is necessary to check whether the joints are damaged.
Caution: The driveshaft is balanced at the factory and should only be replaced as an assembly. Replace a worn driveshaft.
Replace the coupling when it is worn out by unscrewing the bolts (arrows). Install the new coupling so that the arrows on the circumference point towards the flange levers.
Before installation, check the alignment of the cardan shaft (4) on the coupling sleeve, lubricate the centering element with grease if necessary. Replace the damaged centering element.
Pull out the CV joint (1) as far as it will go. Fill the CV joint with grease when the grease is used up or lost. Use only special grease.
Replace the gasket (2). Before doing this, degrease the sealing surfaces on the CV joint and on the drive flange with alcohol.
Place the propeller shaft with the CV joint tightened onto the rear axle flange.
Caution: The joint should not be compressed during installation, as the grease may be squeezed out onto the sealing ring, and the CV joint will not be tight. By alternately tightening the nuts, evenly pull the cardan shaft to the rear axle. Use new self-locking nuts and tighten them to a torque of 70 Nm.
Install the coupling onto the gearbox flange.
Tightening torque:
- bolts with M8 thread - 45 Nm,
- bolts with M10 thread - 70 Nm,
- bolts with M12 thread - 80 Nm.
Install the heat shield for the exhaust system.
Install the exhaust system. Lower the vehicle.
This article is available at russian, bulgarian, belarusian, ukrainian, serbian, croatian, romanian, polish, slovak, hungarian
Article verified: Sevastyanov Nikolay
Share information:
Previous articles
БМВ E32: Cardan gear
Next articles
Similar articles on other types of BMW cars:
Automatic transmission — removal and installation BMW 3 Series E46 (1998-2006, petrol)
Removal and installation of automatic transmission BMW 3 Series E46 (1998-2006)
Removal and installation the cardan transmission BMW 5 Series E12 (1972-1981)
Removal and installation of transmission BMW 5 Series E28 (1981-1988)
Pistons — removal and installation BMW X3 E83 (2003-2010)
Removal and installation of automatic transmission type A5S 440Z BMW X5 E53 (1999-2006)
Link in different formats to this page
Visitor comments
No comments yet
- General information
- Introduction to guide
- Manual
- Maintenance
- Power unit
- Engine M60/1, M60/2 (petrol)
- M62 engine (petrol)
- M57 engine (diesel)
- M67 engine (diesel)
- Cooling system
- Fuel system (petrol)
- Fuel system (diesel)
- Exhaust system
- Ignition and control systems
- Charge and launch systems
- Transmission
- Clutch
- Mechanical gearbox
- Automatic gearbox
- Cardan and drive shafts
- Chassis
- Brake system
- Front suspension
- Rear suspension
- Steering
- Body
- Exterior
- Interior
- Electrical equipment
- Equipment and devices
- Lighting
- Heating and air conditioning
- Electrical circuits
- General information
- Care and maintenance
- Power unit
- Minor engine repair
- Engine overhaul
- Lubrication system
- Cooling system
- Ignition system
- Supply system
- Injection system (petrol)
- Injection system (diesel)
- Exhaust system
- Transmission
- Clutch
- Manual gearbox
- Automatic gearbox
- Cardan gear
- Rear axle and shafts
- Chassis
- Front suspension
- Rear suspension
- Steering
- Wheels and tires
- Brake system
- Body
- Body elements
- Electrical equipment
- Equipment and devices
- Electrical circuits