
Note. This is a very difficult operation. Read this manual carefully before starting work and purchase a winch and/or hydraulic lifting equipment. You will need a torque converter centering tool and new O-rings when installing.
Withdrawal
1. Disconnect the wire from the negative battery terminal (see chapter 5A).
2. Raise the vehicle and place it on stands (cm. "Lifting and placing the car on supports"). Please note that the height of the vehicle must be sufficient so that the cart with the gearbox can be rolled out from under it. Turn out screws and remove protection of a case of the engine/transmission.
3. Turn out bolts and remove the forward amplifier.
4. Remove the starter (see chapter 5A).
5. Remove the exhaust system and heat shields, then remove the exhaust system support from under the vehicle.
6. Remove cardan shaft (see chapter 8).
7. Drain the fluid from the transmission (see paragraph 9).
8. Loosen the union nut and disconnect the pipeline (if it exists) transmission hydraulic reservoir.
9. Disconnect the selector cable from the gearbox (see paragraph 3).
10. Disconnect from a transmission sockets of electroconducting, having remembered their arrangement. Release the wiring harnesses from all attachments to the gearbox.
11. Remove the oxygen sensor from the transmission bracket (if it exists).
12. Disconnect the brackets and clamps of the transmission fluid cooling system. Disconnect the pipelines (prepare for a liquid leak).
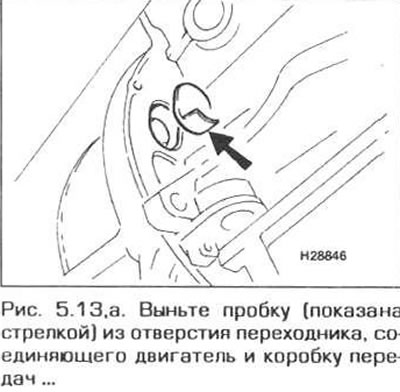
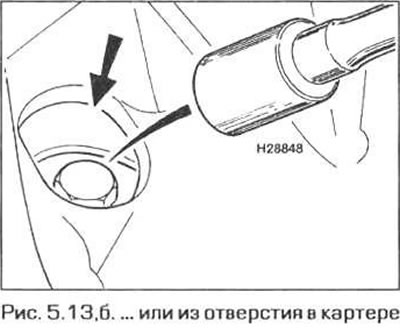
13. Remove the plug from the adapter hole. connecting the gearbox to the engine (the plug is located above the pallet) or from a hole in the crankcase (depending on the model) for access to torque converter mounting bolts (pic. 5.1, a, b).
14. Turn out three bolts of fastening of the hydrotransformer, turning the hydrotransformer or a cranked shaft.
15. Place a pallet jack with a piece of wood under the gearbox.
Caution: The transmission is very heavy, so the support must be secure.
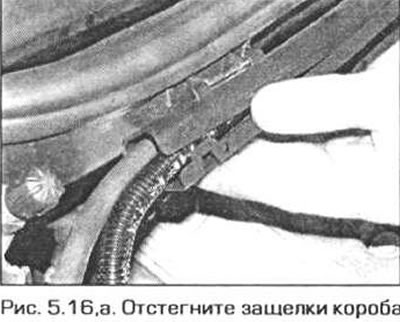
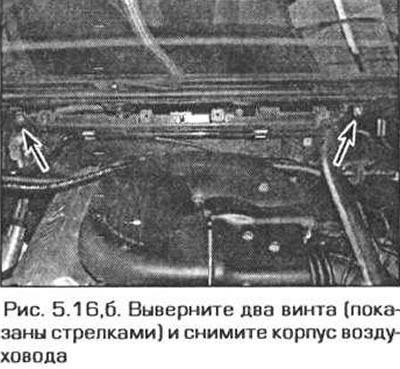
16. In models with the six-cylinder engine remove an air duct of system of heating/ventilation of salon from a back part of a motor compartment as follows.
- A) Remove the cabin air filter cover by turning its retainers 90°counterclockwise. Pull the filter out of the housing.
- b) Unfasten the four latches of the wiring box and remove the sleeves with wires from the box.
- V) Remove the four screws and pull the cabin filter housing forward.
- G) In the left rear corner of the engine compartment, pull off the seal, turn the two latches counterclockwise and slide the trim panel slightly forward.
- d) Turn out two screws and remove an air duct.
17. On models with a four-cylinder M43TU engine, remove the bolts, remove the ignition coil and move it to the side. This is done to prevent damage to the high voltage circuit of the system.
18. On all models with a four-cylinder engine, support the engine with a hydraulic jack. Place a jack under the engine sump by placing a block of wood between the jack and the sump. Raise the jack until it touches the pallet.
19. On models with a six-cylinder engine, connect a winch to the engine's lifting eye. The lug is located in the left rear corner of the engine (at the rear of the cylinder block).
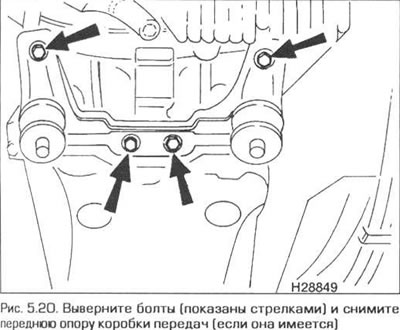
20. Turn out bolts of a forward support of a transmission (if it exists) (pic. 5.20).
21. Make sure that the engine and gearbox are securely supported, then unscrew the nuts securing the gearbox to the supports.
22. Turn out bolts of fastening of a support of a transmission to a body If necessary remove thermal screens of an exhaust system.
23. With the help of a jack (or winches) lower the engine and transmission so that the engine passes under the engine bulkhead. Make sure that the engine does not interfere with the interior heating hoses.
24. Turn out bolts of fastening of a transmission to the engine, remove washers, then shift a transmission back.
25. Insert a piece of metal or wood into the gap between the engine and transmission case to support the torque converter. After the transmission is disconnected from the engine, check again that the engine does not touch the interior heating hoses.
26. Lower the transmission and roll it out from under the vehicle on the cart. Be careful not to drop the torque converter. If the transmission is being removed indefinitely, provide reliable support for the engine.
27. To remove the torque converter, first remove the bar holding it.
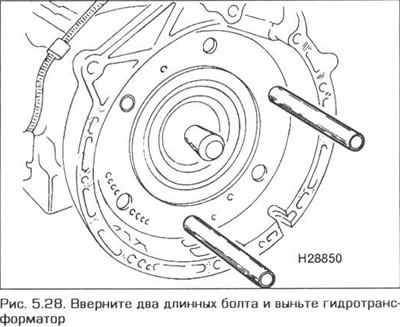
28. Insert two long bolts into the torque converter mounting holes and. pulling them, remove the torque converter from the gearbox (pic. 5.28). Pull both bolts at the same time. Prepare for a fluid leak.
Installation
29. Reinstall the torque converter. Using two bolts, turn the torque converter so that it is in the desired position. First turn the torque converter like this. so that the splines of the hub are aligned with the splines of the input shaft. The depth of the location of the torque converter relative to the end face of the casing exceeds 30 mm.
30. Make sure that the transmission centering pins have not fallen out of the engine.
31. Before installing the gearbox on the engine, align the torque converter with the flywheel, because after installing the gearbox, the torque converter will not turn.
32. To align the torque converter with the flywheel, a special tool is used that is attached to the flywheel. You can make a homemade fixture from an old torque converter bolt by sawing off its head, or from a stud of a suitable length. Note that the tool must be slotted or hexed so that it can be removed after the gearbox has been installed on the engine.
33. Turn the flywheel so that one of the torque converter mounting holes is at the bottom (to access this bolt through a hole in the crankcase). This will allow you to remove the stud after installing the gearbox.
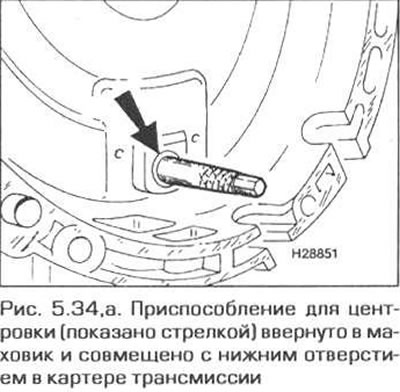
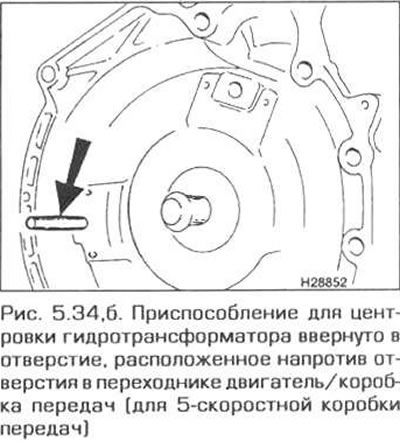
34. Screw the centering tool into the flywheel hole (pic. 5.34, a, b).
35. Remove the bar that fixed the torque converter.
36. Make sure the gearbox is securely attached to the hydraulic trolley and roll it under the vehicle.
37. Turn the torque converter so that one of its holes coincides with the device for centering it and install the gearbox in place.
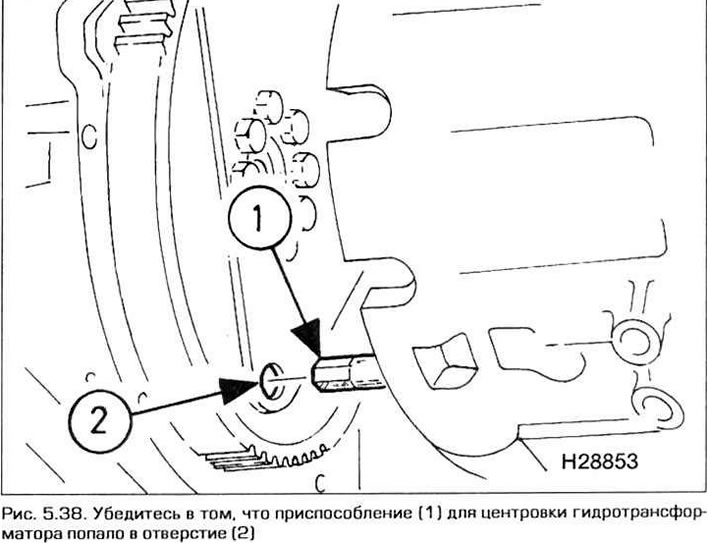
38. Make sure that the fixture is in the torque converter centering hole, then insert the bolts securing the gearbox to the engine, putting washers on them (pic. 5.38).
39. Turn out the adaptation from a flywheel, then insert a bolt of fastening of the hydrotransformer to a flywheel. Tighten the bolt to the required torque.
40. Turn the engine crankshaft and insert the two remaining torque converter mounting bolts. Tighten the bolts to the required torque.
41. The rest of the installation procedure is performed in the reverse order of removal. Pay attention to the following.
- a) Tighten all fasteners to the required torque.
- b) Check the condition of the sealing ruts of the gearbox pipelines, if necessary, replace them.
- V) Install the cardan shaft (see chapter 8).
- G) Install starter (see chapter 5A).
- d) Connect and adjust selector cable (see paragraph3).
- e) At the end of the work, fill the fluid into the transmission (see paragraph 9).