
Table of contents: ABS control unit (models up to…↓ ABS/ASC T/DSC control unit (models…↓
- Home
- BMW 7 Series
- E38
- Chassis
- Brake system
- Removal and installation of the electronic control unit of the ABS / ASC+T / DSC systems
Removal and installation of the electronic control unit of the ABS / ASC+T / DSC systems (BMW 7 Series E38)
1. Turn off the ignition.
1. Remove the lower section of the glove box trim.
2. Loosen the mounting bolts, move the control unit down so that the electrical wiring connector of the unit can be disconnected and remove it.
1. Disconnect the connector (1) by sliding the lock in direction (2) and remove the connector by pulling it in direction (3) (vertically upwards).
2. Remove the screws (1) and disconnect the electronic control unit (2) from the hydraulic modulator.
3. Visually inspect the sealing surface of the hydraulic modulator for damage and clean it.
4. Carefully place the control unit on the hydraulic modulator, avoiding distortion of the excitation coils. The edge of the control unit housing should slide along the protrusion of the hydraulic modulator.
5. Press the control unit against the hydraulic modulator and screw in the mounting bolts (1 and 2), without tightening them until the control unit housing is evenly adjacent to the hydraulic modulator. Screw in bolts 1 through 6 until the contact surfaces are adjacent, and then with the required force in sequence from 1 through 6.
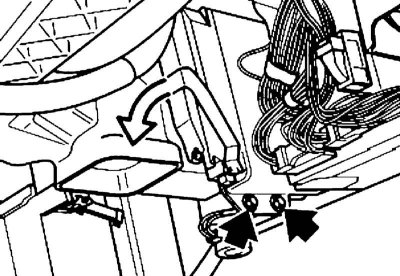
ABS control unit (models up to 09.1998.)
1. Remove the lower section of the glove box trim.
2. Loosen the mounting bolts, move the control unit down so that the electrical wiring connector of the unit can be disconnected and remove it.
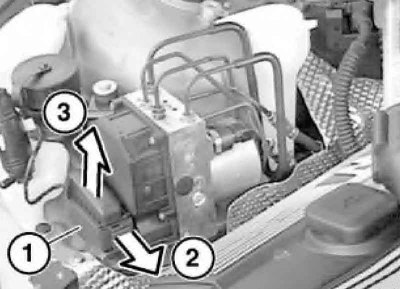
ABS/ASC T/DSC control unit (models from 09.1998.)
After installing a new control unit, it must be programmed, and on models with the DSC system, the steering wheel position sensor must also be matched. A diagnostic scanner is required for these procedures.
1. Disconnect the connector (1) by sliding the lock in direction (2) and remove the connector by pulling it in direction (3) (vertically upwards).
When installing, to avoid damaging the contacts, insert the connector plug into the control unit, holding it strictly perpendicularly.
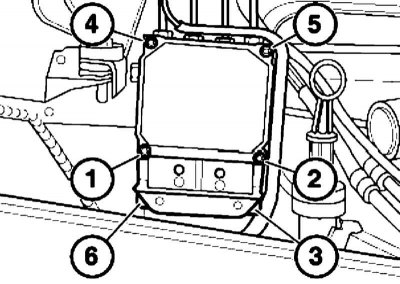
2. Remove the screws (1) and disconnect the electronic control unit (2) from the hydraulic modulator.
Please use new screws when installing.
3. Visually inspect the sealing surface of the hydraulic modulator for damage and clean it.
In this case, do not use tools with sharp edges or aggressive cleaning agents. Check the connector contacts for corrosion and damage. If defects are found in the sealing surface or contacts, replace the hydraulic modulator.
4. Carefully place the control unit on the hydraulic modulator, avoiding distortion of the excitation coils. The edge of the control unit housing should slide along the protrusion of the hydraulic modulator.
5. Press the control unit against the hydraulic modulator and screw in the mounting bolts (1 and 2), without tightening them until the control unit housing is evenly adjacent to the hydraulic modulator. Screw in bolts 1 through 6 until the contact surfaces are adjacent, and then with the required force in sequence from 1 through 6.
This article is available at russian, bulgarian, belarusian, ukrainian, serbian, croatian, romanian, polish, slovak, hungarian
Article verified: Polikarpov Saveliy
Share information:
Previous articles
БМВ E38: Brake system
Next articles
Similar articles on other types of BMW cars:
Removal and installation the control unit BMW 3 Series E30 (1982-1994)
Removal and installation the DME control unit BMW 3 Series E36 (1990-2000)
Removal and installation the electronic control unit (ECU) BMW 5 Series E28 (1981-1988)
Removal and installation the DME control unit BMW 5 Series E39 (1995-2003)
Removal and installation the airbag control unit BMW X3 E83 (2003-2010)
Programming the electronic control unit BMW X5 E53 (1999-2006)
Link in different formats to this page
Visitor comments
No comments yet
- General information
- Introduction to guide
- Manual
- Maintenance
- Power unit
- Engine M60/1, M60/2 (petrol)
- M62 engine (petrol)
- M57 engine (diesel)
- M67 engine (diesel)
- Cooling system
- Fuel system (petrol)
- Fuel system (diesel)
- Exhaust system
- Ignition and control systems
- Charge and launch systems
- Transmission
- Clutch
- Mechanical gearbox
- Automatic gearbox
- Cardan and drive shafts
- Chassis
- Brake system
- Front suspension
- Rear suspension
- Steering
- Body
- Exterior
- Interior
- Electrical equipment
- Equipment and devices
- Lighting
- Heating and air conditioning
- Electrical circuits
- General information
- Care and maintenance
- Power unit
- Minor engine repair
- Engine overhaul
- Lubrication system
- Cooling system
- Ignition system
- Supply system
- Injection system (petrol)
- Injection system (diesel)
- Exhaust system
- Transmission
- Clutch
- Manual gearbox
- Automatic gearbox
- Cardan gear
- Rear axle and shafts
- Chassis
- Front suspension
- Rear suspension
- Steering
- Wheels and tires
- Brake system
- Body
- Body elements
- Electrical equipment
- Equipment and devices
- Electrical circuits