
- Home
- BMW 7 Series
- E38
- Chassis
- Brake system
- Replacing brake pads
Replacing brake pads (BMW 7 Series E38)
Brake pads should be replaced in pairs, i.e. on both wheels of the same axle. Replacing the parking brake pads is described in Section Replacing the parking brake pads and their release mechanism.
1. Remove the wheels.
Models with floating calipers (front wheels)

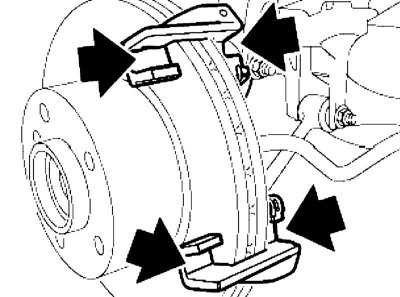
1. Remove the retaining spring (1). Disconnect the brake pad wear sensor connector on the left, replace the sensor if necessary.
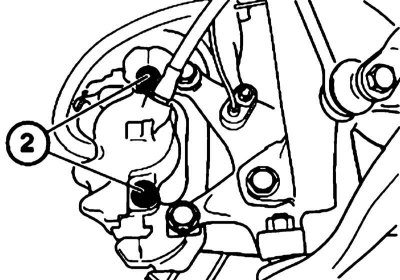
2. Remove the plastic caps (2) and take the brake hose out of the holder. Unscrew the guide pins located under the caps and remove the caliper by pulling it back.
When installing, clean it (but don't grease it!) guide pins, check the condition of the threads and replace the pins if necessary.
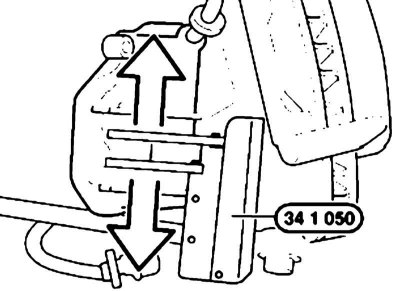
3. Move the piston as far as possible inside the wheel cylinder. For this, you can use, for example, device No.34 1 050.
When moving the piston, monitor the brake fluid level and do not allow it to overflow the edge of the reservoir.
4. Remove the outer brake shoe. The pressure spring holds the inner shoe on the piston. Mark the worn-in shoes and do not mix them up if they are worn on one side. Clean the brake shoes.
Do not apply grease to the back plate of the pad.
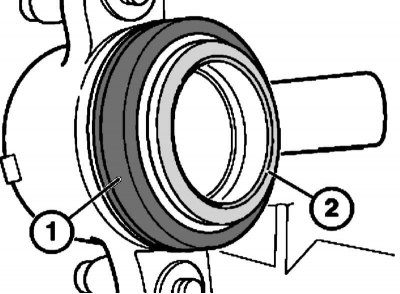
5. Check the dust boot (1) for damage and replace it if necessary. Clean the contact surface (2) of the brake cylinder piston and apply a thin layer of paste to it to prevent squealing of brake mechanism parts.
Avoid contact of the paste with the anther as it may swell under its influence.
6. Clean the mating surfaces of the T-shaped ends of the brake pads and the caliper body and lubricate them with a thin layer of paste that prevents squealing of brake parts.
7. Installation is carried out in reverse order.
8. After completing the work, press the brake pedal several times so that the brake pads take up their working position relative to the brake discs.
9. When installing new brake pads on the front and rear wheels, bring the brake fluid level up to the "MAX" mark.
10. Keep the ignition key in position "1" for at least 30 seconds without starting the engine. This will clear the fault code and prevent the brake lining wear indicator from coming back on.
Fixed caliper models (front wheels)
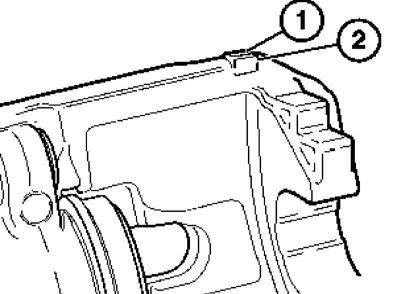
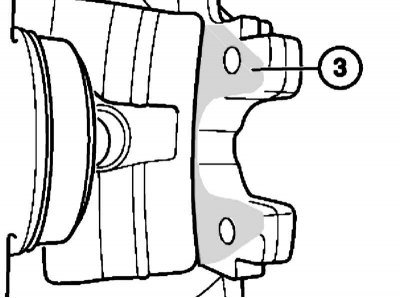
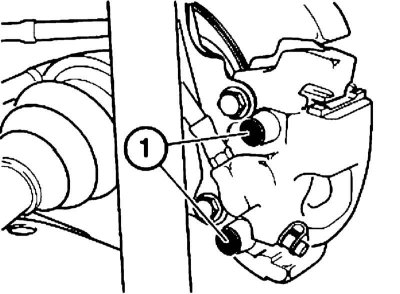
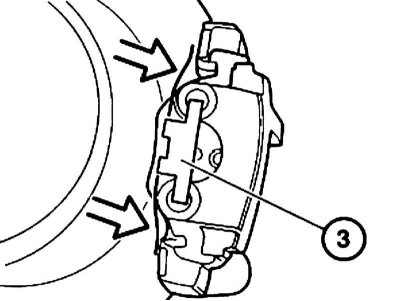
1. Disconnect the connector (1) of the brake pad wear sensor, remove the guide pins (2) and remove the retaining spring (3).
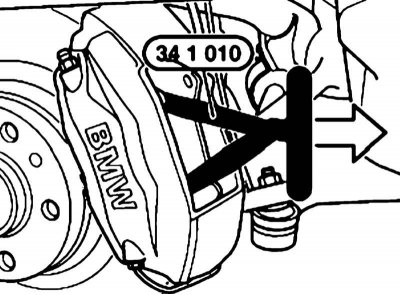
2. Remove the brake pads using puller No.34 1 010. Mark the worn-in pads and do not mix them up if there is one-sided wear. Clean the brake pads.
Avoid contact of the paste with the anther as it may swell under its influence.
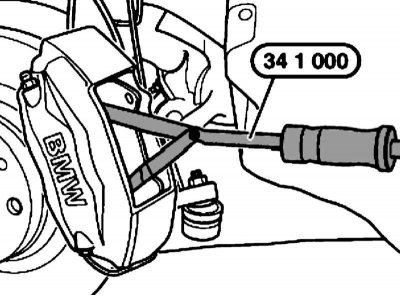
3. If the pads are jammed, knock them out using special tool No.34 1 000.
4. Move the piston as far as possible inside the wheel cylinder using tool No.34 1 050.
When moving the piston, monitor the brake fluid level and do not allow it to overflow the edge of the reservoir.
5. Clean the brake pad guides of the caliper, check the dust boots for damage and, if necessary, replace the dust boots.
6. Installation is carried out in reverse order.
Do not apply grease to the brake pad guides or the piston contact surfaces of the Brembo aluminum caliper.
7. Perform the actions described in paragraphs c 8 to 10.
Models with floating calipers (rear wheels)
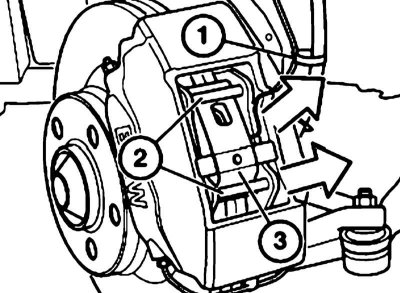
1. Remove the plastic caps (1). On the left, disconnect the brake pad wear sensor connector, replace the sensor if necessary.
2. Unscrew the guide pins located under the caps.
When installing, clean it (but don't grease it!) guide pins, check the condition of the threads and replace the pins if necessary.
3. Remove the retaining spring (3) and the caliper by pulling it backwards.
4. Perform the actions described in paragraphs c 3 to 10.
This article is available at russian, bulgarian, belarusian, ukrainian, serbian, croatian, romanian, polish, slovak, hungarian
Article verified: Polikarpov Saveliy
Share information:
Previous articles
БМВ E38: Brake system
Next articles
Similar articles on other types of BMW cars:
Removal and installation disc brake pads BMW 3 Series E21 (1975-1983)
Checking the thickness of brake pads BMW 3 Series E36 (1990-2000)
Replacing the front brake pads BMW 5 Series E12 (1972-1981)
Replacing disc brake pads BMW 5 Series E28 (1981-1988)
Replacing the fluid in the ABS/ASC brake system + T BMW X3 E83 (2003-2010)
Replacing the brake pads of the wheel BMW X5 E53 (1999-2006)
Link in different formats to this page
Visitor comments
No comments yet
- General information
- Introduction to guide
- Manual
- Maintenance
- Power unit
- Engine M60/1, M60/2 (petrol)
- M62 engine (petrol)
- M57 engine (diesel)
- M67 engine (diesel)
- Cooling system
- Fuel system (petrol)
- Fuel system (diesel)
- Exhaust system
- Ignition and control systems
- Charge and launch systems
- Transmission
- Clutch
- Mechanical gearbox
- Automatic gearbox
- Cardan and drive shafts
- Chassis
- Brake system
- Front suspension
- Rear suspension
- Steering
- Body
- Exterior
- Interior
- Electrical equipment
- Equipment and devices
- Lighting
- Heating and air conditioning
- Electrical circuits
- General information
- Care and maintenance
- Power unit
- Minor engine repair
- Engine overhaul
- Lubrication system
- Cooling system
- Ignition system
- Supply system
- Injection system (petrol)
- Injection system (diesel)
- Exhaust system
- Transmission
- Clutch
- Manual gearbox
- Automatic gearbox
- Cardan gear
- Rear axle and shafts
- Chassis
- Front suspension
- Rear suspension
- Steering
- Wheels and tires
- Brake system
- Body
- Body elements
- Electrical equipment
- Equipment and devices
- Electrical circuits