
- Home
- BMW 7 Series
- E38
- Power unit
- Cooling system
- Removal and installation the thermostat
Removal and installation the thermostat (BMW 7 Series E38)
Models with M57 engine
If the installed boost air hoses are wet and have traces of grease, this can lead to turbocharger failure. Hoses must be dry and free of grease.
The thermostat is built into the housing and can only be replaced as an assembly.
1. Remove the accessory drive belts (see chapter Engine).
2. Drain the coolant (see chapter Vehicle settings and routine maintenance).
3. Cover the generator to prevent oil, fuel and coolant from getting on it.
4. Remove the top engine cover.
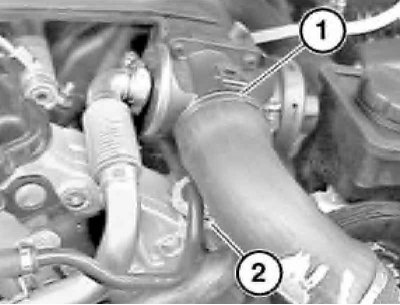
5. Loosen the clamp (1) securing the boost air hose. Disconnect the boost air hose.
The hoses must be dry and free of grease. Remove the bolt (2).
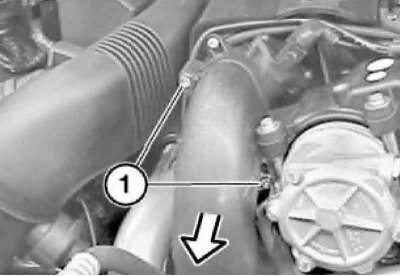
6. Loosen the bolts and remove the molded hose in the direction shown by the arrow.
When installing, lubricate the mating surfaces with a thin layer of petroleum jelly and install new O-rings.
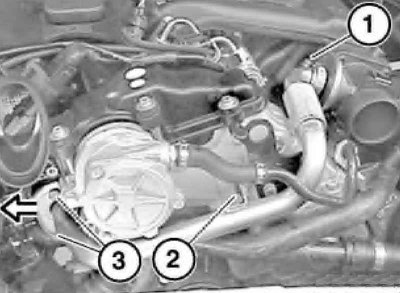
7. Loosen the clamp (1) securing the EGR pipe, remove the bolt (2), then the bolts (3) and press the heat shield in the direction indicated by the arrow. Remove the EGR pipe.
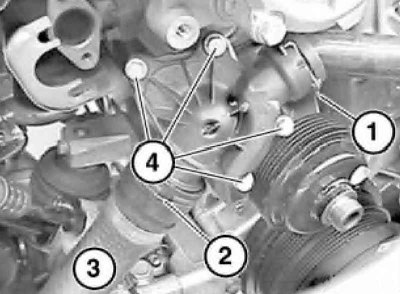
8. Remove the clamps (1 and 2) and disconnect the water hose (3). Unscrew the bolts (4) securing the thermostat housing and remove it.
9. Installation is carried out in the reverse order. Use a new thermostat housing gasket.
Models with M60 engine
1. Remove the engine crankcase guard.
2. Drain the coolant (see chapter Vehicle settings and routine maintenance).
3. Remove the upper part of the air cleaner housing together with the MAF sensor.
4. Disconnect the cooling system hose and remove the thermostat housing cover.
5. Installation is carried out in the reverse order. Use a new thermostat housing gasket.
Models with M67 engine
1. Drain the coolant (see chapter Vehicle settings and routine maintenance).
2. Remove the top engine cover.
3. Remove the fan shroud (see section Removal and installation the fan shroud).
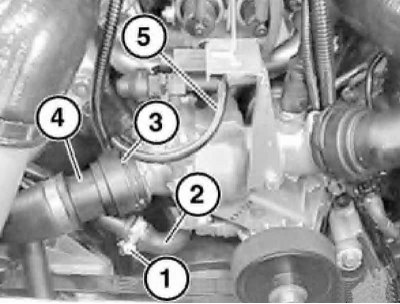
4. Loosen the clamp (1) and disconnect the water hose (2). Release the retainer (3), disconnect the water hose (4) and set it aside. Disconnect the vacuum hose (5).
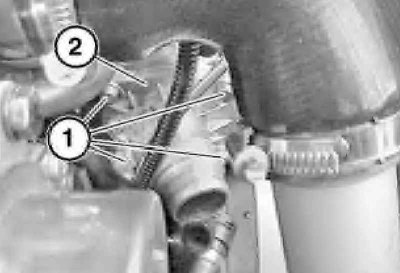
5. Unscrew the bolts (1) and remove the thermostat (2) together with the housing.
6. Installation is carried out in the reverse order. Use a new thermostat housing sealing ring.
Models with M73 engine
1. Drain the coolant (see chapter Vehicle settings and routine maintenance).
2. Remove the fan impeller assembly with the fan drive clutch (see section Removal and installation the fan drive clutch).
3. On cylinder bank 1-6, remove the one-way valve of the exhaust emission control system (see chapter Exhaust systems).
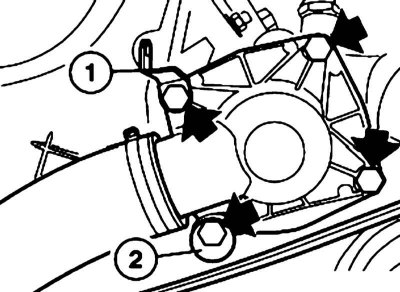
4. Unscrew the thermostat housing mounting bolts and remove it. Remove the thermostat.
When installing, clean the mating surfaces, replace the sealing gasket. Pay attention to the bracket (1) of the high-pressure fuel line and the damper sleeve (2) of the drive belt.
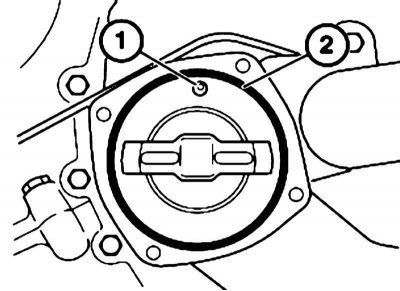
5. Installation is carried out in the reverse order. The thermostat should be positioned so that the hole (1) is at the top. Replace the sealing ring (2).
[Original publication posted on the website «www.bmwman.ru»]
This article is available at russian, bulgarian, belarusian, ukrainian, serbian, croatian, romanian, polish, slovak, hungarian
Article verified: Polikarpov Saveliy
Share information:
Previous articles
БМВ E38: Cooling system
Next articles
Similar articles on other types of BMW cars:
Removal and installation the thermostat BMW 3 Series E21 (1975-1983)
Removal and installation, checking of the thermostat BMW 3 Series E30 (1982-1994)
Removal and installation, checking of the thermostat BMW 5 Series E34 (1988-1996)
Removal and installation / checking the thermostat BMW 5 Series E39 (1995-2003)
Pistons — removal and installation BMW X3 E83 (2003-2010)
Removal and installation the engine BMW X5 E53 (1999-2006)
Removal and installation the thermostat BMW 3 Series E21 (1975-1983)
Removal and installation, checking of the thermostat BMW 3 Series E30 (1982-1994)
Removal and installation, checking of the thermostat BMW 5 Series E34 (1988-1996)
Removal and installation / checking the thermostat BMW 5 Series E39 (1995-2003)
Pistons — removal and installation BMW X3 E83 (2003-2010)
Removal and installation the engine BMW X5 E53 (1999-2006)
Link in different formats to this page
Visitor comments
No comments yet
- General information
- Introduction to guide
- Manual
- Maintenance
- Power unit
- Engine M60/1, M60/2 (petrol)
- M62 engine (petrol)
- M57 engine (diesel)
- M67 engine (diesel)
- Cooling system
- Fuel system (petrol)
- Fuel system (diesel)
- Exhaust system
- Ignition and control systems
- Charge and launch systems
- Transmission
- Clutch
- Mechanical gearbox
- Automatic gearbox
- Cardan and drive shafts
- Chassis
- Brake system
- Front suspension
- Rear suspension
- Steering
- Body
- Exterior
- Interior
- Electrical equipment
- Equipment and devices
- Lighting
- Heating and air conditioning
- Electrical circuits
- General information
- Care and maintenance
- Power unit
- Minor engine repair
- Engine overhaul
- Lubrication system
- Cooling system
- Ignition system
- Supply system
- Injection system (petrol)
- Injection system (diesel)
- Exhaust system
- Transmission
- Clutch
- Manual gearbox
- Automatic gearbox
- Cardan gear
- Rear axle and shafts
- Chassis
- Front suspension
- Rear suspension
- Steering
- Wheels and tires
- Brake system
- Body
- Body elements
- Electrical equipment
- Equipment and devices
- Electrical circuits