
- Home
- BMW 5 Series
- E39
- Power unit
- Cooling system
- Removal and installation / checking the thermostat
Removal and installation / checking the thermostat (BMW 5 Series E39)
As the engine temperature rises, the thermostat opens a large circuit of coolant circulation. If the thermostat remains closed due to a fault, the engine overheats. This can be determined by the coolant temperature gauge moving into the red area, while the radiator of the cooling system remains cold. A faulty thermostat can also remain open after the coolant has cooled. In this case, the engine does not reach its operating temperature, the coolant temperature gauge rises more slowly than before, and in winter, the heating efficiency of the heater is low.
Remove the fan, see page 38.
Drain some coolant into a suitable container, see section "Maintenance work".
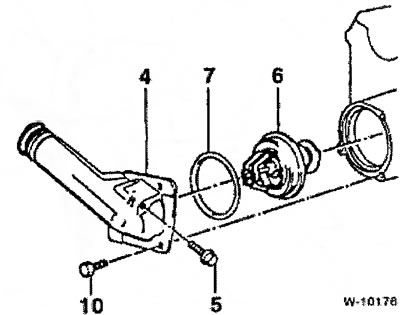
Model 525tds
4 - thermostat housing
5- air bleed plug
6 - thermostat
7 - sealing ring
10 - Hexagon head bolt
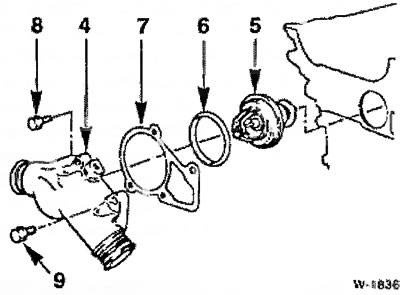
Models 520i, 523i, 528i
4 - thermostat housing
5 - thermostat
6 - sealing ring
7 - sealing gasket
8 - Hexagon head bolt M6
9 - Hexagon head bolt M8
Loosen the clamps and disconnect from the thermostat housing (from the front side of the cylinder block) coolant hoses.
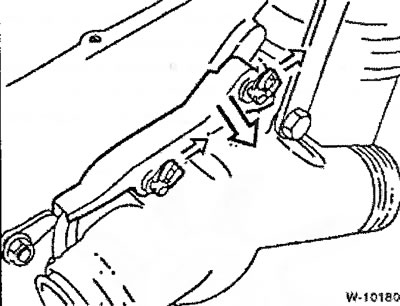
Models 520i, 523i, 528i: Unscrew the engine suspension eye fastening. Unfasten and remove the cable management box, see figure.
Unscrew the thermostat housing cover fastener.
Mark the mounting position of the thermostat and remove it.
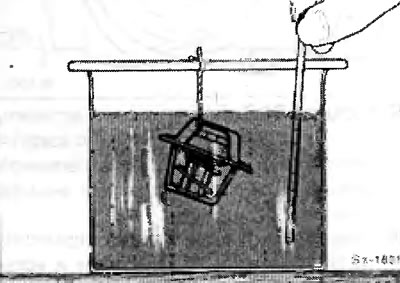
Heat the thermostat in a water bath. The thermostat should not touch the walls of the vessel. Monitor the heating temperature with a suitable thermometer.
At a temperature of approximately +88°C, the thermostat valve begins to open. The temperature at which the valve begins to open is stamped on the thermostat.
Check if the thermostat valve opens and closes again and if the valve opening temperature corresponds to the value stamped on the thermostat. Replace the thermostat if necessary.
Clean the contact surfaces of the housing and cover.
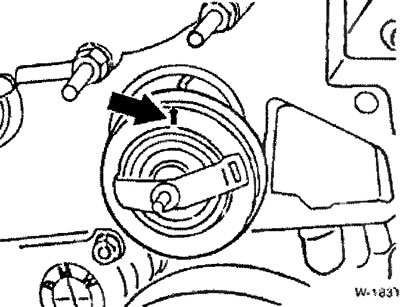
Models 520i, 523i, 528i: Insert the thermostat into the cylinder head so that the arrow stamped on it points upward, see illustration.
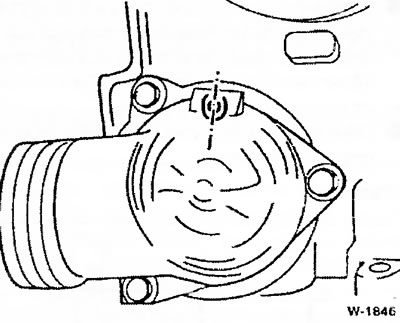
Models 525tds: Insert the thermostat so that the air bleed plug is at the top. When the lid is attached, it is located in the recess in the lid.
The new thermostat sealing ring is easy to lubricate with glycerin and install, see the pictures above.
Models 520i, 523i, 528i: Always replace the paper seal.
Insert the thermostat housing and tighten the mounting bolts evenly to a torque of 10 Nm.
Secure the box for laying wires with clamps.
Install the fan and fan shroud.
Top up the coolant level and bleed the cooling system, see section "Maintenance work".
Warm up the engine until the viscous coupling engages the fan. Check if the radiator is heating up at the bottom and if the thermostat housing is tight. If leaks are detected, tighten the housing mounting bolts slightly.
The original text can be read on the website «BMWMAN.ru»
Caution: If the engine becomes hot after the car has been driven for a short distance, the cause may be low efficiency of the radiator due to salt deposits in it.
Removal
Remove the fan, see page 38.
Drain some coolant into a suitable container, see section "Maintenance work".
Model 525tds
4 - thermostat housing
5- air bleed plug
6 - thermostat
7 - sealing ring
10 - Hexagon head bolt
Models 520i, 523i, 528i
4 - thermostat housing
5 - thermostat
6 - sealing ring
7 - sealing gasket
8 - Hexagon head bolt M6
9 - Hexagon head bolt M8
Loosen the clamps and disconnect from the thermostat housing (from the front side of the cylinder block) coolant hoses.
Models 520i, 523i, 528i: Unscrew the engine suspension eye fastening. Unfasten and remove the cable management box, see figure.
Unscrew the thermostat housing cover fastener.
Note: The mounting bolts are of different lengths, so to facilitate subsequent assembly, the bolt positions should be recorded.
Mark the mounting position of the thermostat and remove it.
Examination
Heat the thermostat in a water bath. The thermostat should not touch the walls of the vessel. Monitor the heating temperature with a suitable thermometer.
At a temperature of approximately +88°C, the thermostat valve begins to open. The temperature at which the valve begins to open is stamped on the thermostat.
Check if the thermostat valve opens and closes again and if the valve opening temperature corresponds to the value stamped on the thermostat. Replace the thermostat if necessary.
Installation
Clean the contact surfaces of the housing and cover.
Models 520i, 523i, 528i: Insert the thermostat into the cylinder head so that the arrow stamped on it points upward, see illustration.
Models 525tds: Insert the thermostat so that the air bleed plug is at the top. When the lid is attached, it is located in the recess in the lid.
The new thermostat sealing ring is easy to lubricate with glycerin and install, see the pictures above.
Models 520i, 523i, 528i: Always replace the paper seal.
Insert the thermostat housing and tighten the mounting bolts evenly to a torque of 10 Nm.
Note: Do not tighten the bolts too much. For a 6-cylinder petrol engine, do not forget to screw on the lifting eye. Tighten the M8 bolts securing the lifting eye to 20 Nm.
Secure the box for laying wires with clamps.
Install the fan and fan shroud.
Top up the coolant level and bleed the cooling system, see section "Maintenance work".
Warm up the engine until the viscous coupling engages the fan. Check if the radiator is heating up at the bottom and if the thermostat housing is tight. If leaks are detected, tighten the housing mounting bolts slightly.
The original text can be read on the website «BMWMAN.ru»
This article is available at russian, bulgarian, belarusian, ukrainian, serbian, croatian, romanian, polish, slovak, hungarian
Article verified: Ilyinsky Matvey
Share information:
Previous articles
БМВ E39: Cooling system
Next articles
Similar articles on other types of BMW cars:
Removal and installation, checking of the thermostat BMW 3 Series E30 (1982-1994)
Removal and installation, checking of the thermostat BMW 3 Series E36 (1990-2000)
Thermostat — Removal, Installation and Checking BMW 7 Series E32 (1986-1994)
Removal and installation the thermostat BMW 7 Series E38 (1994-2001)
Pistons — removal and installation BMW X3 E83 (2003-2010)
Checking the Thermostat BMW X5 E53 (1999-2006)
Removal and installation, checking of the thermostat BMW 3 Series E30 (1982-1994)
Removal and installation, checking of the thermostat BMW 3 Series E36 (1990-2000)
Thermostat — Removal, Installation and Checking BMW 7 Series E32 (1986-1994)
Removal and installation the thermostat BMW 7 Series E38 (1994-2001)
Pistons — removal and installation BMW X3 E83 (2003-2010)
Checking the Thermostat BMW X5 E53 (1999-2006)
Link in different formats to this page
Visitor comments
No comments yet
- General information
- Governing bodies
- Manual
- Maintenance
- Power unit
- Engine repair
- Lubrication system
- Cooling system
- Ignition system
- Supply system
- Injection system (gasoline)
- Injection system (diesel)
- Exhaust system
- Transmission
- Clutch
- Car gearbox
- Front axle
- Rear axle
- Chassis
- Steering
- Brake system
- Wheels and tires
- Body
- Interior
- Exterior
- Heating system
- Electrical equipment
- Equipment and devices
- Power devices
- Windscreen wipers
- Electrical circuits
- General information
- Manual
- Maintenance
- Power unit
- Engine repair
- Ignition system
- Engine lubrication system
- Cooling system
- Fuel system (gasoline)
- Fuel system (diesel)
- Exhaust system
- Transmission
- Clutch
- Car gearbox
- Chassis
- Front and rear suspension
- Steering
- Brake system
- Body
- Exterior
- Interior
- Electrical equipment
- Heating system
- Equipment and devices
- Power devices
- Electrical circuits
- General information
- Manual
- Maintenance
- Power unit
- Engine in a car
- Engine overhaul
- Cooling system
- Supply system
- Ignition system
- Control system
- Transmission
- Clutch
- Manual gearbox
- Automatic gearbox
- Transmission line
- Chassis
- Steering
- Front suspension
- Rear suspension
- Brake system
- Body
- Body elements
- Car care and painting
- Electrical equipment
- Heater and air conditioner
- Equipment and devices
- Starter and generator
- Electrical circuits
- General information
- Operation and maintenance
- Specifications
- Power unit
- Engine repair
- Cooling and lubrication system
- Supply system
- Ecotronic power supply system
- Fuel injection system
- Ignition system
- Transmission
- Clutch
- Gearbox BMW 242/4
- Gearbox Getrag 262/8
- Gearbox Getrag 265/6
- Automatic gearbox
- Cardan gear
- Rear axle
- Chassis
- Steering
- Front suspension
- Rear suspension
- Brake system
- Electrical equipment
- Equipment and devices
- Electrical circuits