
Maintaining the speed, tighten the brake by one tooth and drive another 400 m. Release the brake and let it cool. This removes any rust that may form on the friction surface and wear products.
Adjustment of the parking brake is necessary when:
- Replacing brake pads.
- Replacement of brake drums/rear brake discs.
- Installing the adjusting device back.
- Too much travel for the brake lever (over 10 teeth).
- Replacing the brake drive cable.
The parking brake cables and all moving brake components must move easily.
Adjustment
1. Loosen one mounting bolt on each rear wheel.
2. Raise and support the rear of the vehicle on stands.
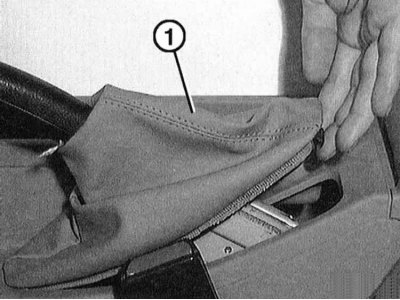
3. Remove the cover of the parking brake lever "1" at the top and pull it forward through the handle.
Service stations use a special tool BMW-341030 to adjust the parking brake. It consists of two socket wrenches located one inside the other, which are set to two sizes: a lock nut and an adjusting nut. If the specified tool is not available, it is necessary to remove the central console, refer to Section Removal and installation the center console.
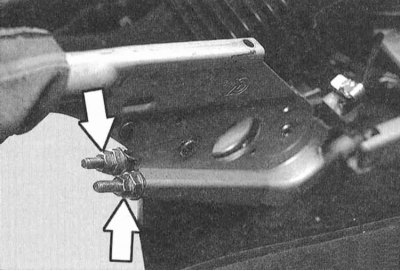
4. Loosen the two lock nuts and two adjusting screws (arrows in the illustration) parking brake cables. Loosen the cables completely.
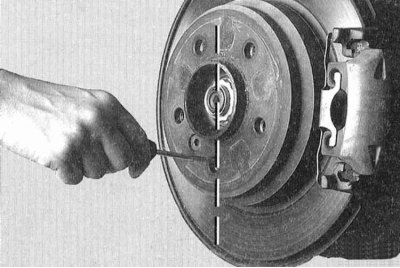
5. Completely unscrew one mounting bolt on each rear wheel. Rotate the wheel so that the hole is vertical at the bottom. Shine a flashlight into the hole; the adjusting nut should be visible in it.
The wheel should not be removed as shown in the illustration.
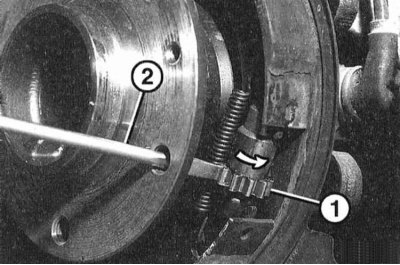
6. Turn the adjusting nut "1" with the screwdriver "2" until the parking brake shoes are pressed against the drum and the wheel can no longer rotate. Then turn the adjusting nut back by 10 teeth. If the adjusting nut on the left side of the car turns in the direction of the arrow, the brake shoes are pressed against the drum. On the right side, the screwdriver turns in the opposite direction.
7. After adjustment, check whether the wheels rotate freely, if necessary, unscrew the adjusting nuts again. The wheels must rotate freely.
8. Adjust the brake cables. To do this, tighten the brake lever by four teeth and screw the adjusting nuts onto the cables so that the rear wheels can still rotate smoothly by hand. Release the brake lever and check whether the wheels rotate freely. Repeat the adjustment if necessary.
9. Release the brake lever completely.
10. Turn on the ignition, the parking brake indicator light should not light.
11. Tighten the brake lever one notch. There should be no braking on the rear wheels. If there is, repeat the brake adjustment. The parking brake indicator light may come on.
12. Tighten the brake lever by two teeth. The indicator lamp should now light. If not, bend the switch contact on the brake lever accordingly.
13. Turn off the ignition.
14. Tighten the locknuts while holding the adjusting nuts.
15. Install the center console if it was removed, refer to Section Removal and installation the center console.
16. Lower the car onto its wheels.
17. Screw in the two mounting bolts on the rear wheels and tighten them to a torque of 100 Nm.
Examine the original source using the link on the website «www.bmwman.ru»