
If air has entered the ABS hydraulic system, for safety reasons the air should be removed at a service station. This occurs if there is a leak in the hydraulic unit or if the brake fluid reservoir is empty or if fluid was forgotten to be added to the reservoir when removing air.
Air is removed from the brake system by rocking movements of the brake pedal, which requires the help of an assistant.
At the service station, air is removed from the brake system, as a rule, using a special device. With the help of such a device, pressure of up to 2.0 bar is created in the system through the brake fluid reservoir.
If it is necessary to bleed air from the entire system, air is bled separately from each brake.
This is mandatory in cases where air has penetrated into each individual caliper. If only one caliper has been replaced or repaired, it is usually sufficient to bleed the air from the corresponding caliper.
Air removal sequence:
- Rear right support.
- Rear left support.
- Front right support.
- Front left support.
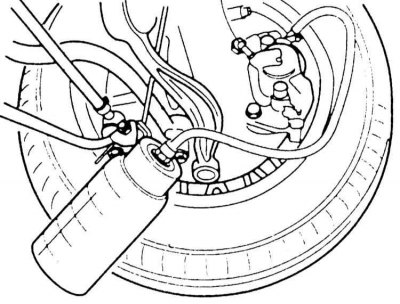
1. Remove the dust cap from the bleed nipple. Clean the nipple, put a clean hose on it, and lower the other end of the hose into a bottle half filled with brake fluid. A suitable hose and container are commercially available.
2. Ask an assistant to press the brake pedal as many times as necessary to create pressure in the system. This is felt by the resistance of the brake pedal.
3. Once the pressure is reached, press the pedal with your foot and do not release it.
4. Loosen the bleed nipple half a turn with a spanner, for example HAZET I968-7. Collect the leaking fluid in a bottle. Make sure that the end of the hose in the bottle is always below the fluid level. If the system is opened, this is noticeable by the pliability of the brake pedal.
5. As soon as the fluid pressure begins to drop, close the nipple.
6. Repeat the pumping process until the system is pressurized. Press the brake pedal and leave your foot on it. Open the air bleed nipple. Open the nipple until the pressure begins to drop. Then close the nipple.
7. Repeat the air removal process until there are no air bubbles in the brake fluid entering the bleeding container.
8. After completing the bleeding process, remove the hose from the fitting and put the protective cap on the fitting.
During the process of bleeding, periodically monitor the brake fluid reservoir. The fluid level should not drop significantly. Otherwise, air may enter the system. Always add new brake fluid to the system!
9. Air from other calipers is removed in a similar manner.

10. After the air removal process is complete, add liquid to the tank up to the "MAX" mark. Check the condition of the sealing gasket "1" of the tank cover.
11. After removing air from the system, when you press the brake pedal, it should not go down smoothly. If this happens, you should repeat the air removal process again.
- Are the brake hoses secured?
- Is the brake hose secured in the holder?
- Are the air bleed nipples tightened?
- Is there enough brake fluid?
- With the engine running, check for leaks. To do this, press the brake pedal with a force of 200-300 N (20-30 kg) for 10 s. The pedal should not weaken. Check all connections for leaks.
Brake fluid should never be poured out or thrown away with household waste. Local authorities inform drivers about possible disposal sites.
12. Finally, perform several braking tests on a road with light traffic. At least one hard braking test should be performed using ABS (you will know by the pulsation of the brake pedal).
At the same time, watch carefully for the vehicles following behind you.