
- Home
- BMW 3 Series
- E46
- Chassis
- Wheel suspension
- Front suspension strut — removal, repair and installation
Front suspension strut — removal, repair and installation (BMW 3 Series E46)
Note: When installing, you will need new upper strut mount nuts and a strut-to-steering knuckle bolt.
Removal
1. Chock the rear wheels. Apply the parking brake. Raise the front of the vehicle and support it on stands (see "Lifting and installing the car on supports"). Remove the corresponding front wheel.
2. When removing the rack, it is necessary to support the lower arm. To do this, screw the wheel mounting bolt into the hub and tie the bolt to the body. Alternatively, support the arm with a jack through a wooden pad.
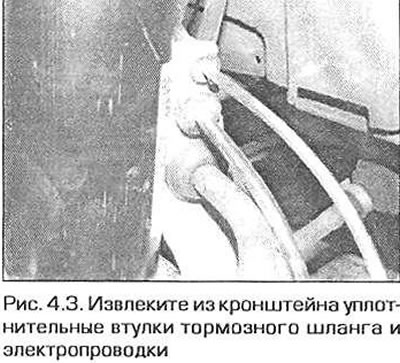
3. Disconnect the brake hose and wiring harness from the rack (Fig. 4.3).
4. Loosen the nut and disconnect the anti-roll bar shackle mounting hinge from the strut. When loosening the nut, hold the hinge pin with an open-end wrench.
5. On models with axle load sensor (headlight beam adjustment systems) unscrew the nut and remove the tie rod bracket from the lower arm.
6. Remove the bolt securing the strut to the steering knuckle. Lower the steering knuckle down and disconnect it from the strut. To make removal easier, use a large screwdriver to spread the steering knuckle clamp apart (see fig. 3.6). Be careful not to spread the clamp more than necessary to avoid breaking it.
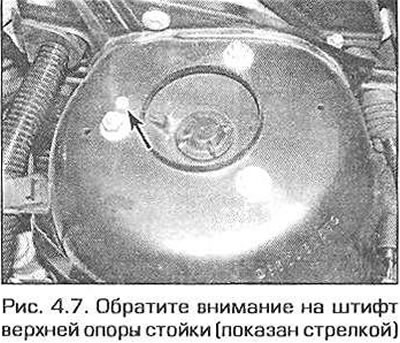
7. In the engine compartment, unscrew the nuts of the upper strut support, then carefully lower the strut down and remove it from under the wing. On some models, the upper strut support is centered with a special pin that enters the hole in the body (Fig. 4.7). On models without this pin, mark the position of the strut support relative to the body. It is very important that the strut is installed in its original position so as not to disturb the camber angle of the wheel.
Repair
Warning! Before you begin disassembling the strut, purchase a spring compressor. The most suitable is an adjustable compressor for coil springs. Other methods of spring compression are very dangerous and can cause injury.
Note: A new support disc nut will be required for assembly.
8. After removing the rack, clean it from dirt and clamp it vertically in a vice.
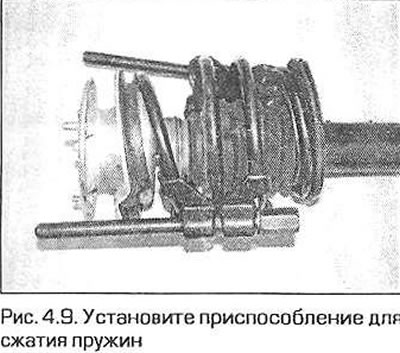
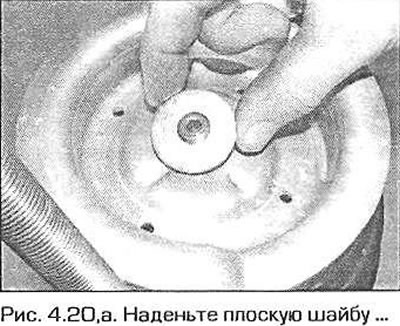
9. Install the spring compressor and compress the spring so that it moves away from the upper seat (Fig. 4.9).
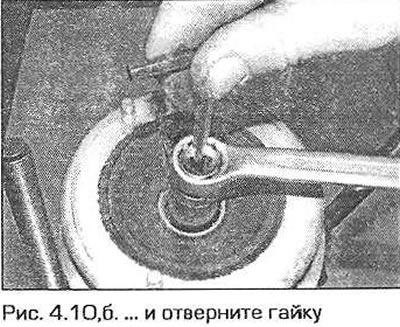
10. To access the upper strut nut, remove the cap. Loosen the nut while holding the shock absorber rod with a suitable tool (fig. 4.10, a, b).

11. Unscrew the nut and remove the support disk together with the thrust bearing. Remove the conical washer, then the flat washer, and also the upper spring seat.
12. Remove the spring, buffer, boot and lower spring seat.
13. The strut is now completely disassembled. Inspect all parts and make sure there is no wear, damage or deformation. Inspect the upper support bearing and make sure it rotates smoothly. Replace any worn or faulty parts.
14. Inspect the shock absorber for leaks. Inspect the shock absorber rod along its entire length for pitting, and the shock absorber body for damage. Holding the shock absorber in a vertical position, check its operation by moving the piston along its entire stroke length, and then by pushing it 50-100 mm. In both cases, you should feel uniform and constant resistance. If you feel jerks or uneven resistance, or if you visually detect wear or damage, the shock absorber should be replaced.
15. If there is the slightest doubt about the spring's serviceability, carefully remove the spring compressor and carefully inspect the spring. If the spring is deformed or damaged, replace it.
16. Inspect the remaining parts and replace any faulty ones.
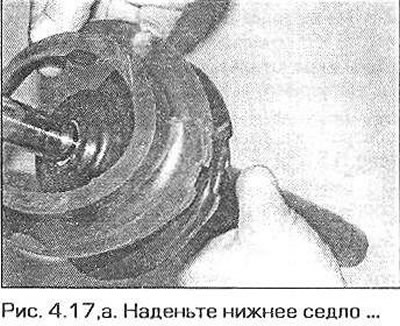
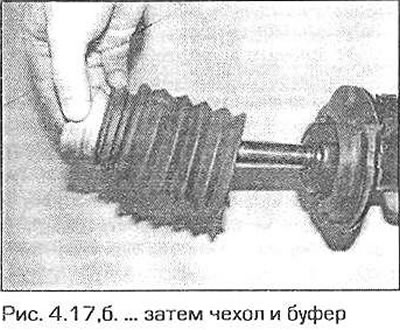
17. Place the lower spring seat onto the strut, then the buffer and boot (fig. 4.17, a, b).
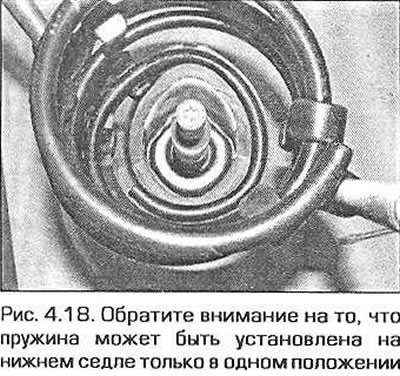
18. Place the spring on the strut. Make sure that the spring is correctly positioned in the rubber seat (Fig. 4.18).
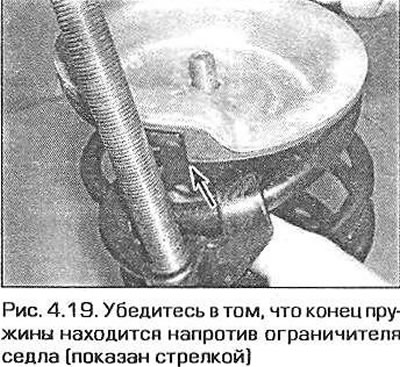
19. Put on the upper spring seat and turn it so that the end of the spring is opposite the seat stop (Fig. 4.19).
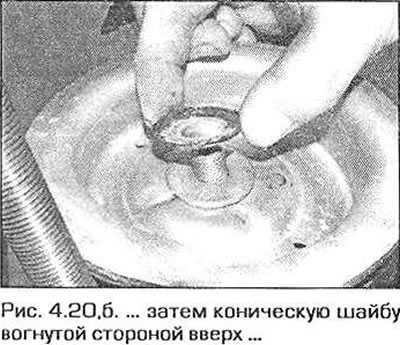
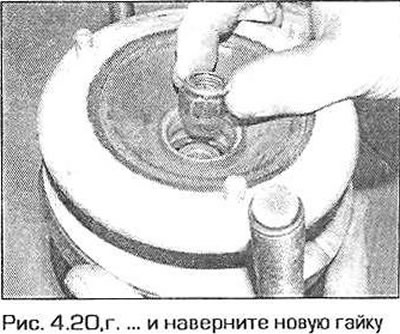
20. Put on the flat washer, then the conical washer (concave side up) and the upper support disk. Screw on a new nut and tighten it to the required torque (fig. 4.20, a-g). If the shock absorber rod rotates when tightening the nut, BMW offers a special socket wrench with a cutout. You can insert an Allen key into this cutout and hold the rod from turning with it.

22. Before installation, use a tap to clean the threaded hole for the tie rod clamp bolt that secures the steering knuckle to the strut.
If you don't have the appropriate tap, you can clean the threaded holes using an old bolt by sawing a groove in it across the threads.
23. Move the rack to its installation location, align the mounting pin with the body hole (or tags between themselves) and secure the upper support with new nuts.
24. Place your fist on the stand (see paragraph 3) and screw in the clamping bolt. Tighten the bolt to the specified torque. Note that the wire and brake hose bracket is also held in place by this bolt.
25. Tighten the upper strut support nuts to the specified torque.
26. Install the axle load sensor rod bracket (if it exists) on the lower arm and tighten the mounting nut securely.
27. Insert the stabilizer bar linkage into the strut. Make sure the flat on the link pin is correctly aligned with the strut, then install the washer, screw on the new mounting nut and tighten it to the specified torque.
28. Secure the wiring harness and brake hose to the strut. Install the wheel, lower the vehicle to the ground and tighten the wheel mounting bolts to the specified torque.
[This publication was borrowed from an online resource: «BMWMAN.ru»]
This article is available at russian, bulgarian, belarusian, ukrainian, serbian, croatian, romanian, polish, slovak, hungarian
Article verified: Ilyinsky Matvey
Share information:
Previous articles
БМВ E46: Wheel suspension
Next articles
Similar articles on other types of BMW cars:
Removal and installation the front suspension strut assembly BMW 5 Series E28 (1981-1988)
Removal and installation the upper shock absorber support and… BMW 5 Series E12 (1972-1981)
Front suspension — removal and installation BMW 7 Series E32 (1986-1994)
Removal and installation, disassembly and assembly of suspension strut BMW 7 Series E38 (1994-2001)
Removal and installation the airbag system module in the left or… BMW X3 E83 (2003-2010)
Removal and installation front door glass BMW X5 E53 (1999-2006)
Link in different formats to this page
Visitor comments
No comments yet
- General information
- Manual
- Maintenance
- Power unit
- Engine repair
- Cooling system
- Power system (gasoline)
- Injection system (gasoline)
- Fuel system (diesel)
- Exhaust system
- Ignition system
- Charge and launch systems
- Transmission
- Car gearbox
- Clutch and drive shafts
- Chassis
- Brake system
- Suspension front and rear
- Steering
- Body
- Body care and repair
- Exterior
- Interior
- Electrical equipment
- Troubleshooting
- Lighting and signaling
- Equipment and devices
- Heater and air conditioner
- Electrical circuits
- General information
- Manual
- Repair on the road
- Weekly checks
- Maintenance
- Troubleshooting
- Power unit
- 4 cylinder engines
- 6 cylinder engines
- Engine overhaul
- Cooling and heating
- Fuel and exhaust system
- Starting and charging system
- Ignition system
- Transmission
- Clutch
- Mechanical gearbox
- Automatic gearbox
- Cardan and drive shafts
- Chassis
- Brake system
- Wheel suspension
- Steering
- Body
- Exterior
- Interior
- Electrical equipment
- Equipment and devices
- Electrical circuits
- General information
- Maintenance
- Power unit
- Engine repair
- Cooling system
- Ignition system
- Supply system
- Fuel injection system
- Exhaust system
- Transmission
- Clutch
- Car gearbox
- Front and rear axle
- Chassis
- Steering
- Brake system
- Body
- Exterior
- Interior
- Electrical equipment
- Heating system
- Equipment and devices
- Power devices
- Electrical circuits
- Power unit
- M10/M20 engine
- M40 engine
- Ignition system
- Lubrication system
- Cooling system
- Supply system
- Fuel injection
- Exhaust system
- Transmission
- Clutch
- Manual gearbox
- Front axle
- Rear axle
- Chassis
- Steering
- Brake system
- Body
- Exterior
- Interior
- Electrical equipment
- Heating system
- Equipment and devices
- Electrical circuits
- General information
- Specifications
- Operation and maintenance
- 4-cylinder engine
- Engine repair
- Cooling and lubrication system
- Supply system
- Ignition system
- 6-cylinder engine
- Engine repair
- Cooling and lubrication system
- Supply system
- Fuel injection system
- Ignition system
- Transmission
- Clutch
- 4-speed manual gearbox
- 5-speed manual gearbox
- Automatic gearbox
- Cardan and rear axle
- Chassis
- Steering
- Front suspension
- Rear suspension
- Brake system
- Electrical equipment
- Equipment and devices
- Electrical circuits