
Basic information
1. Tire pressure monitoring system (RDC) installed as an option on most BMW 3 Series models. The system consists of a transmitter mounted on the tire valve, a receiver mounted in the wheel well behind the poker, and a control box mounted behind the passenger side glovebox. If the tire pressure differs from the set one, a corresponding warning lights up on the instrument panel. Keep in mind that the transmitter has a certain mass, so when changing tires, they must be balanced.
Component Replacement
Control block
2. Disconnect the wire from the negative battery terminal (see chapter 5A).
3. Remove the passenger side glove box (see chapter 11, paragraph 27).
4. Carefully remove the plastic trim located behind the glove box.
5. Release the wiring connector, then disconnect it. Press the latch and remove the control unit.
6. Installation is carried out in the reverse order of removal. Program the system for a specific tire pressure (see your vehicle owner's manual).
Receiver
7. Raise the corresponding part of the car and place it on supports (cm. "Lifting and placing the car on supports"). Turn out screws, take out clamps and remove locker of a corresponding wheel.
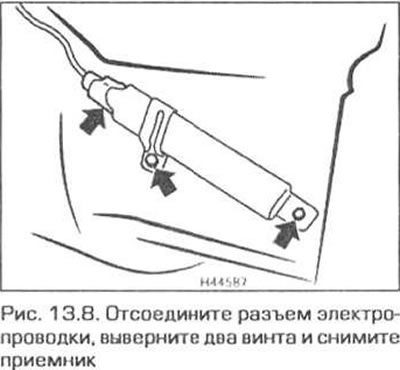
8. Disconnect the electrical connector from the receiver, unscrew the two fastening screws and remove the receiver (pic. 13.8). Keep in mind that the right front and rear wheel receivers are located on the back of the poker.
9. Installation is carried out in the reverse order of removal.
Transmitter
10. The transmitters are mounted on the nipples of the tires of each wheel. Remove the tire.
11. Remove the slotted head screw and disconnect the transmitter from the nipple. Observe the following precautions:
- A) Do not blow out the transmitter with compressed air.
- b) Do not clean the tire rim with pressure cleaners.
- V) Do not flush the transmitter with solvent.
- G) If you have used a tire sealant. the nipple and transmitter must be replaced.
- d) The valve does not work when the transmitter is removed.
12. Insert the spoke into the hole in the valve sleeve and unscrew it.
13. Insert new valve (together with bushing) into the transmitter and screw (only by hand) transmitter mounting screw.
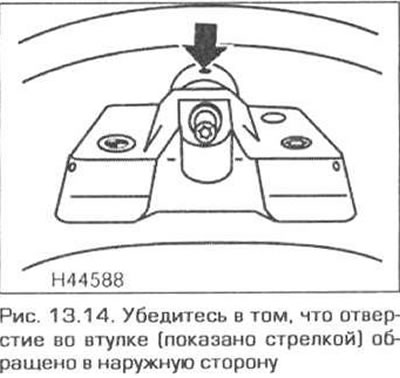
14. Install the node on disk. Make sure the hole in the bushing is facing out. Tighten the sensor mounting nut. Insert a spoke into the hole in the hub and hold the valve from turning (pic. 13.14).
15. Tighten the transmitter mounting screw to the required torque.
16. Install the tire.