
- Home
- BMW 5 Series
- E28
- Transmission
- Manual gearbox
- Replacing oil seals
Replacing oil seals (BMW 5 Series E28)
Worn or damaged seals will cause leaks. Lack of lubrication in the transmission can cause hard shifting, unwanted shifting and transmission noise. Ultimately, this lack of lubrication will lead to accelerated wear and failure of components.
All three transmission seals can be replaced without disassembling the transmission; two of them can be replaced even without removing the transmission.
If a leak is suspected in the seal, then, while working under the transmission, carefully inspect the seals. Place it on stands. To prevent the car from rolling away, do not forget to place stops under the rear wheels.
Don't confuse engine oil leaks with transmission oil leaks - hypoid oil, for example, has a distinctive smell, and can be easily distinguished from engine oil by it. If oil covers the front of the driveshaft, then either the shifter shaft seal or the output shaft seal is leaking. If oil is found on the bottom of the clutch housing, then the input shaft seal is probably leaking (of course, the rear crankshaft oil seal can also cause engine oil to be present in the lower part of the clutch housing). Whenever you decide to replace a seal, first check the vent on top of the transmission case. A clogged or damaged vent can cause pressure to build up inside the transmission, and oil will be forced out through the seals. If you simply replace the seal without cleaning the clogged vent, the new seal will soon fail as well.
1. Raise the front of the car and place it on stands. To prevent the car from rolling, do not forget to place chocks under the rear wheels.
2. If necessary to gain access, remove the exhaust system (see chapter Power supply system).
3. Remove the propeller shaft (see chapter Transmission line). If measures are taken to prevent the creation of load on the cardan joints, then the cardan shaft from the rear axle does not need to be disconnected.
4. Bend the tabs of the locking plate out of their grooves and remove the locking plate. While holding the flange (if necessary, secure the long plate with a bolt), use a 30mm thin-wall socket to loosen the flange nut. Remove the flange from the output shaft. Use a puller if necessary.
5. Using a seal removal tool or a small screwdriver, carefully pry up the old seal. Make sure that the seal recesses are not damaged when removing the seal.
6. Apply a thin layer of grease to the flange of the new seal and clean the end of the output shaft. Place the seal on the shaft and carefully install the seal in place using a short piece of pipe with an outside diameter slightly smaller than the outside diameter of the seal.
7. Install the flange. To prevent leaks, apply sealant to the side of the nut facing the flange. Tighten the flange nut to the torque specified in Table of sizes and adjustment data at the end of the manual. Note that on Getrag transmissions the nut must be tightened in three stages. On ZF transmissions the threads must be coated with thread compound. Install the new locking plate and bend its tabs into the corresponding grooves.
8. Otherwise, installation is the reverse of removal.
1. Follow procedures 1-5 above.
2. On early models, to disconnect the shift rod from the shift shaft, remove the bushing retaining ring, then use a small punch to knock out the pin.
3. On later models, to disengage the shift rod from the shift shaft, engage 3rd gear, pull back on the spring sleeve and knock out the pin.
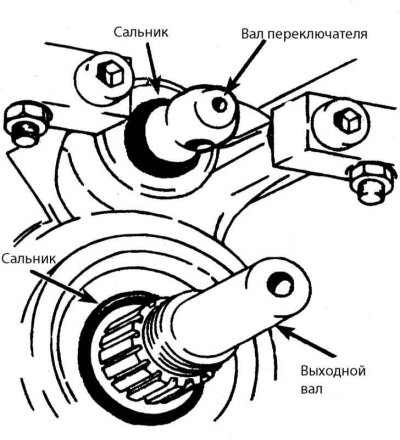
4. Using a seal removal tool or a small screwdriver, pry up the seal (see picture). Make sure that when removing the oil seal, the recess for the oil seal is not damaged.
5. Apply grease to the flange of the new seal, then place the seal onto the end of the shifter shaft. Use a socket head or a piece of pipe of suitable dimensions to hammer the seal into place.
6. Attach the switch stem to the switch shaft.
7. Install the flange (see above). Otherwise, installation is the reverse of removal.
1. Remove the transmission (see section Removal and installation of transmission).
2. Remove the clutch release bearing and lever (see chapter Clutch).
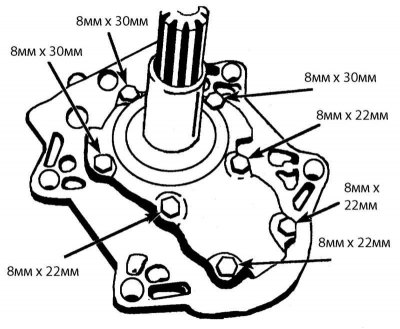
3. Remove the clutch guide bolts. On some models the bolts are not the same size, so pay attention to the bolt placement. Remove the clutch and any spacers underneath it.
Location of guide coupling bolts (shown by arrows). Shown is the Getrag 265 transmission.
4. Use a seal removal tool or a screwdriver to remove the old seal. Be careful not to damage the seal recess.
5. Apply grease to the flange of the new seal and use a suitable length of pipe to hammer it into place. If used, replace the O-ring in the groove of the coupling.
6. Clean the mounting bolts and sealing surfaces of the guide sleeve, as well as the bolt threads in the crankcase. On Getrag transmissions without an O-ring, apply a suitable sealant to the sealing surface of the guide sleeve. Install the guide sleeve and spacer(s).
7. Apply sealant to the bolt shoulders, install the bolts and tighten them.
8. Otherwise, installation is the reverse of removal.
1. Check the transmission oil level and add the recommended oil if necessary (see chapter Routine car maintenance).
2. Lower the vehicle, perform a control check and check for leaks.
All three transmission seals can be replaced without disassembling the transmission; two of them can be replaced even without removing the transmission.
If a leak is suspected in the seal, then, while working under the transmission, carefully inspect the seals. Place it on stands. To prevent the car from rolling away, do not forget to place stops under the rear wheels.
Don't confuse engine oil leaks with transmission oil leaks - hypoid oil, for example, has a distinctive smell, and can be easily distinguished from engine oil by it. If oil covers the front of the driveshaft, then either the shifter shaft seal or the output shaft seal is leaking. If oil is found on the bottom of the clutch housing, then the input shaft seal is probably leaking (of course, the rear crankshaft oil seal can also cause engine oil to be present in the lower part of the clutch housing). Whenever you decide to replace a seal, first check the vent on top of the transmission case. A clogged or damaged vent can cause pressure to build up inside the transmission, and oil will be forced out through the seals. If you simply replace the seal without cleaning the clogged vent, the new seal will soon fail as well.
Output shaft seal
1. Raise the front of the car and place it on stands. To prevent the car from rolling, do not forget to place chocks under the rear wheels.
2. If necessary to gain access, remove the exhaust system (see chapter Power supply system).
3. Remove the propeller shaft (see chapter Transmission line). If measures are taken to prevent the creation of load on the cardan joints, then the cardan shaft from the rear axle does not need to be disconnected.
4. Bend the tabs of the locking plate out of their grooves and remove the locking plate. While holding the flange (if necessary, secure the long plate with a bolt), use a 30mm thin-wall socket to loosen the flange nut. Remove the flange from the output shaft. Use a puller if necessary.
5. Using a seal removal tool or a small screwdriver, carefully pry up the old seal. Make sure that the seal recesses are not damaged when removing the seal.
6. Apply a thin layer of grease to the flange of the new seal and clean the end of the output shaft. Place the seal on the shaft and carefully install the seal in place using a short piece of pipe with an outside diameter slightly smaller than the outside diameter of the seal.
7. Install the flange. To prevent leaks, apply sealant to the side of the nut facing the flange. Tighten the flange nut to the torque specified in Table of sizes and adjustment data at the end of the manual. Note that on Getrag transmissions the nut must be tightened in three stages. On ZF transmissions the threads must be coated with thread compound. Install the new locking plate and bend its tabs into the corresponding grooves.
8. Otherwise, installation is the reverse of removal.
Switch shaft seal
1. Follow procedures 1-5 above.
2. On early models, to disconnect the shift rod from the shift shaft, remove the bushing retaining ring, then use a small punch to knock out the pin.
3. On later models, to disengage the shift rod from the shift shaft, engage 3rd gear, pull back on the spring sleeve and knock out the pin.
4. Using a seal removal tool or a small screwdriver, pry up the seal (see picture). Make sure that when removing the oil seal, the recess for the oil seal is not damaged.
5. Apply grease to the flange of the new seal, then place the seal onto the end of the shifter shaft. Use a socket head or a piece of pipe of suitable dimensions to hammer the seal into place.
6. Attach the switch stem to the switch shaft.
7. Install the flange (see above). Otherwise, installation is the reverse of removal.
Input shaft seal
1. Remove the transmission (see section Removal and installation of transmission).
2. Remove the clutch release bearing and lever (see chapter Clutch).
3. Remove the clutch guide bolts. On some models the bolts are not the same size, so pay attention to the bolt placement. Remove the clutch and any spacers underneath it.
Location of guide coupling bolts (shown by arrows). Shown is the Getrag 265 transmission.
4. Use a seal removal tool or a screwdriver to remove the old seal. Be careful not to damage the seal recess.
5. Apply grease to the flange of the new seal and use a suitable length of pipe to hammer it into place. If used, replace the O-ring in the groove of the coupling.
6. Clean the mounting bolts and sealing surfaces of the guide sleeve, as well as the bolt threads in the crankcase. On Getrag transmissions without an O-ring, apply a suitable sealant to the sealing surface of the guide sleeve. Install the guide sleeve and spacer(s).
7. Apply sealant to the bolt shoulders, install the bolts and tighten them.
8. Otherwise, installation is the reverse of removal.
All seals
1. Check the transmission oil level and add the recommended oil if necessary (see chapter Routine car maintenance).
2. Lower the vehicle, perform a control check and check for leaks.
This article is available at russian, bulgarian, belarusian, ukrainian, serbian, croatian, romanian, polish, slovak, hungarian
Article verified: Zhuravleva Isolda
Share information:
Previous articles
БМВ E28: Manual gearbox
Next articles
Similar articles on other types of BMW cars:
Replacing the main gear pinion seals BMW 3 Series E21 (1975-1983)
Replacing crankshaft seals BMW 7 Series E38 (1994-2001)
Replacing the oil filter (center bolt design) BMW 7 Series E32 (1986-1994)
Replacing the intake camshaft BMW X3 E83 (2003-2010)
Replacing valve stem seals BMW X5 E53 (1999-2006)
Replacing the main gear pinion seals BMW 3 Series E21 (1975-1983)
Replacing crankshaft seals BMW 7 Series E38 (1994-2001)
Replacing the oil filter (center bolt design) BMW 7 Series E32 (1986-1994)
Replacing the intake camshaft BMW X3 E83 (2003-2010)
Replacing valve stem seals BMW X5 E53 (1999-2006)
Link in different formats to this page
Visitor comments
No comments yet
- General information
- Governing bodies
- Manual
- Maintenance
- Power unit
- Engine repair
- Lubrication system
- Cooling system
- Ignition system
- Supply system
- Injection system (gasoline)
- Injection system (diesel)
- Exhaust system
- Transmission
- Clutch
- Car gearbox
- Front axle
- Rear axle
- Chassis
- Steering
- Brake system
- Wheels and tires
- Body
- Interior
- Exterior
- Heating system
- Electrical equipment
- Equipment and devices
- Power devices
- Windscreen wipers
- Electrical circuits
- General information
- Manual
- Maintenance
- Power unit
- Engine repair
- Ignition system
- Engine lubrication system
- Cooling system
- Fuel system (gasoline)
- Fuel system (diesel)
- Exhaust system
- Transmission
- Clutch
- Car gearbox
- Chassis
- Front and rear suspension
- Steering
- Brake system
- Body
- Exterior
- Interior
- Electrical equipment
- Heating system
- Equipment and devices
- Power devices
- Electrical circuits
- General information
- Manual
- Maintenance
- Power unit
- Engine in a car
- Engine overhaul
- Cooling system
- Supply system
- Ignition system
- Control system
- Transmission
- Clutch
- Manual gearbox
- Automatic gearbox
- Transmission line
- Chassis
- Steering
- Front suspension
- Rear suspension
- Brake system
- Body
- Body elements
- Car care and painting
- Electrical equipment
- Heater and air conditioner
- Equipment and devices
- Starter and generator
- Electrical circuits
- General information
- Operation and maintenance
- Specifications
- Power unit
- Engine repair
- Cooling and lubrication system
- Supply system
- Ecotronic power supply system
- Fuel injection system
- Ignition system
- Transmission
- Clutch
- Gearbox BMW 242/4
- Gearbox Getrag 262/8
- Gearbox Getrag 265/6
- Automatic gearbox
- Cardan gear
- Rear axle
- Chassis
- Steering
- Front suspension
- Rear suspension
- Brake system
- Electrical equipment
- Equipment and devices
- Electrical circuits